Ebben az ablakban ArcGIS-adatokat importálhat a rajzba Civil 3D-objektumokként.
Ha rendelkezik ArcGIS-fiókkal, az ablak megjelenítése előtt a program arra kéri, hogy jelentkezzen be a fiókjába az adatok eléréséhez. Ha nem rendelkezik ArcGIS-fiókkal, bejelentkezhet vendégként a nyilvános adatok eléréséhez.
Ebben az ablakban megadhatja a kívánt területet a térképen, a használandó adatkészletet, valamint az ArcGIS-adatokból létrehozni kívánt Civil 3D-objektumtípusokat.
Navigáció és a kívánt terület vezérlői
A térképterület tetején található vezérlőkkel navigálhat a kívánt területre a térképen. A kívánt területhez elérhető adatkészletek a bal oldali ablaktáblán jelennek meg.
- Keresés hely alapján
-
- Írja be a keresősávba egy hely nevét, címét vagy a kívánt pontot. Szélességi és hosszúsági koordinátákat is megadhat.
- Eltoláshoz és zoomoláshoz használja az egeret, vagy a nagyítási/kicsinyítési eszközökkel (+/- gombok) pontosítsa a keresést.
- A kívánt terület megadása
-
- Kattintson a
 elemre az aktuális térkép terjedelmének kijelöléséhez.
Megjegyzés: Ez az alapértelmezett kijelölési módszer.
 - Kattintson a
 elemre egy téglalap alakú terület kijelöléséhez a térképen.
- Kattintson a
 elemre egy sokszög alakú kívánt terület SHP-adatokból való importálásához.
Megjegyzés: Az SHP-adatok használatához hozzon létre egy .zip fájlt, amely tartalmazza a kapcsolódó SHP-adatkészlet fájljait, majd válassza ki .zip fájlt a lépés során. Az SHP-adatkészlet megnyitása után az SHP-adatkészlet sokszögei megjelennek a térképnézetben. Kattintson egy sokszögre, hogy kiválassza azt kívánt területként.
- Kattintson a
Adatkészletszűrők és kiválasztás
Adja meg a Civil 3D-be importálni kívánt adatokat a kiválasztott területhez elérhető adatkészletek Nyilvános, Saját tartalom, Saját csoportok és Szervezet szűrőkkel való tallózásával.

Jelölje be azon adatkészlet jelölőnégyzetét, amelyet a Civil 3D-be kíván importálni, ha az adatkészlet összes fóliáját ki szeretné jelölni.

Ha manuálisan szeretné kiválasztani az importálni kívánt fóliákat, kattintson az adatkészlet mozaikjára, de ne jelölje be a jelölőnégyzetet. Ezután válassza ki az importálni kívánt fóliákat a jobb oldalon látható listából.
A mozaikon és a listában kiválasztott fólia mellett megjelenő  figyelmeztető jel jelzi, hogy a kiválasztott fóliákhoz meg kell adni a jellemzőtípusokat.
Jellemzőtípus megadása
 Fóliák
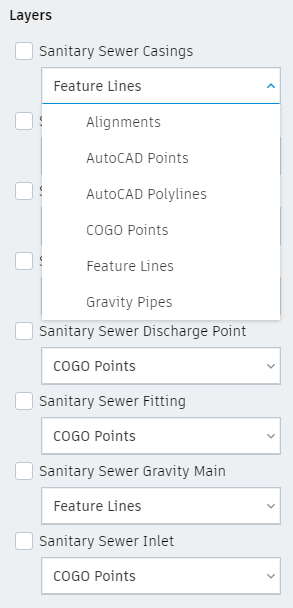
- Megjeleníti az egyes fóliákból létrehozandó Civil 3D-objektumok típusának meghatározásához és a fólia térképen való megtekintéséhez használt vezérlőket.
Kattintson a
 Fóliák elemre, és a legördülő listák segítségével adja meg, hogy milyen típusú Civil 3D-objektumokat hozzon létre a program az egyes fóliákból.
- Fóliák
- Megadja, hogy a program milyen Civil 3D-objektumokat hozzon létre az egyes fóliákból.

 Fólia láthatósága
- A kijelölt fóliák láthatóságát vezérli a térképterületen.
 Áttekintés
- Információt jelenít meg a kiválasztott adatkészletről.
Tipp: Kattintson a Fólia adatforrásának megtekintése gombra az adatkészlettel kapcsolatos információk megtekintéséhez, és a térkép ArcGIS webhelyen való megtekintéséhez.
Hozzáadás a saját tervezési projekthez
Elindítja a kiválasztott fóliák rajzhoz történő hozzáadásának folyamatát. Ezután megjelenik a Fóliák importálása párbeszédpanel, ahol kiválaszthatja vagy létrehozhatja az importált adatokhoz tartozó beállítássablont, vagy importálhatja az adatokat az alapértelmezett beállításokkal.