Adding a Light Source
When you enter Action, the scene is lit by global scene ambient lighting. This global scene ambient lighting can be enabled or disabled in the Rendering section of the Action Setup menu or in individual Light menus. You can also add individual light objects in Action. When you add a light to a scene, it is applied to all objects. Before adding another light, you may want to position the light and modify its attributes. In the Lights menu, you can set lighting properties such as position, orientation, spread, falloff, and colour.
To add a light to the scene:
Do one of the following:
- Drag the light node from the node bin and place it in the schematic.
- Drag the light node from the node bin to Result view, so you can see its effect on the scene before placing it exactly where you want.
- Double-click the light node. The node appears next to the last added object. You do not need to be in Schematic view to add a node in this manner.
- With the cursor in the viewport, press the keyboard shortcut for Action Create Light at Camera Position to add a new light node that uses the current camera position.
A light is added to the scene. An icon representing the light source is added to the schematic.
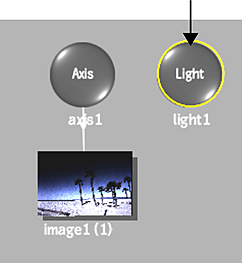
Unlike many objects, a light is added without an axis. To set the position and rotation of a light source, use the Position and Rotation fields in the Light menu.
To display the Light menu, double-click the selected light in the schematic.
Note: The default Z position of the light is set at 50% of the Z position of the default camera in your Action scene.Enable the Active button in the Light menu to activate the light source.
The light icon appears in the scene.
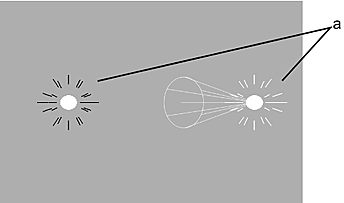
(a) Light sources in the scene.
To work with global scene ambient lighting in the scene:
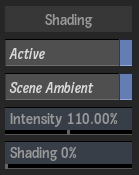
Enable the Scene Ambient button in the Rendering section of the Action Setup menu, or in an individual Light menu.
This is a global setting for the Action scene, and is enabled by default.
In the Action Setup menu, you can also adjust the intensity and shading levels of this global scene ambient light.
Selecting a Light Source
You can select a light source in the following ways:
- Click the light source in the scene.
- In Schematic view, click the icon corresponding to the light source. All light sources initially appear at the same X, Y, and Z position in the scene (0, 0, 0). If you add two light sources, for example, you need to move one light source in order to see the other.
- Select a Light folder in the Channel Editor.
- Use the Prev and Next buttons to select the previous or next light source.
Importing Lights
FBX and Alembic files may have lights and their data included, and you can use these same lights in Action. See Importing 3D Models.