The Best Fit Alignment From Points enables you align a part to the CAD model using the centre points from three or more geometric items. PowerInspect uses these points to perform a best fit that matches the measured data to the CAD model.
To create a Best Fit from Points alignment:
- Select the Definition level in the inspection sequence.
- Click Home tab > Create panel > Alignment arrow > Best Fit Alignment From Points. The Best Fit From Points Alignment dialog is displayed.
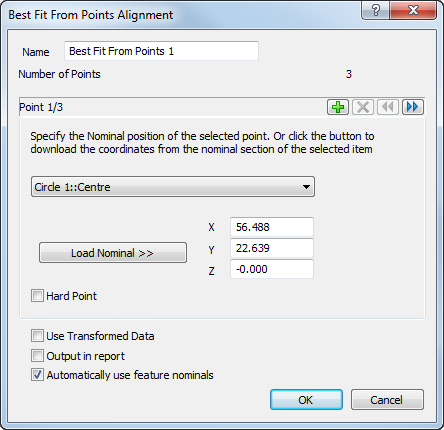
- Enter a Name for the alignment.
- In the drop-down list, select the item containing the first alignment point.
By default, the nominal coordinates of the point are displayed in the X, Y, and Z boxes. To enter the nominals of each point manually, deselect the Automatically use feature nominals check box, and type the coordinates.
- Select the Hard Point check box to position the first point with zero error; deselect the check box to allow optimization of the first point's coordinates.
- Click
 to specify the next point, and select the second alignment point from the list.
 - Repeat step 6 to select the third point for the alignment.
- If you want to use more than three points for the alignment, click
 to add a new point and repeat step 5. You can add as many points as you want.
 To display a previous point, click
 . To delete the currently selected point, click
  .
. - If one or more of the features used in the alignment are measured using a point cloud, select the alignment used to calculate the measured values of the point cloud in the Reference alignment list.
- If the inspection sequence contains constructed features that use measurements taken by different measuring devices or from different device positions, select the Use transformed data check box. This converts the device coordinates to CAD coordinates so that all calculations use a common reference system.
The check box has no effect when all coordinates in the inspection are collected with one measuring device in one position, or when the inspection sequence contains no constructed features.
- To include the details of this item in the report, select the Output in report check box.
- Click OK to close the dialog and create the alignment item.