As well as using points or axes measured by geometric items, you can select a whole circle as the first item in an RPS alignment. This enables you to use the orientation of the circle's reference plane to constrain the rotation of the alignment in addition to the position lock controlled by the circle centre.
To create an RPS alignment using a whole circle:
- Click Hometab > Create panel > Alignment > RPS Alignment to display the RPS Alignment Definition dialog, and enter a Name for the alignment.
- Select the name of the item in the drop-down list, or click
 and select the feature in the CAD view. For example:
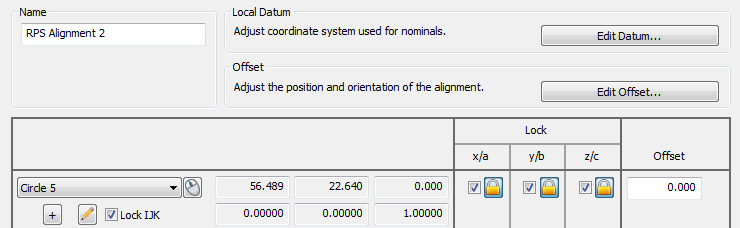
- Select the Lock IJK check box to use the orientation of the circle's reference plane to lock two rotation axes of the alignment.
If you do not select Lock IJK, the orientation of the circle is ignored. This has the same effect as only using the centre of the circle.
- In the Lock column, select the check boxes of the translation axes you want to constrain.
- If you over-constrain an axis, PowerInspect creates a best-fit of all the features. To choose which axis locks are included in the best-fit, select the lock button adjacent to the selected check box:
 excludes the axis lock from the best-fit;
  includes the axis lock in the best-fit.
 - Continue to add constraining items to the alignment.
If you lock all three translation axes, you need only select one more locking item to perfectly constrain the alignment.
- When you have selected all the items for the alignment, click OK to save your changes and close the dialog.