You can place Orientation Point items anywhere in the Definition level of the Sequence Tree. You can also use them within a geometric group to orient the probe before or after any item.
The following example illustrates the use of Orientation Points:
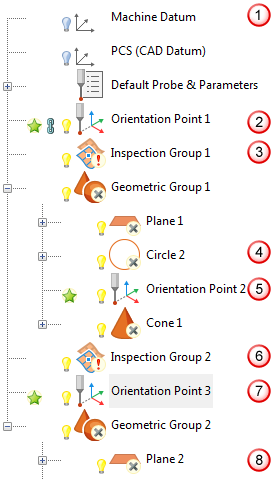
 The inspection sequence starts by using the default (Machine Datum) to position and orient the probe.
 The probe is transformed by Orientation Point 1.
 In Inspection Group 1, Auto-Orientation is selected for the group's UserDefined probing method, so the probe is transformed before probing begins.
 In Circle 2, Auto-Orientation is not selected, so, before the first point on the Circle 2 probe path is played, the probe is transformed back to Orientation Point 1 because it is the preceding orientation point.
 Orientation Point 2 transforms the probe for Cone 1.
 Inspection Group 2 does not use Auto-Orientation, so the probe uses the orientation of Orientation Point 1 because it is the preceding orientation point item at that level in the inspection sequence.
 When the probing of Inspection group 2 is complete, the probe is transformed by Orientation Point 3.
 If Geometric Group 2 contains any item in which Auto-Orientation is selected, the probe is transformed by the associated probing method. Otherwise, the probe remains at the rotation specified in Orientation Point 3.