VRED Library
We added a new online VRED Library for downloading 3D environments to the Web Shops menu. These are VPB files that contain a fully modeled environment, in addition to an environment material with an HDR. Some contain different light situations that you can switch, via variant sets in VRED. These files have to be unpacked before used because they also contain folders with lightmaps for the corresponding lighting situation.
Video captions: Last but not least, we give you now the possibility to download four brand-new 3D environments for free. Therefore, you need to go to Web Shops > VRED Library, and after logging in using your Autodesk account, you can choose between four different environments. Just download them to your preferred directory. Be aware that some scenes need to be unzipped, before you open them in VRED because we added multiple light baking texture sets, which you can see in the separate folders.
I will quickly introduce the four environments to you:
Simple Studio: First, we have the Simple Studio. This is a very reduced minimal dark studio setup, which you can use for Raytracing and OpenGL.
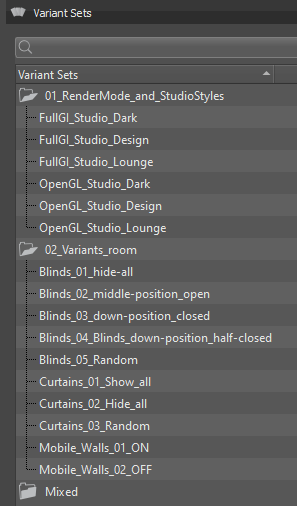
Another Studio is the modular studio. Here you have a set of three different studio types within one scene. You can switch them in the Variant Sets and they are working with OpenGL and Full GI Raytracing. You can choose, for example, a dark mode, with glowing letters. In the scene is also a complete alphabet. So, you can adjust the letters to your needs. Additionally, you can switch to a design studio scene, where you can switch on and off curtains, window blinds, and image walls. And also, a lounge style scene setup is included, so you have multiple options to play around and set it up to your needs and taste.
Please be aware that all three base setups have all different light baking texture sets, which have to be loaded. You can see them stored in separate folders.
City: Next one is the city environment. The city contains variant sets for OpenGL and Raytracing. And, for VR, you can hide some objects, if you are running into performance issues using the variant sets.
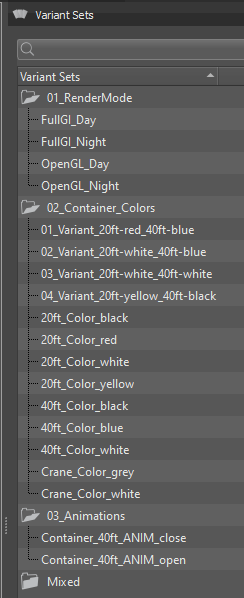
Harbour: Last but not least, we have a harbour. Within this scene, you are able to set a night and day situation. Therefore, we created two different light baking texture sets. This will give you a perfect example how to deal with different baked texture sets for different light situations. You can also switch some container colors and activate a container door animation. And you can also switch between OpenGL and Raytracing.
I hope you enjoy them. Thanks for watching the video!
These 3D environments are fully immersive and not limited to an image projection of a sphere or dome. This leads to a more realistic experience when moving through the environment. This also means there is no image distortion of the HDRs and no backplates needed.
All 3D environments are optimized for real-time use cases in OpenGL, such as VR sessions, as well as offline renderings/high-end visualization in raytracing. They can be viewed in both render modes and are fully modeled in 3D with actual geometry.
The VRED Library allows us to provide and update our content independent of the VRED release cycle. That means you don't have to reinstall many, potentially very large files when you update or reinstall VRED. Instead, you can selectively download assets as you need them.
If you cannot access Web Shops > VRED Library, speak to your admin, as many companies block the Web Shops options.
Download any of these free 3D environments:
Industrial Harbor
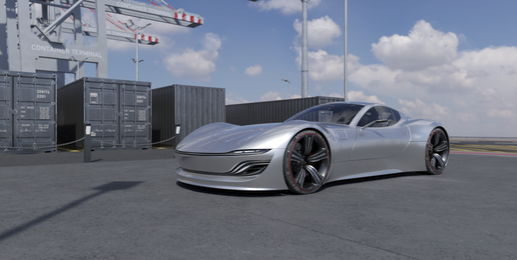
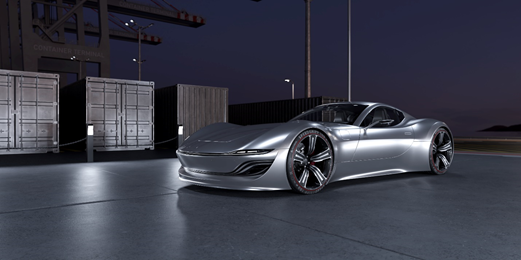
This 3D environment contains an industrial harbor with modelled containers and a crane. There are day and night scenarios in both OpenGL (with baked lightmaps) and raytracing, which can be switched with the corresponding variant set. Additionally, container and crane colors can be changed. The doors of a container in the scene, whose interior walls are modelled out, can be opened and are animated.
Modular Studio
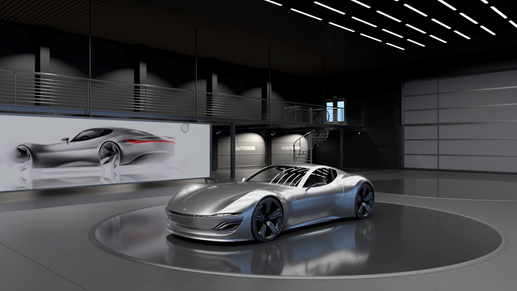
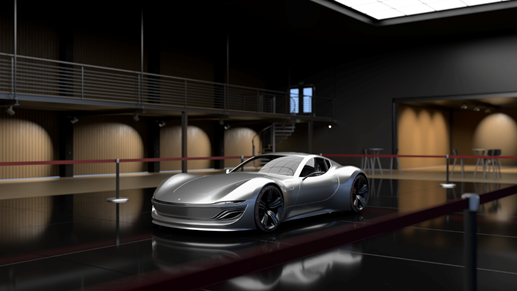
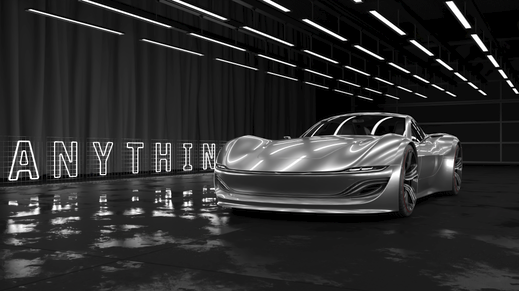
This 3D environment contains a modular studio. There are three studio styles that switch to different variants of the room in both OpenGL (with baked lightmaps) and raytracing: Dark, Design, and Lounge. Each style has different ceiling, floor, and wall elements, as well as lighting situations that can be switched with the appropriate variant set. Additional blinds, curtains, and movable walls can be switched to different states independent of the room setting. There is also an alphabet of light tubes available. With it, you can customize the slogan in Studio Dark, according to your needs.
City
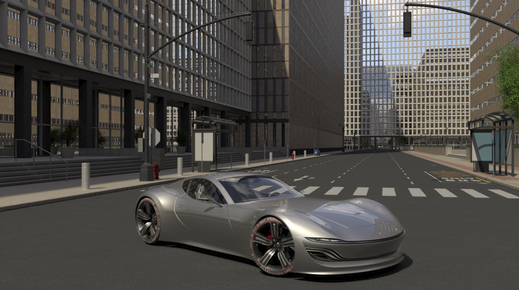
This 3D environment contains a city block of a modelled large city with streets, sidewalks, and detailed props, such as trees, traffic signs, and lights. This VRED scene works in OpenGL (with baked lightmaps) and raytracing. There is a variant set for each render mode, which switches corresponding geometry and materials. Additionally, objects can be switched off and on again, via a variant set, to improve performance in VR.
Simple Studio
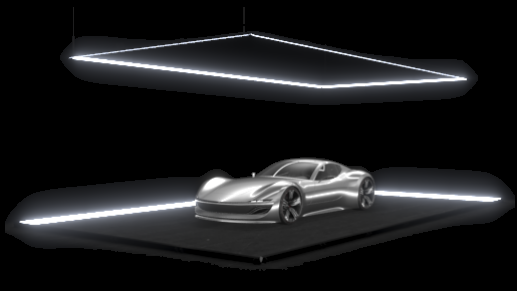
This 3D environment contains a simple studio with a modelled stage and detailed lighting. It works with both OpenGL and raytracing. To optimize the performance of the scene, e.g., for VR presentations, there is a variant set for lighting, without additional area lights (IBL only), and one with area lights, which requires a higher computation.
Getting Started
Access to the VRED Web Server and port 8888 are required for downloading the VRED Library.

- In VRED, select Edit > Preferences > General Settings > Web Interface > Base and ensure Enable Web Server is activated and Port is set to 8888.
- Click Apply and OK.
- Select Web Shops > VRED Library, then log in with your Autodesk account.
Now, you are ready to download 3D environment assets from the VRED Library.
Download 3D Environment Assets from the VRED Library
The downloaded library assets work with both OpenGL and raytracing and contain an assortment of variant sets.
In the VRED Library, scroll to see each 3D environment.
Click Download to download the VPB file to either the default location,
C:/ProgramData/Autodesk/VREDPro-15.3/data/downloads/vred library, or a specified location, using .Note:
When you click
, the asset files are not displayed, as this is only for setting a directory. To see the asset files, open an Explorer window and enter C:\ProgramData\Autodesk\VREDPro-15.3\data\downloads\vred library.Below the toolbar, an indicator animates as the file is downloaded and it disappears when complete. Some of these files are very large, so this process can take some time.

Some of these 3D environments, which include external lightmaps, are packed as a zip file and must be unpacked first. Once that is done, we can load the 3D environment.
Loading a 3D Environment
- In the toolbar, click
 .
. - Navigate to the location of the assets. Remember, by default, this is
C:\ProgramData\Autodesk\VREDPro-15.3\data\downloads\vred library. - Select the file and click Open.
- A message asks if you want to calculate missing variant set previews. Choose either Yes, for calculating missing variant set previews, or No.
With your 3D environment loaded, let's add your model and explore the different variant sets.
Setting Up Your Scene
Take a few minutes to explore the scene nodes in the Scenegraph. Open the 3D-Env node to find an environment transform, geometry, lights, and/or cameras, containing assorted variations. Some scenes contain a Place_your_Vehicle_here group with a switch for toggling the shadowplane on or off.
Find pre-created variants in the Variants Set module. Depending on the scene, you will find different variant sets to switch between different render modes, lighting scenarios, and scene configurations.
Adding Vehicles to the Scene
We need to import your vehicle (either the geometry only or a fully-staged scene) into the new 3D environment. Those scenes contain a Place_your_Vehicle_here node for quick scene placement. The node will place your vehicle in the correct place and contains a pre-calculated shadow to be found more easily in the viewport. Of course, you can also place your vehicle at your own discretion and desired location in the scene.
In the Scenegraph, if there is a
Place_your_Vehicle_herenode, select it.In the toolbar, click
 , locate the file with the geometry, such as
 Automotive_Genesis, and click Open.In the Import File(s) dialog, choose your import settings and click Import.
Use the Transform tool to tweak the placement, direction, and scale of the geometry in the scene.
Recalculate the ground shadow of your vehicle.
a. In the Scenegraph, select
ShadowPlane_Vehicle_On. In the Bake Light and Shadows module, under Bake Settings > Direct Illumination, enable Lights and Shadows, then click Calculate All.b. Alternatively, you can use your own shadow plane. In this case, ensure to delete
ShadowPlane_Vehicle_Onand replace it with yours, then move yours into the Geometry tab in the corresponding Variant Set in theRenderModegroup.
Customizing Your Environment
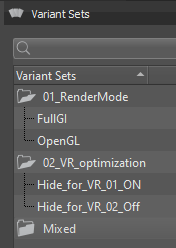
The scenes are structured in such a way that the render mode and lighting can be switched, via a variant set. This is because a separate HDR is used for OpenGL and raytracing, and also partly for different lighting situations, and other configurations, such as differing lighting and material use. The Simple Studio is currently the only exception, since it is less complex and was built differently.
To switch the different render modes, open the Variant Sets module and activate the corresponding variant. Depending on the 3D environment, there are different lighting situations, such as day and night, as well as other configurations.
The Industrial Harbor 3D environment comes with day and night scenarios. The 3D environments also have additional objects, lights, cameras, and materials. Use the Variant Sets module to toggle these on or off.
In the Modular Studio, you can choose one of three room configurations: Dark, Design, or Studio. Each configuration has its own lighting scenario and uses different objects and room elements. In addition, details, such as curtains, blinds, and presentation walls, can be modified.
Setting Lighting Scenarios
In the Industrial Harbor scene, you can choose between a day or night scenario. In the Modular Studio scene, you can choose from three different room configurations, each with a different lighting scenario. With your vehicle and a ground shadow added to the scene, use these variants to change your 3D environment from day to night or switch between the other available lighting scenarios.
With
ShadowPlane_Vehicle_DayorShadowPlane_Vehicle_Nightselected, in the Quick Access Bar, click .
.In the Variant Sets module, double-click
01_RenderModeto expand it, then double-click one of the following:OpenGL_Day,OpenGL_Night,FullGI_Day, orFullGI_Night.Note:The Industial Harbor environnment serves as an example here. In other 3D environments, the names of the variant sets may differ.
Customization of 3D Environments
Each 3D environment comes with its own unique additional configuration options. In the Variant Sets module, double-click the various sets and explore the assets to change up our scene. For example, for Industrial Harbor, use one of the variant sets in the group 02_Container_Colors to change container colors. For Modular Studio, use one of the variant sets in the group 02_Variants_room to change the position of the blinds or to show and hide curtains and mobile walls. If you want to restore the original room configuration, select one of the studio styles (Dark, Design, or Lounge).
Using the Modular Studio 3D environment, with
ShadowPlane_Vehicle_Onselected, in the Quick Access Bar, click.In the Variant Sets module, double-click
02_Variants_roomto expand it, then double-click any of the variants listed to change the 3D environment assets.Tip:To set keys for the different variants, in the General tab, select each variant, then use the Hotkey fields to assign a unique shortcut for each one. Now, you can use these hotkeys to switch the environment during a presentation.
Adjust these scenes and optimize your settings to meet your needs. Consider the settings in the 3D environments as an example you can modify and make your own. Try different render settings and variant sets. Here are some variant sets you'll find in the 3D environments:
| City | Industrial Harbor | Modular Studio |
|---|---|---|
 |
 |
 |