VRED 2023.3 and 2023.3.1
Learn about new features and improvements in this release of VRED. For technical details and bug fixes, see the 2023.3 release notes and recommended system requirements to ensure Autodesk VRED products are running to their potential.
What's New in 2023.3.1 and General Improvements
For Windows users, 2023.3.1 requires an NVIDIA RTX driver v.511.65 or above.
For Linux users, 2023.3.1 requires an NVIDIA driver v.510.47.03 or above.
Autodesk VRED 2023.3.1 is a hotfix, and as a result, there are no new features or enhancements.
What's New in 2023.3 and General Improvements
For Windows users, 2023.3 requires an NVIDIA RTX driver v.511.65 or above.
For Linux users, 2023.3 requires an NVIDIA driver v.510.47.03 or above.
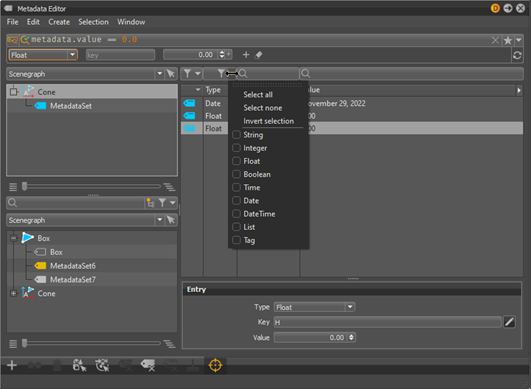
Video Captions: In VRED 2023.3, we added the completely new so-called Metadata Editor. Metadata is information that is attached to a node that can be used to extend workflows or pipeline scripts, while being object name independent. So, with the Metadata Editor, you can create, edit, and control metadata, which is information that is attached to objects, that is normally hidden. I can also use existing metadata that are coming from external CAD applications like Catia or Inventor, and within the Metadata Editor, I can create metadata sets to arrange them to my needs or to search for specific information.
Here is how it works: I can now search and filter nodes without knowing the name of the nodes, by using the metadata information. This can be done using our new advanced search widget, which uses simple Python expressions to search for metadata information. So, I can, for example, search for a specific owner or author. Like here, where I am searching for my name. Now, I see hundreds of nodes. But I can also specify it a bit more and add a date to my search. So now, I only see objects that I have created at this specific date.
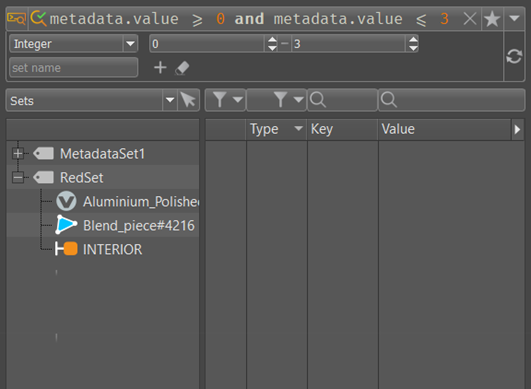
And, this advanced search is now implemented in all corresponding editors like the Scenegraph, Material, Camera, Light, and Sceneplate Editor. Or I want to filter for a specific part, like here, the generative design wheels, and in case I need this filter more often, I can also save that query search as a favorite and use the same search within the Material Editor, to find out where the materials of that objects are. So, it’s all about a name independent advanced search and what I do with this, strongly depends on my workflows and also my creativity.
I give you a practical example: Here, I am creating a metadata set for a specific variant or version of the car by simply dragging and dropping the related nodes or materials into the metadata set. In this case, I am adding different wheels and several material switches to my sets. And for a better overview, I can change the color of the sets. Additionally, for future use, I can save the metadata sets or store them in the Asset Manager.
And now, I can use a Python script that controls the visibility of the nodes within the metadata set, and this gives me the possibility to show different car variants without the need to rearrange nodes within geometry switches. This can keep the scenegraph complexity very low, and this can be even more helpful when variant switches of a car are getting extremely complex.
Here is another example: When loading a Substance material into VRED, I can see that the texture size is still the default 100 mm. But in the metadata of the material, I can see the real values written in cm. Now, I can run a script that reads out this information, converts them into mm and writes that into the size field of the material and you will have instantly the right size.
And also a roundtrip with Maya is possible. So, I can read the VRED metadata from an exported FBX part within Maya, edit them there, reimport the parts to VRED, and I can see the new metadata entries from Maya in VRED, now as well. So generally, we have now an editor that can use this hidden metadata information and you can decide what to do with this new selection and filtering ability, depending on your workflows and needs.
We also decoupled the Scenegraph. This gives you the possibility to access the scenegraph via the Python API. Additionally, we added some more functionality to it. Now, you have access to many more important options directly at this QuickActions Bar and also the context menu is been reorganized. The Scenegraph contains also another section of columns that shows which nodes contain metadata, animation, transform variants, touch sensors, and annotations. This gives you a much better overview of your scene. But the best thing is, you have now direct access to this information. For example, I can double-click onto an icon, like the animation flag, and the corresponding editor will instantly open up. So, you have now direct access to all these values, which can speed up your workflow massively, as I can instantly find the animation curve of an object.
Last but not least, we give you now the possibility to download four brand-new 3D environments for free. Therefore, you need to go to Web Shops > VRED Library, and after logging in using your Autodesk account, you can choose between four different environments.
Just download them to your preferred directory. Be aware that some scenes need to be unzipped, before you open them in VRED because we added multiple light baking texture sets, which you can see in the separate folders. I will quickly introduce the four environments to you:
Simple Studio: First, we have the Simple Studio. This is a very reduced minimal dark studio setup, which you can use for Raytracing and OpenGL.
Another Studio is the modular studio. Here you have a set of three different studio types within one scene. You can switch them in the Variant Sets and they are working with OpenGL and Full GI Raytracing. You can choose, for example, a dark mode, with glowing letters. In the scene is also a complete alphabet. So, you can adjust the letters to your needs. Additionally, you can switch to a design studio scene, where you can switch on and off curtains, window blinds, and image walls. And also, a lounge style scene setup is included, so you have multiple options to play around and set it up to your needs and taste.
Please be aware that all three base setups have all different light baking texture sets, which have to be loaded. You can see them stored in separate folders.
City: Next one is the city environment. The city contains variant sets for OpenGL and Raytracing. And, for VR, you can hide some objects, if you are running into performance issues using the variant sets.
Harbour: Last but not least, we have a harbour. Within this scene, you are able to set a night and day situation. Therefore, we created two different light baking texture sets. This will give you a perfect example how to deal with different baked texture sets for different light situations. You can also switch some container colors and activate a container door animation. And you can also switch between OpenGL and Raytracing. I hope you enjoy them. Thanks for watching the video.
Click the cards below for further information on new features and improvements found in 2023.3.