カスタム スタンドアロン ユーザー メニューを作成するには
- XML ファイルを作成し、user_menu.xml と名前を付けます。
- PowerMill インストール パス\sys\hci\popups フォルダーにある TreeSchema.xml ファイルのコピーを作成します。
- user_menu.xml ファイルと TreeSchema.xml ファイルのコピーの両方を、PowerMill のホーム フォルダーのサブフォルダーに配置します。
- TreeSchema.xml ファイルの名前を user_menu.xsd に変更します。これにより、user_menu.xml ファイルが PowerMill のスキーマに従うようになります。
カスタム スタンドアロン ユーザー メニューの形式
<?xml version="1.0" ?>
<menus xmlns="x-schema:user_menu.xsd">
	<usermenu value="user_menu">
		<menupage label="This is the Title">
			<spacer/>
			<button
			label="Button Label"
			command="SOME POWERMILL COMMAND"/>
		</menupage>
	</usermenu>
</menus>
最初の 3 行と最後の 3 行は必須です。
たとえば、次のサンプル ユーザー メニューを作成します。
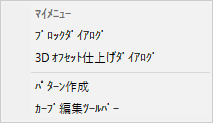
この場合、user_menu.xml の内容は次のようになります。
<?xml version="1.0" ?>
<menus xmlns="x-schema:user_menu.xsd">
	<usermenu value="user_menu">
		<menupage label="My menu"><button label="Block dialog" command = "Form Block"/>
			<button label="Block dialog" command = "Form Block"/>
			<button label="3D Offset Finishing dialog" command = "IMPORT TEMPLATE ENTITY TOOLPATH TMPLTSELECTORGUI'Finishing\3D-Offset-Finishing.ptf'"/>
		<spacer/>
			<button label="Create Pattern" command = "CREATE PATTERN"/>
			<button label="Curve Editor toolbar" command = "CREATE PATTERN ; EDIT PATTERN ; CURVEEDITOR START"/>
		</menupage>
	</usermenu>
</menus>