重置旧版 SSL 设置
实施用于优化 SSL 连接的新 SSL 设置后,任何基于旧版配置的修改将不受支持。如果要在使用增强的 SSL 功能时修改 SSL 连接,则必须手动重置旧版 SSL 设置。
重置 IIS 绑定
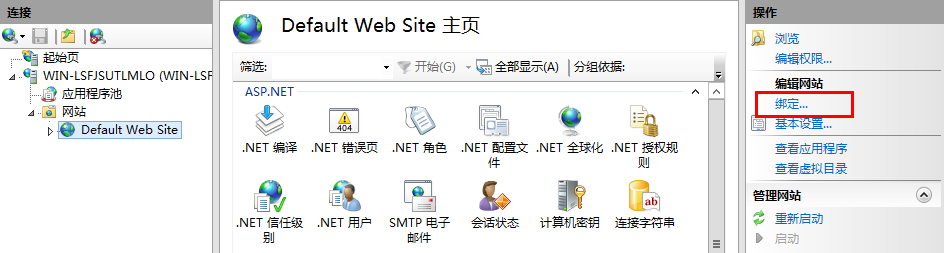
启动 Internet Information Services(如果尚未运行)。
展开“站点”树,然后选择托管 AutodeskDM 虚拟目录的网站。在下图中,该网站是默认网站。选择“默认网站”,然后单击“操作”窗格中的“绑定”。
删除 https 绑定。
如果已删除默认的 http 绑定,请单击“添加”,确认类型为 http 且端口为 80,然后单击“确定”。
选择“AutodeskDM”>“Services”虚拟目录,并双击“SSL 设置”按钮。
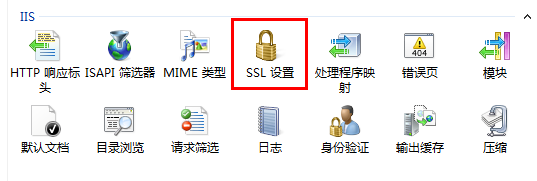
在“SSL 设置”页面中,取消选中“需要 SSL”选项。
从“操作”窗格单击“应用”。
对于“AutodeskDM”>“服务”>“Filestore”重复步骤 5 至 步骤 7。
针对 AutodeskTC 重复步骤 5-7(如果要配置 Vault Thin Client)。
重置 Vault Server 配置
Connectivity.ADMSConsole.exe.config
复制一份位于“<安装路径>\Autodesk\ADMS Professional 20##\ADMS Console”目录中的“Connectivity.ADMSConsole.exe.config”。
使用记事本打开“Connectivity.ADMSConsole.exe.config”文件。
找到“<system.serviceModel>
”部分,然后将端点编辑为“http://localhost”。需要编辑三行内容。下面是编辑后应显示的内容。 在“<connectivity.vaultmanager>”部分中,更改 webServer 部分中的值。下面是编辑后应显示的内容:
保存配置文件。
Connectivity.avfsConsole.exe.config
以下配置适用于 Autodesk Vault File Server (AVFS)。
创建位于“<安装路径>\Autodesk\Vault File Server 20##\avfs Console”目录中的“Connectivity.avfsConsole.exe.config”的副本。
使用记事本打开“Connectivity.avfsConsole.exe.config”文件。
找到“<system.serviceModel>
”部分,然后将端点编辑为“http://localhost”。需要编辑两行内容。下面是编辑后应显示的内容: <endpoint name="avfs-notification" address="http://localhost/AutodeskDM/Services/Filestore/_impl/NotificationService.svc" binding="basicHttpBinding" bindingConfiguration="RemoteCalls" contract="NotificationContract"/
保存配置文件。
Web.config
复制位于 <安装路径>\Autodesk\ADMS Professional 20##\server\web\services\ 目录下的 web.config 文件。
使用记事本打开“web.config”文件。
找到 <system.serviceModel>
部分,然后将端点编辑为“https://* *”。需要编辑四行内容。 (自 Vault 2019 及更高版本起),如果服务器主机\计算机名称与证书名称不同,请将“fullyQualifiedDomainName”开关添加到以下行:
"<connectivity.web>
<server port="80" sslPort="443" sslRequired="true" website="Default Web Site" fullyQualifiedDomainName="
" /> </connectivity.web>"
保存配置文件。
重新启动 IIS。
Connectivity.WindowService.JobDispatch.exe.config
复制位于“<安装路径>\Autodesk\ADMS Professional 20##\server\dispatch”目录下的“Connectivity.WindowsServer.JobDispatch.exe.config”文件。
使用记事本打开“Connectivity.WindowsServer.JobDispatch.exe.config”文件。
在“<System.servicemodel>
”部分中,将地址值更改为“http://localhost”。下面是编辑后应显示的内容: 保存配置文件。
通过“控制面板”->“管理工具”->“Services.msc”重新启动服务。
验证 SiteConfiguration.xml
- 使用记事本打开“C:\ProgramData\Autodesk\VaultServer\Configuration\SiteConfiguration.xml”文件。
- 在“
”部分中, - 如果是 ADMS 服务器,请验证,对于 DataManager 和 Filestore,“generateUri”值均为“true”,且“Uri”值均为“http://<计算机名称>”。
- 如果是 AVFS 服务器,请验证,对于 Filestore,“generateUri”值为“true”,对于 DataManager,“generateUri”值为“false”,且对于 Filestore,“Uri”值为“http://<计算机名称>”。
- 关闭或保存配置文件。