Hardware Shade
![]()
Toggles between wireframe and render preview views of the scene. Hardware shading attempts to show as realistic an image as possible while maintaining interactive speeds.
Hardware Shade settings
Use Embedded File Settings
(Applies to Alias and VRED Renderers) If the file has been saved in Alias 2020 or later, Hardware Shade settings were saved with the wire file, and will be used by checking this option.
All Windows
(Applies to Alias and VRED Renderers) If checked, geometry in all modeling windows is shaded. If not checked, geometry is shaded in the current modeling window only.
All Geometry
(Applies to Alias and VRED Renderers) If checked, all geometry is shaded. If not checked, only the picked (active) geometry using the picked lights is shaded. If no lights are active, all lights are used.
Tessellator
(Applies to Alias and VRED Renderers) This value is not available when Global Tessellation in turned on in the Control Panel.
Fast – Tessellates more quickly and less accurately.
Accurate – Tessellates more accurately and more slowly.
Quality
(Applies to Alias and VRED Renderers) Controls how accurately surfaces are tessellated. Choices include Low, Medium, and High.
Choose User defined to control how accurately surfaces are tessellated using the Tolerance parameter (see below). This value is not available when Global Tessellation in turned on in the Control Panel.
Tolerance - Controls how accurately surfaces are tessellated when Quality is set to User defined. The slider range is 0.001 to 0.1 cm. The default value is 0.005 cm.
Show triangles - Overlays the surfaces with triangles used for tessellation. This option only appears if Quality is set to User defined.
Limit edge length - This option only appears if Tessellator is set to Accurate and Quality is set to User defined.
If checked, a Max edge length slider appears. If unchecked, there is no limit on the size of the triangles.
Max edge length - Specifies the maximum length of any triangle edge (in current linear units).
Texture resolution
If you are using textures, you can use approximations to speed the computations in hardware rendering. Texture maps can be rendered at the following square resolutions: 128, 256, 512, 1024, and 2048. You can also turn off texture maps by choosing Off from this pop-up menu. A texture map should not be larger than the size the rendered texture will appear to be. For example, if a label in a finished rendering is to be about 256 x 256 pixels square, it is a waste of computational power to use a texture map and a texture resolution that is greater than that value.
Light Source
All Lights – Shade surfaces using the lights in the scene, up to a maximum of eight.
Selected Lights – Shade surfaces using any picked lights, up to a maximum of eight.
Warm Cold – Shade surfaces using a preset combination of warm and cool colored lights.
Contrast – Shade surfaces using a preset combination of lights to create a wide range from highlights to shadows.
Default – Shade surfaces using a direction light at the camera and an ambient light. This is the fastest option. This option may be hardware accelerated.
Self Shadows
Self-shadows boost the realism of a scene by adding additional information about spatial relationships of objects, and provide information about the shape of an object as it casts shadows on itself.
Self shadows must be turned on in the Hardware shade settings window. This is the master control that determines whether any self-shadows can be cast.
Use self-shadows with either ALL LIGHTS or SELECTED LIGHTS to have control over the shadows based on the lights’ parameters, position, and rotation.
To select which specific lights can cast shadows, use the Light editor’s Cast Shadows button in the Active Effects section. The light editor shadow settings are shared with the software renderer.
The WARM COLD and CONTRAST light settings, while useful for examining a scene, do not create “real” lights, and so, do not provide any controls to change the lights’ position or parameters. With these settings the Self-shadow check box must be toggled ON but shadows do not have to be ON in the light editor.
Shadows cast by the preset lights, WARM COLD and CONTRAST, will only display once the camera has stopped moving. The effect is the same as when “Optimize during tumble” is enabled for user defined lights which correspond to the ALL LIGHTS option in the hardware shade settings.
The DEFAULT light setting does not work with self-shadows.
Clicking Self Shadows in the Optimize during Tumble section may speed up playback.
Moving lights around in a scene is computationally expensive, and the more lights that are moved, the greater the number of calculations that must be made. Tumbling a scene, where the objects and lights are stationary and the camera moves, is much faster and less expensive computationally.
Auto update
(Applies to Alias and VRED Renderers) When checked, modifications made to the options are implemented immediately, and reflected in the scene as quickly as possible. You may want to turn Auto update off if you have a very large model and are applying a number of initial settings.
Enable Environment Effects
Use Environment/ Show Environment
(Applies to Alias and VRED Renderers) Turn on this option to have your model reflect a background environment. Several preset cube map environments are provided in the Control Panel (when you set the application mode to Visualize at the top), or you can create your own in the Multi-lister.
Show Background
If a background is set up in the Environment editor (color, color map, or a backdrop), checking this option will turn it on. Options that determine what the background look like are found under Color and Backdrop in the Environment editor section of the Multi-lister reference documentation.
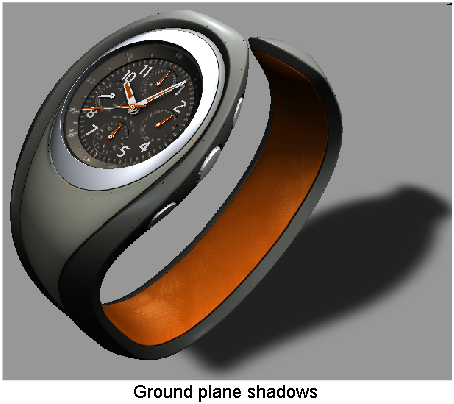
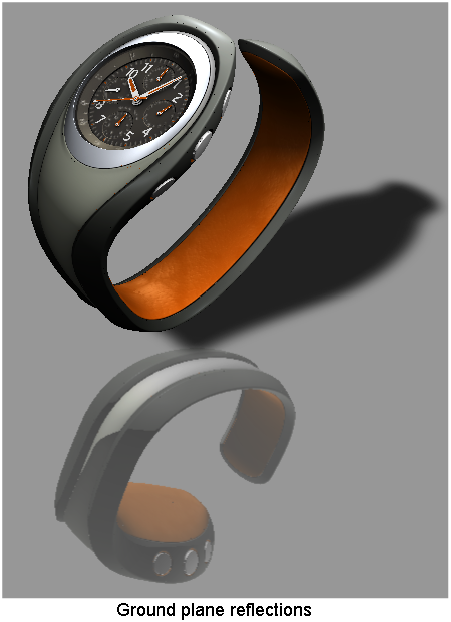
Ground Plane/Show Ground Plane
(Applies to Alias and VRED Renderers) Enables ground planes, ground plane shadows, and ground plane reflections in hardware shade mode. Options are found in the Ground Plane section of the Environment Editor.
Ambient Occlusion
(Applies to Alias and VRED Renderers) Toggles the display of ambient occlusion on and off. For Alias, Ambient Occlusion must first be calculated. See Ambient Occlusion. VRED Ambient Occlusion displays immediately when toggled on. See VRED Ambient Occlusion.
Shader Glow
Enables shader glow. Most settings are found in the ShaderGlow section of the Environment editor. Be aware that glows require significant calculations that may slow performance. Reflected objects and the ground plane will not show the glow.
Glow Quality
If Shader Glow is enabled, this slider enables you to trade off speed vs. quality of the glow in hardware shade.
Linear Reflection
If enabled, shows the model as if it were surrounded by long fluorescent light fixtures. The linear reflection tool is only available in hardware shade mode. Settings for this feature are found in LInear Reflection controls in the Environment editor.
Edit Environment
(Applies to Alias and VRED Renderers) Click this button to open the Environment Editor where you can edit the attributes of the environment. For more information, see the following:
- Alias Renderer Environment Editor.
- VRED Renderer Render Settings
Edit Render Settings
![]()
(Applies to the VRED Renderer) Click this button to open the VRED Render Settings window, which allows you to control how the scene renders when the VRED Renderer is on.
Optimize during Tumble
Self Shadows
If enabled, self-shadows are approximated while camera operations (track, dolly, tumble) occur, and are updated when the mouse button is released.
Shader Glow
If enabled, shader glow is approximated while camera operations (track, dolly, tumble) occur, and is updated when the mouse button is released.
Ground Plane Reflections
If enabled, ground plane reflections are approximated while camera operations (track, dolly, tumble) occur, and are updated when the mouse button is released.
About Hardware Shade
Preview accuracy
Because of these speed considerations, not all rendering attributes are supported, and the hardware shading accuracy depends on your graphics card’s capabilities. Per-vertex shading does not support as many rendering attributes as per-pixel shading.
The following rendering attributes are shown in the preview:
- Color, transparency, bump, and displacement mapping on supported texture types (all Surface, Environment Ball, Solid Projection maps).
- Specular and reflection maps.
- 2D procedural maps in the color channel.
- File texture support for label mapping and the Special effects section of the Shader editor.
- Cube map environment texture (on graphics cards which have cube map support).
- Planar ground shadows generated from a single light source.
- Ambient occlusion.
- Reflected background from a cube map environment (on CG-shading enabled graphic cards).
- Linear and spot lights.
- Exclusive and linked lights are ignored in Hardware Shade.
Tessellation
Before surfaces can be rendered, they must be tessellated, that is, polygonal objects approximating the surfaces have to be calculated. Hardware Shade displays a progress bar during tessellation, indicating the approximate time to completion. It is also possible to escape tessellation by pressing the Esc key.
Limitations
Although unlikely, you may experience the following limitations when viewing shaded surfaces:
When using Label Mapping (any 2D texture placement with Ucoverage or Vcoverage less than 1.0), turn off U and V wrap if you don't need them, as they can potentially reduce Alias's ability to optimize hardware shading quality.
Transparent surfaces (or diagnostic shading with Transparency greater than zero) may cause distant surfaces to appear in front of near objects.
Re-order surfaces in the SBD window from left to right so that the left-most surface is the surface that is nearest the camera (in the view that you are shading) and the right-most surface is the surface that is farthest from the camera.
To move a surface, select it in the SBD window, hold down the
Altkey and press theLeftkey (to move it left) or theRightkey (to move it right).Transparent surfaces (or diagnostic shading with Transparency greater than zero) may shade poorly (for example, triangles or bands may be visible).
Smooth line display (Display > Anti-Alias > Wireframe Anti-Alias) and diagnostic shading cause lines to break up.
When diagnostic shading is applied to a selected model, the lines in other models become broken up and difficult to view.
If you dolly (in the perspective view), the models become more difficult to see the further the surfaces are from the camera.