Use this procedure to override the infill of a door/window assembly cell. For example, you might have a row of simple concrete panels in your door/window assembly, but want in one location a round window instead of the concrete panel. In that case, it might be simpler to use an infill override, instead of creating complex door/window assembly definitions.
Note: To override an infill assignment, the cell markers must be visible. And to exchange an infill definition, the new infill definition must already be defined in the curtain wall style.
- Select the door/window assembly on which you want to override an infill.
- Click
 .
. - Select the marker of the cell(s) where you want to create an override, and press Enter.
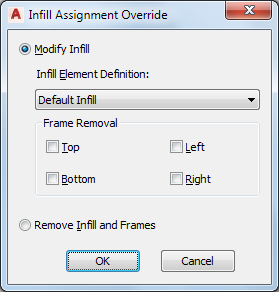
- Create the override:
If you want to… Then… exchange the existing infill for another select a new infill definition from the list. remove one or more of the frames around the infill select the frame component to be removed. You could, for example, override a cell to contain a door infill instead of a panel infill; in this case, you would want to remove the bottom frame of the cell. remove the complete infill and its frame select Remove Infill and Frames. Note: This works only for infills that border the exterior of the door/window assembly. - Click OK.
- Specify where you want to save the door/window assembly override:
If you want to… Then… save the override only on this specific door/window assembly no further steps are necessary. The override is saved to the door/window assembly. save the override to a door/window assembly style select the door/window assembly, click . - If you have chosen to save the override to a door/window assembly style, select the door/window assembly again, click Save to Style and decide to which door/window assembly style you want to save the override.
If you want to… Then… save the override to the current door/window assembly style select Transfer Cell Overrides to Style, and click OK. save the override to a new door/window assembly style select Transfer Cell Overrides to Style, and click New. Then, enter a name for the new door/window assembly style, and click OK. Note: If you have created only an infill override, only the Transfer Cell Overrides to Style check box is active. If you have also created other overrides, such as a cell merge or a frame or mullion edge override, these check boxes are available as well. If you also want to save these overrides to the style, select their check boxes too.If you do not want to save the override back to a style at all, click
Revert to Style Design Rules. The overrides remain on the door/window assembly, where they can be removed, but they are not saved back to a door/window assembly style.