Normal Menu Settings
Controls Menu
Use the Encoding and Orientation settings to help Action with information on how the normal map was encoded and rendered. Then use the Normal Controls to tweak the map in Action.
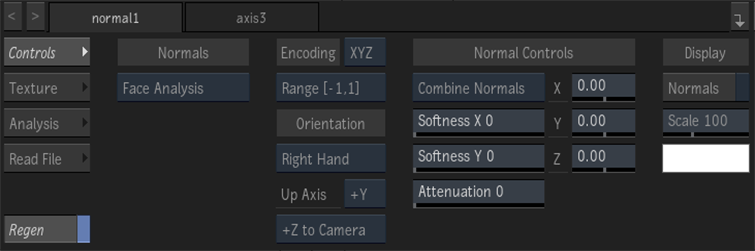
Normals Source option
Select Face Analysis to create a normals map of a face using machine learning, using the Analysis menu to define an ROI if necessary. Select Media Input to use an existing normals map.
Encoding option
Select the order that the normal map is encoded based on the interpretation of the RGB channels (XYZ or XZY).
Range option
When working with floating point normal map media, select the range of the normal map media: [0, 1] or [-1, 1]. When working with 8-, 10-, or 12-bit images, the Range option displays the appropriate range for Action, but the drop-down is greyed out.
Orientation option
Select whether the orientation of the coordinate system of the map is Left Hand or Right Hand.
Up Axis option
Select which axis is the up axis of the map.
Camera option
Select which axis of the map corresponds to the Z axis in Action. The selection in the Up Axis option determines the available selections for this option.
Normals option
Select whether to combine or replace the normal map with the surface normals.
| Select: | To: |
|---|---|
| Combine Normals | Combine the normals map texture with the surface’s normals. |
| Replace Normals | Apply only the normal map texture to the surface (ignoring the surface normal properties). |
Softness X field
Displays the amount of X-axis blur applied to the normal map.
Softness Y field
Displays the amount of Y-axis blur applied to the normal map.
Attenuation field
Displays the level of amplitude of the effect caused by the normal map texture.
X Normal axis
Displays the amount of offset in pixel units along the X axis.
Y Normal axis
Displays the amount of offset in pixel units along the Y axis.
Z Normal axis
Displays the amount of offset in pixel units along the Z axis.
Show Normals
Enable to display normal vectors over the surface (does not affect the render).
Normals colour
Displays the normal vectors colour.
Scale field
Displays the scale of the normal vectors.
Regen
Enable to dynamically refresh the image as changes are made to the normal settings.
Texture Menu
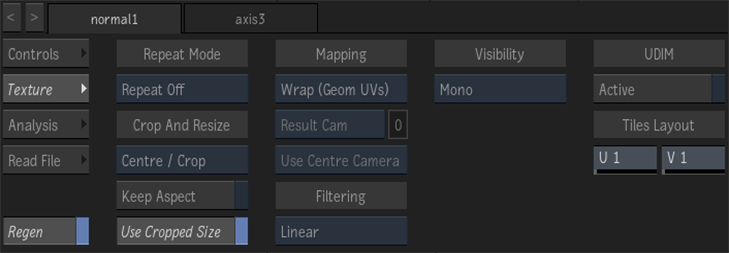
Repeat mode option
Select how the normal map pattern is repeated on the surface.
Fit Method option
Select a fit method option to be applied to the normal map.
Keep Aspect
Enable to preserve the aspect ratio of non-square pixels (not available for the Fill fit method).
Use Cropped Size
Enable to replace the normal map with the cropped size of the normal media. Disable to use the cropped normal media as is.
Mapping option
Select the type of texture mapping.

Camera option
Specify which camera's FOV to take into account when using perspective or projection mapping.
Camera field
Displays the active perspective or projection camera number.
Stereo Camera Projection option
Select whether to use the centre, left, or right camera from a stereo camera rig when projection mapping.
Filter option
Select the type of filtering to apply to the normal map.
| Type | Description |
|---|---|
| Nearest | No filtering — the pixel of the texture closest to the screen pixel is displayed. |
| Linear | Basic bilinear filtering. |
| Anisotropic | Non-proportional filtering between X and Y (faster to process than EWA, but with a lesser quality). |
| Aniso+Linear | A combination of Anisotropic and Linear filtering. |
| EWA | A high-quality elliptical weighted average filter to produce enhanced rendering results (slower to process than other filters). |
| EWA+Linear | A combination of EWA and Linear filtering (offers the most advanced filter processing). |
Camera Type option
Select the camera type visibility for the normal map. For example, you can use this setting to apply a Left Eye and Right Eye camera type for two maps that are children of the same surface or geometry in a stereo scene.
Analysis Menu
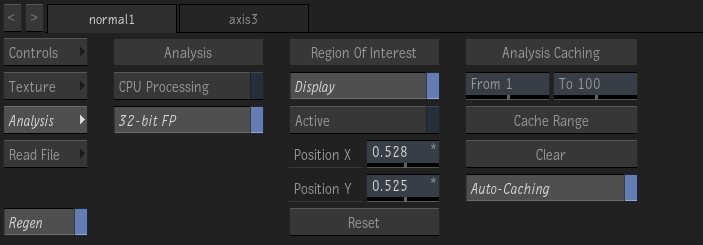
CPU Processing
Enable to perform the analysis with the CPU instead of the GPU. Using the CPU helps stability on computers equipped with minimal amounts of VRAM.
32-bit Floating Point
Enable to use create maps with 32-bit floating point precision. Disable to use 16-bit floating point precision for a smaller cache footprint, but at the cost of precision. Disable this option if you run out of media storage space because of caching.
Display Region of Interest
Display the Region Of Interest (ROI). The ROI can only appear in a viewport set to Object (F8) view.
Enable Region of Interest
Enable to analyze only the area defined by the Region Of Interest (ROI). A well-defined ROI can improve performance, caching, and the quality of the analysis.
ROI X Position field
Position of the centre of the Region Of Interest along the x-axis.
ROI Y Position field
Position of the centre of the Region Of Interest along the y-axis.
Caching Start field
The first frame of the interval to cache.
Caching End field
The last frame of the interval to cache.
Cache Range
Analyze the media, and caches the results for the interval defined by the From and To fields. If a Region of Interest is defined, only that area is analyzed and cached. Disables sections Analysis and Region of Interest.
Clear
Clear the cached motion analysis. Enables sections Analysis and Region of Interest.
Auto-Caching
Enable to cache the analysis during playback or scrub. Disable to cache the analysis only when you click Cache Range. Turn off Auto-Caching if you run out of space on your media storage.