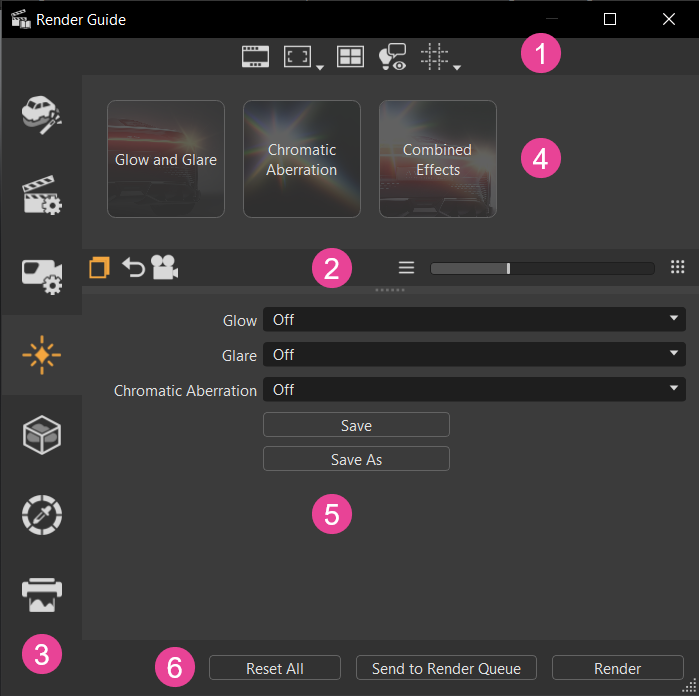
The Render Guide helps beginner and non-advanced users, for example, coming from a Live References session with data already in their scene, quickly create a rendered cinematic moody image. You don't need to locate different settings; the Render Guide consolidates workflow-driven toolsets in one place. It guides you through categories with the option to move from one to the next and back. Use them as a stepped guide, starting from top and working your way down, with the final result being a rendering.
Video captions: Besides the introduction of Vulkan, we also added and improved more aspects around VRED’s Rendering capabilities. You can now create custom or user defined cryptomatte render passes via the render layer module. This allows a more granular control about the creation and assignment of masks for post processing workflows. The output will be a Multilayered EXR file where every layer contains a separate mask.
Rendering is often perfect. Reality is not. To achieve more realistic and life-like rendering results in real time and offline we have a new addition to our list of visual effects called Chromatic Aberration. It is mimicking the effects caused by a camera’s lens in traditional filmmaking by adding distortion and splitting up color at the edges of objects. It's a subtle effect but something that adds greatly to the perceived realism of 3D experiences and renderings.
After releasing color grading in VRED 2025 update 3, we've now added a global weight option to control the overall impact of the tone mapping. This allows you to easily adjust and create subtle results, increasing the ease of use.
We also have added more options within the Render Settings module. Composition line overlays provide a structural guide, helping creators produce well-composed and visually appealing imagery. So now you can choose from Rule of thirds, Golden Ratio or Center Diagonal – just to name a few.
Speaking about Render Settings – with VRED 2026 most of the properties of the render settings module are now accessible via the Python API V2. For more information, please go to the Python documentation.
If you work very often with deep learning super sampling, you will be very pleased to see, that it can now be enabled directly from the Main Toolbar and quality levels can be accessed and adjusted easily without the need to open modules.
Access it either from the main toolbar () or menu bar, by selecting Rendering > Render Guide.
Main Toolbar
Tip:
Right-click next to the main toolbar to access a context-menu of these tools.
Toggle Main Toolbar - Hides VRED toolbars to set up the viewport for a cleaner view of your scene when rendering. Click again to display the main toolbar.
Original Layout
Using Toggle Main Toolbar
Set Aspect Ratio - Defines the aspect ratio used in the viewport. Select from Dynamic Resolution 21:9, 4:3 Ratio, 16:9 Ratio, 2.39 Ratio, and Use Preferences, which uses whatever was set in your Render Settings > Image preferences.
Show Split View - Provides a layout to see four different angles in the viewport when rendering. Click again to return to a single view.
Tip:
To apply a different color grading preset and/or effect to each view, click a view, then click a color grading preset, then an effect preset. Click the next view and select a different presets.
Show Helper - Hides auxiliary UI, such as the View Cube, Navigation Bar, or visible cameras, that distract from the rendering. Click again to return any auxiliary UI.
Using Toggle Main Toolbar
Using Show Helper
Composition Lines - Displays composition lines in the viewport. Use these when trying to compose a scene and place an object in the perfect spot to make the composition of the rendering more visually appealing and artistic. The composition lines change as the aspect ratio () is changed.
Click-hold to access a menu where you can select one or more of the options to set up your composite lines.
Click again to hide the composition lines in the viewport.
Splitter Bar
The tools in this bar are used for the following:
- Each category has content-specific properties listed below the presets that are displayed by default. To show or hide these properties, click . Use these properties to tweak your rendered image to achieve the look you want.
- Resets the properties to the scene or file defaults.
If you still need additional options, use the following to quickly access the relevant modules:
- Opens the Render Settings for further customization of settings not available in the Render Guide.
- Opens the Camera Editor for further customization of settings not available in the Render Guide.
- Opens the Material Editor for further customization of settings not available in the Render Guide.
- Opens the Scenegraph for further customization of settings not available in the Render Guide.
Use the slider and its buttons to quickly resize the presets displayed above the bar.
Categories
Along the left of the guide are categories for accessing workflow-driven presets and their properties. Use them as a guide and go through each category, moving from one to the next and back. Start from top with Cinematic Settings and work your through Render Settings, Camera Settings, Effects, Volume Fog, Color Grading, and Render Output, quickly creating a rendered cinematic moody image.
Presets
Find presets for each category are found in this area. Presets were created with the beginner user in mind. These help to quickly achieve the look you want with minimal effort and without requiring expert knowledge.
To further refine the look, use the options in the Properties section. If access to additional settings is required, use the Render Settings and Camera Editor quick access buttons in the Splitter Bar to open these editors for further options.
When a preset appears with a yellow border and icon, this indicates a change to its properties and just serves as a visual cue of changes, not an error.
However, to save any changes, use Save or Save As to create a custom preset.
Custom Presets
To create a custom preset, after any changes, click the Save or Save As button. The new preset will be highlighted blue when active, can be renamed, and a custom thumbnail image can be assigned to it.
Renaming a Custom Preset
Custom preset names support both ASCII and Unicode character sets and can be renamed.
Click a custom preset name to make it editable, then enter a new name and press Enter.
Adding a Custom Preset Thumbnail
For a custom preset thumbnail, VRED supports PNG, JPG, JPEG, and BMP image file formats.
Once all changes are made within the guide, use one of these buttons at the bottom of the module to start image calculations.
Reset All - Resets all the categories. The reset values are updated when loading a project or when creating a new scene.
Send to Render Queue - Opens a file browser to name and set the location of the saved renderings, then opens the Render Queue, where the image names cannot be changed. Use the buttons along the bottom to send all renders to the Cluster Queue, add them to the Render Queue, or render all. See To Start Image Calculations for more details.
Render - Opens a file browser to name and setting the location of the saved renderings, then creates the image or movie at that location using the current settings. An image's name can be changed during this process.
 Main Toolbar
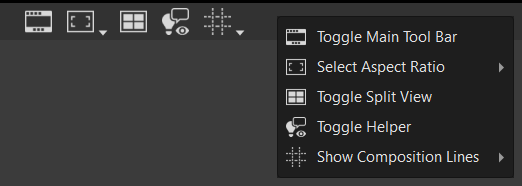
 Toggle Main Toolbar - Hides VRED toolbars to set up the viewport for a cleaner view of your scene when rendering. Click
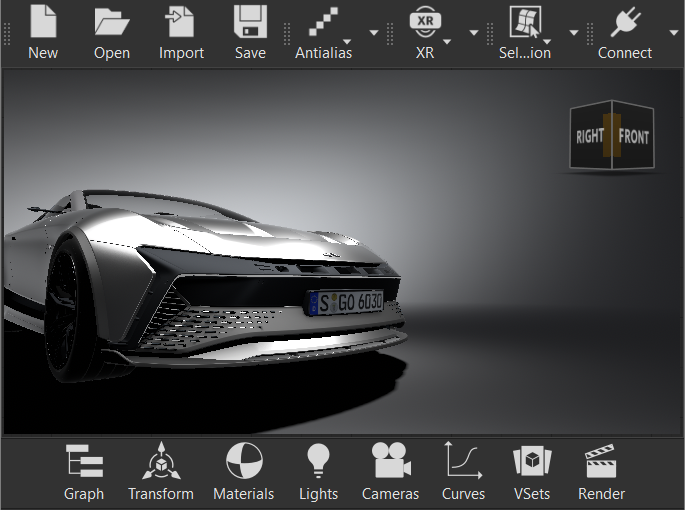
 Set Aspect Ratio - Defines the aspect ratio used in the viewport. Select from Dynamic Resolution 21:9, 4:3 Ratio, 16:9 Ratio, 2.39 Ratio, and Use Preferences, which uses whatever was set in your Render Settings > Image preferences.
  Show Split View - Provides a layout to see four different angles in the viewport when rendering. Click
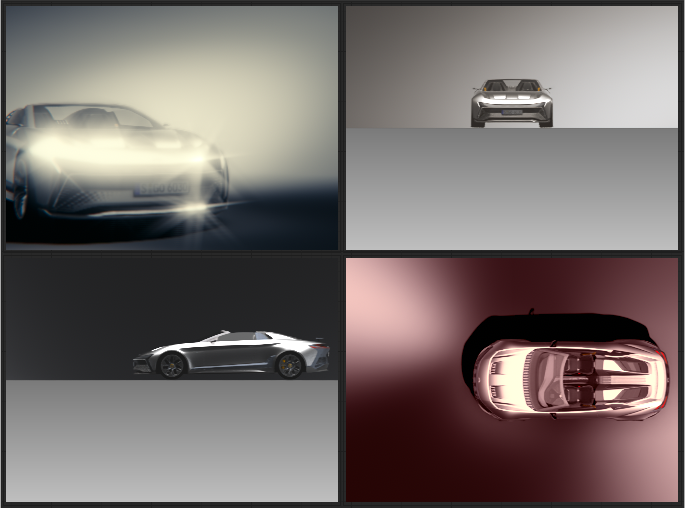
 Show Helper - Hides auxiliary UI, such as the View Cube, Navigation Bar, or visible cameras, that distract from the rendering. Click
 Composition Lines - Displays composition lines in the viewport. Use these when trying to compose a scene and place an object in the perfect spot to make the composition of the rendering more visually appealing and artistic. The composition lines change as the aspect ratio (
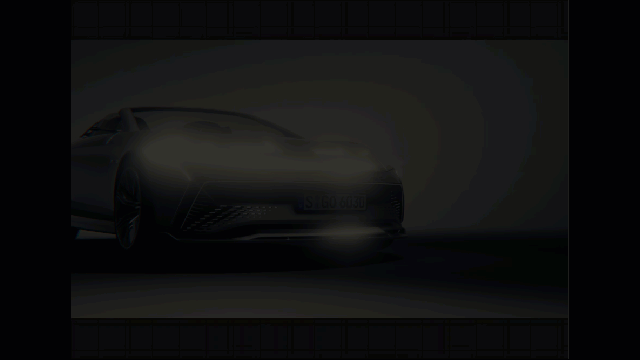
 to access a menu where you can select one or more of the options to set up your composite lines.
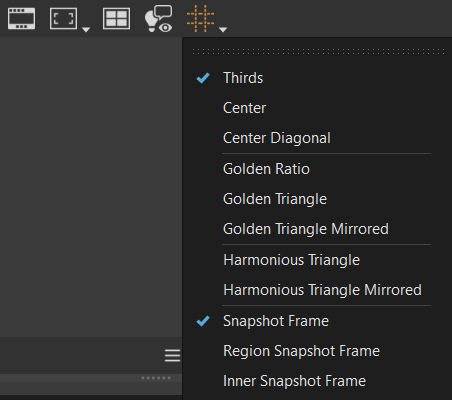
 Splitter Bar
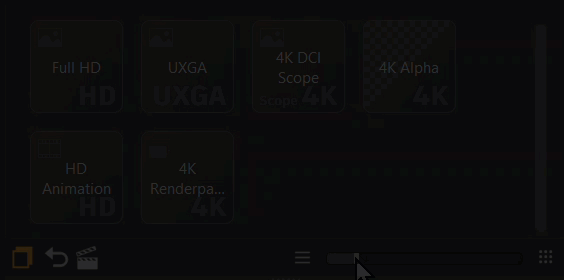
 Categories
 Presets

 Properties
 Render Options