 Render Guide
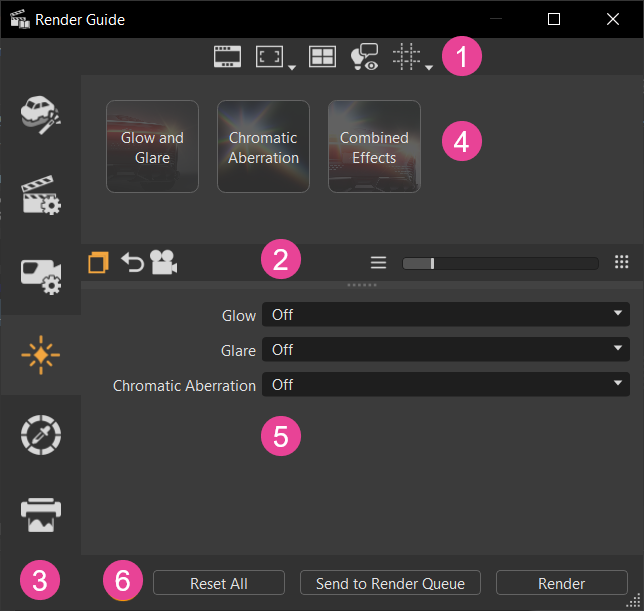
The Render Guide helps beginner and non-advanced users, for example, coming from a Live References session with data already in their scene, quickly create a rendered cinematic moody image. You don't need to locate different settings; the Render Guide consolidates workflow-driven toolsets in one place. It guides you through categories with the option to move from one to the next and back. Use them as a stepped guide, starting from top and working your way down, with the final result being a rendering.
Video captions: Another addition to make your work easier is the Render Guide. This is the perfect place to start for Alias users that send their data to VRED via live referencing and want to create impressive imagery quickly. The intention of the Render Guide is to summarize the most important features needed to achieve a good look for the scene in one place. Thus, new or casual users will have an easy wizard to achieve cinematic looks in a guided experience. The module combines the most essential features and automates setup to create great imagery with minimal effort and expertise.
Access it either from the main toolbar (![]() ) or menu bar, by selecting Rendering > Render Guide.
) or menu bar, by selecting Rendering > Render Guide.
 Main Toolbar
Use these to quickly access tools for changing visual aspects of the viewport.
Right-click next to the main toolbar to access a context-menu of these tools.
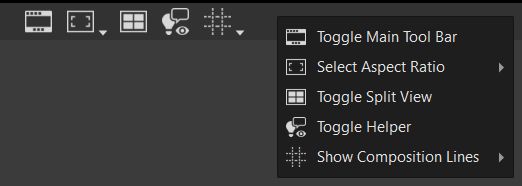
 Toggle Main Toolbar - Hides VRED toolbars for a cleaner view of your scene when rendering, by removing them from the viewport.
Original Layout Using Toggle Main Toolbar 

 Set Aspect Ratio - Defines the aspect ratio used in the viewport. Select from Dynamic Resolution 21:9, 4:3 Ratio, 16:9 Ratio, 2.39 Ratio, and Use Preferences, which uses whatever was set in your Render Settings > Image preferences.
  Show Split View - Provides a layout to see four different angles in the viewport when rendering.Tip:
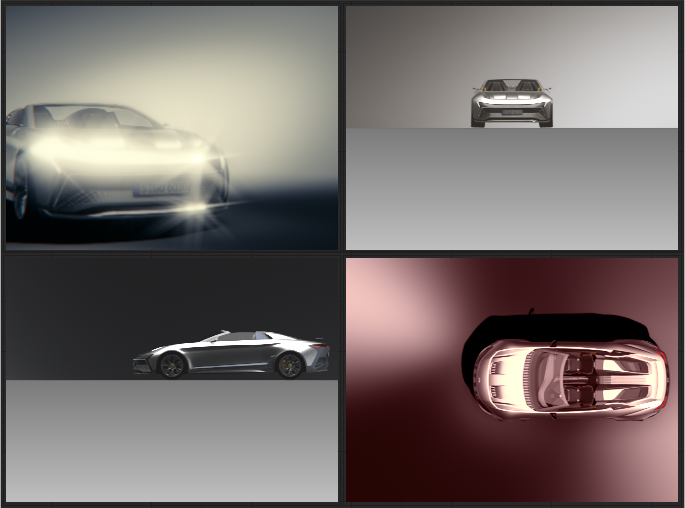
To apply a different color grading preset and/or effect to each view, click a view, then click a color grading preset, then an effect preset. Click the next view and select a different presets.
 Show Helper - Hides auxiliary UI, such as the View Cube, Navigation Bar, or visible cameras, that distract from the rendering.
Using Toggle Main Toolbar Using Show Helper 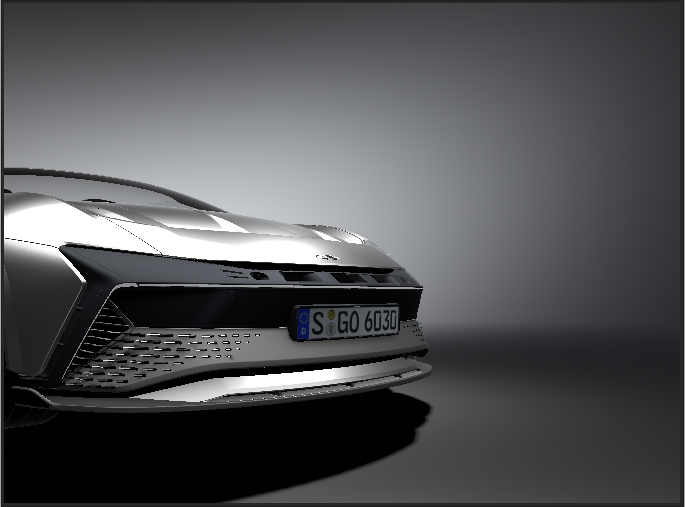
 Composition Lines - Displays composition lines in the viewport. Use these when trying to compose a scene and place an object in the perfect spot to make the composition of the rendering more visually appealing and artistic. The composition lines change as the aspect ratio () is changed.
Click-hold
 to access a menu for selecting one or more options to set up your composite lines.
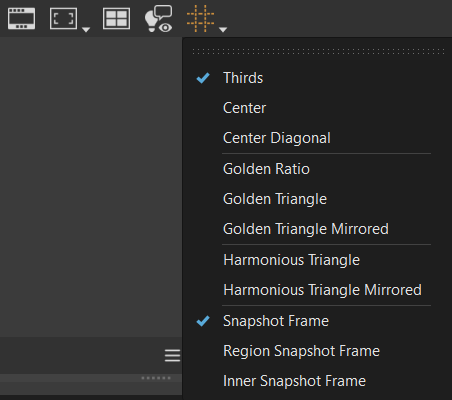
For inforamtion on the different composite line types, see Composition Lines.
 Splitter Bar
The tools in this bar are used for the following:
 - Each category has content-specific properties listed below the presets that are displayed by default. To show or hide these properties, click . Use these properties to tweak your rendered image and achieve the look you want.
 - Resets the properties to the scene or file defaults.
If you still need additional options, use the following to quickly access the relevant modules:
 - Opens the Render Settings for further customization of settings not available in the Render Guide.
 - Opens the Camera Editor for further customization of settings not available in the Render Guide.
Use the slider and its buttons to quickly resize the presets displayed above the bar.
 Categories
Along the left of the guide are categories for accessing workflow-driven presets and their properties. Use them as a guide and go through each category, moving from one to the next and back. Start from top with Cinematic Settings and work your through Render Settings, Camera Settings, Effects, Color Grading, and Render Output, quickly creating a rendered cinematic moody image.
 Presets
We have provided cinematic, render, camera, effects, color grading, and render output presets all in one place, with the beginner user in mind. These help to quickly achieve the look you want with minimal effort and without requiring expert knowledge.
To further refine the look, for minor tweaks, use the options in the Properties section below.
To access additional settings not found in the Properties section, use the
Render Settings and Camera Editor quick access buttons in the Splitter Bar.
 When a preset appears with a yellow border and icon, this indicates a change to its properties and just serves as a visual cue of changes, not an error.
 Cinematic Settings
To access the cinematic settings, click ![]() in the Presets area. The presets are applied to the scene and loaded into the Properties, where you can see the settings used to achieve the displayed cinematic effect.
in the Presets area. The presets are applied to the scene and loaded into the Properties, where you can see the settings used to achieve the displayed cinematic effect.
 Properties
Click ![]() to display the following properties, if not already visible:
to display the following properties, if not already visible:
- DLSS - Sets the DLSS quality. Choose from Off, Ultra Performance, Performance, Balanced, and Quality. See How to Enable Deep Learning Supersampling for more information on the individual settings.
- Clamping Off - Enables or disables clamping of bright pixels to eliminate white spots after antialiasing. See Use Clamping for more information.
- Color Space - Sets the color space used during rendering. See Rendering Color Space for more information.
- Tonemapper - Maps the high dynamic range rendering for a display onto an output device with lower dynamic range. See Tonemapping for more information.
 Render Settings
To set the render settings used, click ![]() in the Presets area, then in the Presets area, xhoose from Vulkan Rendering, OpenGL Rendering, GPU Raytracing, CPU Raytracing, or to add photon tracing to raytracing, GPU Photon Tracing and CPU Photon Tracing. The presets are applied to the scene and loaded into the Properties, where you can see the settings used for the selected render settings preset.
in the Presets area, then in the Presets area, xhoose from Vulkan Rendering, OpenGL Rendering, GPU Raytracing, CPU Raytracing, or to add photon tracing to raytracing, GPU Photon Tracing and CPU Photon Tracing. The presets are applied to the scene and loaded into the Properties, where you can see the settings used for the selected render settings preset.
Properties
Click ![]() to display the following properties:
to display the following properties:
Renderer - Sets the renderer used. Choose from CPU Raytracing, GPU Raytracing, OpenGL, and Vulkan.
Realtime Env. Shadow - Sets what is used for calculating realtime environment shadows. Keep in mind that these can be quite performance intensive. See Realtime Environment Shadows for more information.
Note:The Raytraced Ambient Occlusion and Raytraced Environment Shadows realtime environment shadows options are only available for Vulkan, since it can support some raytracing functionality.
Intensity - Sets the shadow intensity. The greater the value, the darker the shadows.
Raytraced Reflection - Enables or disables raytraced reflections. See Raytraced Reflection for more information.
Screen Space Refraction - Turns screen space refractions on or off. See Screen Space Refractions for more information.
 Camera Settings
To select the camera settings used, click ![]() in the Presets area, then choose from the 65mm Lens, 65mm Depth of Field, and 65mm Motion Blur presets. The presets are applied to the scene and loaded into the Properties, where you can see the settings used to create this preset. See the Lens Attributes section for more information.
in the Presets area, then choose from the 65mm Lens, 65mm Depth of Field, and 65mm Motion Blur presets. The presets are applied to the scene and loaded into the Properties, where you can see the settings used to create this preset. See the Lens Attributes section for more information.
Properties
Click ![]() to display the following properties:
to display the following properties:
Roll - Adjusts the camera rotation angle (in degrees) about its line of sight. It rotates the image plane, not the camera.
Dolly Zoom - Only available when the Perspective Projection Mode is selected. Changes the Field of View and Focal Length, in combination with moving the camera. This makes the observer feel that the focused object is always the center of interest and everything around it moves. When the check box is enabled, Field of View and Focal Length can act independent of one another. This option only affects the current focused object within the Render Window (double-right-click on the object's surface).
Field of View - Sets the field of view in degrees.
Focal Length - Only available when the Perspective Projection Mode is selected. Sets the focal length, measured in millimeters, which affects the camera's zoom. The focal length is directly related to the field of view.
FStop - Defines a custom F-Stop as f over the input value (f/x). The value set in the Depth of Field changes this value.
Shutter Speed - Defines a custom shutter speed in seconds. The selected Motion Blur value changes this value.
ISO - Sets the ISO response of the camera sensor. Either enter a value or use the one set for the selected Motion Blur value.
Depth of Field - Simulates blurring of everything in front or behind the focused object. The value set defines the focal aperture (F-Stop) used for the calculation. See Depth of Field in the Lens Attributes section for more information.
- Autofocus - Calculates the focus distance automatically, based on the center of the image.
- Focus Distance - Sets the distance to the focus plane.
Motion Blur - Creates the streaking that appears due to the rapid movement of an object or long exposure. The value set defines the shutter setting, which controls the strength of the effect.
 Effects
To set the effects used, click ![]() in the Presets area, then choose from the Glow and Glare, Chromatic Aberration, and Combined Effects presets. The presets are applied to the scene and loaded into the Properties, where you can see the settings for the preset.
in the Presets area, then choose from the Glow and Glare, Chromatic Aberration, and Combined Effects presets. The presets are applied to the scene and loaded into the Properties, where you can see the settings for the preset.
Properties
Click ![]() to display the following properties:
to display the following properties:
- Glow and Glare- Enable a glow and glare camera effects.
- Chromatic Aberration - Enable the camera chromatic aberraction effect. See Chromatic Aberration for more information.
- Combined Effects - Enables the combination of glow, glare, and chromatic aberration.
 Color Grading
To select the color grading used, click ![]() in the Presets area, then choose from Film Warm, Faded Film Warm, Warm, Contrast, Nostalgic, and Black and White. The presets are applied to the scene and loaded into the Properties, where you can see the settings are used by the preset. Color Grading helps with exposure and impact the mood, tone, and the overall visual appeal of your project.
in the Presets area, then choose from Film Warm, Faded Film Warm, Warm, Contrast, Nostalgic, and Black and White. The presets are applied to the scene and loaded into the Properties, where you can see the settings are used by the preset. Color Grading helps with exposure and impact the mood, tone, and the overall visual appeal of your project.
When using Toggle Split Screen View with four views, a different color grading preset can be applied to each view by clicking a view and a color grading preset. Next, click a different view and different presets.
Properties
Click ![]() to display the following properties:
to display the following properties:
- Preset - Provides an extensive list of presets. For how to create a camera preset, see Creating a Camera Preset.
- Weight - Sets the influence of the overall color grading of the image. To apply full color grading, enter 1. For no color grading, enter 0. Find this in the Camera Editor > Image Processing tab > Color Grading section. As the Weight value is decreased, so is the color grading's influence on the image's color grading.
 Render Output
To set the render output used, click ![]() in the Presets area, then choose from:
in the Presets area, then choose from:
- Full HD - Uses the 16:9 ratio, which can be seen when is enabled.
- UXGA - Uses the 4:3 ratio, which can be seen when is enabled.
- 4K DCI Scope - Uses the 2.39 ratio, which can be seen when is enabled.
- 4K Alpha - Uses the 2.39 ratio and outputs an alpha channel/mask for compositing.
- HD Animation - Uses the 16:9 ratio and renders out a sequence of images using either the timeline or a clip.
- 4K Renderpasses - Uses the 16:9 ratio and renders out separate layer renderpasses.
The presets are applied to the scene and loaded into the Properties, where you can see the settings for the preset.
Properties
Click ![]() to display the following properties:
to display the following properties:
- Render Quality - Uses one of the presets, Draft, Preview, Production, or Production Interior, or Custom to set the number of image samples used for rendering.
- Image Size - Automatically fills in the corresponding number of pixel for horizontal and vertical resolution, based on your choice. Choose from a list of presets for industry standard resolutions, such as 4K, FullHD, HD, and SVGA. For unique image sizes, use the Custom option, then click and enter the size in the Render Settings > File Output tab > Image section > Image Size option.
- Export Alpha Channel - Enables the export of additional information regarding transparent areas within the image for use in post-production processes. This requires the target file format to support alpha channels. See the Export Alpha Channel section for more information.
- Render Region - Restricts rendering to the rectangular region specified with the coordinates set using Use Current Region, Upper Left Corner, and/or Lower Right Corner in the Render Settings > File Output tab > Image section when enabled.
- Animation - Renders out a full animation sequence and is intended to be used with the HD Animation preset. Choose from Timeline or Clip, which uses a specific clip that exists in the scene. See Animation for more information.
- Renderpasses - Interactively evaluate specific renderpasses in the viewport when enabled. Choose from Combined, Backplates, Frontplates, and Lens Flares. See Renderpasses Rendering for more information.
 Render Optons
Once all changes are made within the guide, use one of these buttons at the bottom of the module to start image calculations.
Send to Render Queue opens a file browser to name and setting the location of the saved renderings, then opens the Render Queue, where the image names cannot be changed. Use the buttons along the bottom to send all renders to the Cluster Queue, add them to the Render Queue, or render all. See To Start Image Calculations for more details.
Render opens a file browser to name and setting the location of the saved renderings, then creates the image or movie at that location using the current settings. An image's name can be changed during this process.