Animation Layers (Layer Controller)
The Animation Layers feature lets you combine multiple animation tracks on the same object. You can store different animations in layers as you try them out, turning them on or off to your liking and merging them with weighting settings. In most cases, the best way to use this feature is via commands on the Animation Layers toolbar, covered in the Interface section in this topic.
- Right-click an unused area of any toolbar > Animation Layers
- Default menu: Animation menu > Animation Layers
- Alt menu: Animation menu > Tools (Animation Set) > Animation Layers
Animation Layers is comparable to the List Controller and biped layer system features, but is easier for animators to use. It is also more flexible.
Enabling Animation Layers
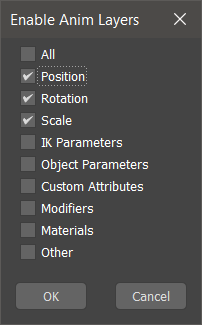
When you enable animation layers for a selected object, 3ds Max assigns a Layer controller to each animation track you specify on the Enable Anim Layers dialog.
When 3ds Max adds a Layer controller, it copies the original controller into its first layer (called Base Layer), preserving any animation data it may already contain.
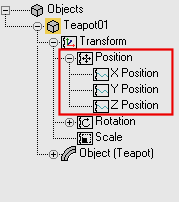 The original controller before you enable animation layers The original controller before you enable animation layers |
 |
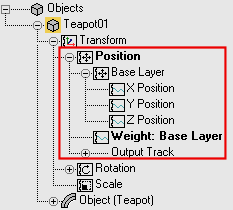 The Layer controller nests the original controller in its Base Layer. The Layer controller nests the original controller in its Base Layer. |
To revert from a Layer controller to the original controller, click  (Disable Anim Layer) on the Animation Layers toolbar. Note that the Disable command is available only when only the Base Layer exists; if your object contains more than one animation layer, you first need to either delete or collapse them.
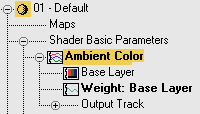
You can assign a Layer controller either at the leaf level of a controller track (such as a material's Diffuse Color track), or at a branch level (such as a Position track).
 The Layer controller affects a point 3 branch. The Layer controller affects a point 3 branch. |
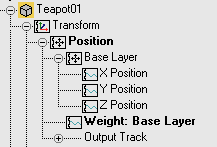 The Layer controller affects a leaf track. The Layer controller affects a leaf track. |
If the selected object already has a List controller track when you enable layers, that controller is preserved within the Base Layer of the new Layer controller.
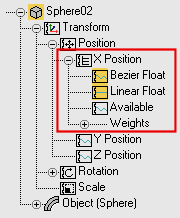 The original List controller The original List controller |
|
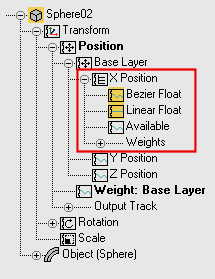 The new Layer controller nests the List Controller. The new Layer controller nests the List Controller. |
Working with Animation Layers
The animation layers list on the Animation Layers toolbar works as follows. For common workflow examples, refer to the Procedures section, following in this topic.
The list displays all existing layers for the selected object. If the selected object isn't layer-enabled, “(Enable Layers)” appears instead.
By default, the Base Layer is the active layer when you first layer-enable an object. This layer stores any existing animation keys when you layer-enable an object.
Every layer you create after layer-enabling an object becomes the new active layer and appears after the previous one in the list.
The active layer stores all newly created animation keys.
When you select an object, its active layer is automatically chosen. When expanded, the drop-down list highlights the active layer.
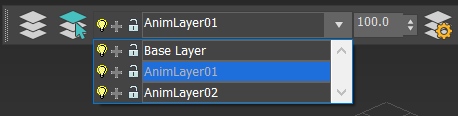
When you select multiple objects that have different active layers, “(Multiple Active Layers)” appears.
The drop-down list displays all common layers (that is, with the same name); layers not common to all are unavailable.
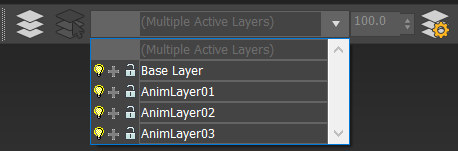
When you select multiple objects, layers not common to all are unavailable on the drop-down list.
You can toggle any layer in the expanded list by clicking its light bulb icon. Turning off a layer hides its animation without deleting it.
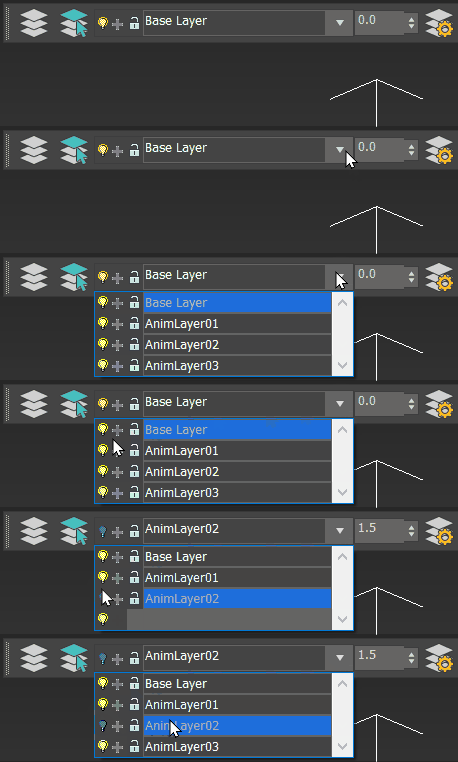
To toggle a layer, click its light bulb icon.
You can include or exclude any layer from the output track by clicking its plus/minus sign icon. The output track combines the animation of all included layers. You can use this track to control other objects' tracks via MAXScript and parameter wiring.
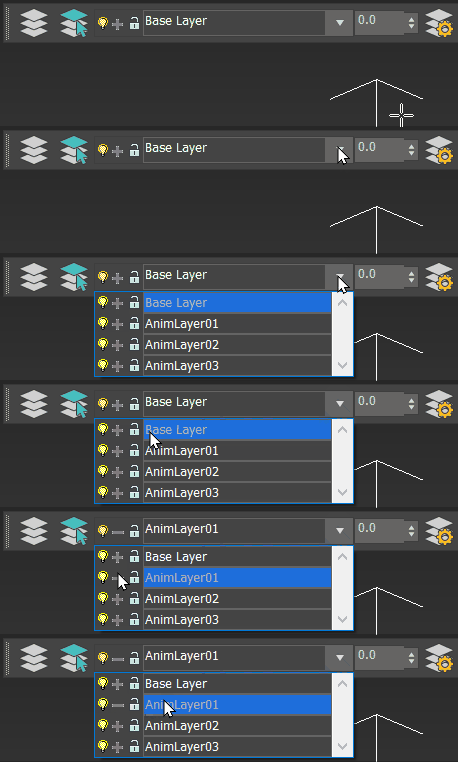
To toggle a layer's inclusion in the output track, click the plus/minus sign icon.
Tip: For a procedure that demonstrates how to use this option, see "Example: To link two objects with wire parameters using the Layer Controller's output track" in the Procedures section, following.You can lock and unlock a layer by clicking its lock icon. If a layer is locked, you cannot manipulate any object properties that the layer controls (such as motion) when the layer is active.
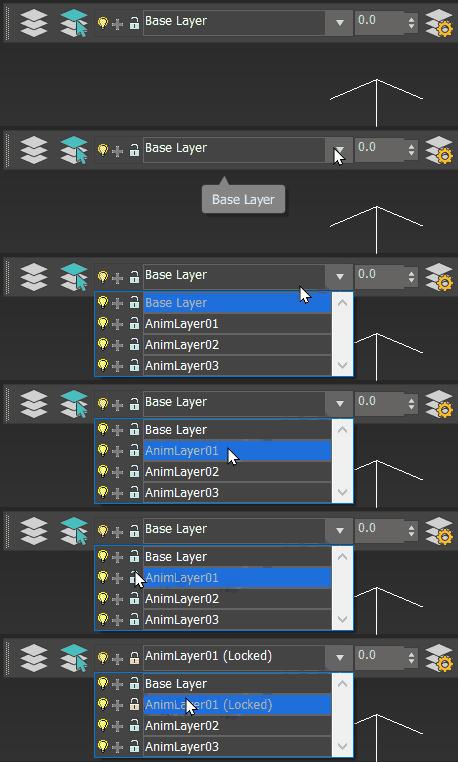
To toggle the ability to change animation in a layer, click the lock icon for the layer.
Each animation layer has a global weight value which, when changed, impacts every controller within that active layer. Similar to the List controller, you can animate a layer's weight and toggle the visibility of the resulting keys in the Track Bar using the Track Bar Filter submenu.
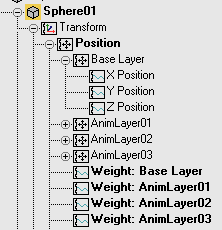
When you add a new animation layer, you can pick a name already in use by an existing layer; this links both layers' weight track, which is now instanced.
Using Merged or XRef Scenes Containing Layers
When you merge or externally reference a source scene (or object) containing layers into your main scene, the system adds the incoming layers to the main scene's layer list.
If a layer name from the merged or XRef scene matches one from the main scene, both layers become synchronized ; that is, the weight track is instanced to both of them.
Collapsing Layers
Collapsing a layer merges keys if any of these conditions are met:
- the two controllers are of similar types (Bezier, Float, TCB, etc.).
- they have the same tangent type.
- the Blend Euler As Quat option of the Layer Controller dialog is turned off.
However, many factors can cause a collapse per frame (that is, setting a key on every frame):
- If one controller type is TCB (Quaternion) and the other is Bezier (Euler).
- If the Blend Euler As Quat option of the Layer Controller dialog is turned on, and both rotation controllers are Euler-driven.
- If the Blend Euler As Quat option of the Layer controller is turned off, and both rotation controllers are Euler-driven, but both have different tangent types.
- If either controller is non-keyable.
Procedures: Integrating Animation Layers in a Workflow
The following sequence of procedures illustrate how you can use animation layers in your workflow to quickly create and combine different animation tracks together for the same object. You should be familiar with the basics of animation and key creation before going through the following steps.
Example: To enable layers:
Create a teapot, and then turn on
 and
and  move the teapot at frames 15 and 30 to create a short animation.
By default, this also creates a key at frame 1. Your start key might be at frame 0 instead; for the purposes of this example, it’s immaterial.
On the main toolbar, choose Animation > Animation Layers.
This opens the Animation Layers toolbar.
Make sure the teapot is selected, then click
 (Enable Anim Layers).
On the Enable Anim Layers dialog, turn on only the Position track, and click OK.
The new Layer controller now nests your teapot's animation.
Example: To add a layer and change its controller type:
This continues from the previous procedure, in which you enabled layers for an animated object.
On the Animation Layers toolbar, click
 (Add Anim Layer).
On the Create New Animation Layer dialog, enter "Noise Layer” as name, and click OK.
The teapot now has two animation layers, each of which can contain a separate animation that you can control independently of the other.
Right-click the teapot, and from the context menu choose Curve Editor. In the hierarchy list on the left, scroll down to the Teapot01 object. Expand the hierarchy as follows: Teapot01 > Transform > Position.
Under Position you’ll see Base Layer, Noise Layer, two Weight Tracks, and Output
Highlight Noise Layer and right-click it.
From the context menu, choose Assign Controller and pick a Noise Position controller.
This opens the Noise Controller dialog. Leave the options as they are and close the dialog.
Two different controllers are now driving the teapot's position.
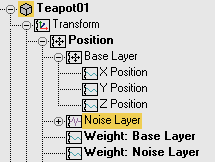
 Play the animation to see the teapot jitter as it moves along the original animation path.
Example: To turn a layer on and off:
This procedure discusses turning existing layers on and off. It continues from the previous procedure.
On the Animation Layers toolbar, expand the drop-down list.
The list currently contains both the original base layer and Noise Layer from the previous procedure.
Move your cursor across the list and click the light bulb icon next to Noise Layer.
This turns off the layer and hides the Noise controller track from the rest of the tracks.
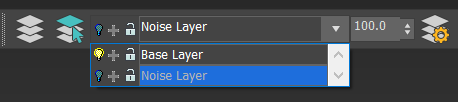
Drag the time slider and notice how the teapot does not shake anymore.
Try turning on and off both layers in the list to see the results. When finished, turn both layers on.
Example: To lock and unlock a layer:
This procedure discusses locking and unlocking layers. It continues from the previous procedure.
If the Base Layer isn’t already active, on the Animation Layers toolbar, expand the drop-down list and choose the Base Layer.
Make sure
 is on, then go to frame 20 and move the teapot to set a new animation key.
Now when you
play the animation, the new key is included.On the Animation Layers toolbar, expand the drop-down list. On the list entry for the Base Layer, click the lock icon so it is locked.
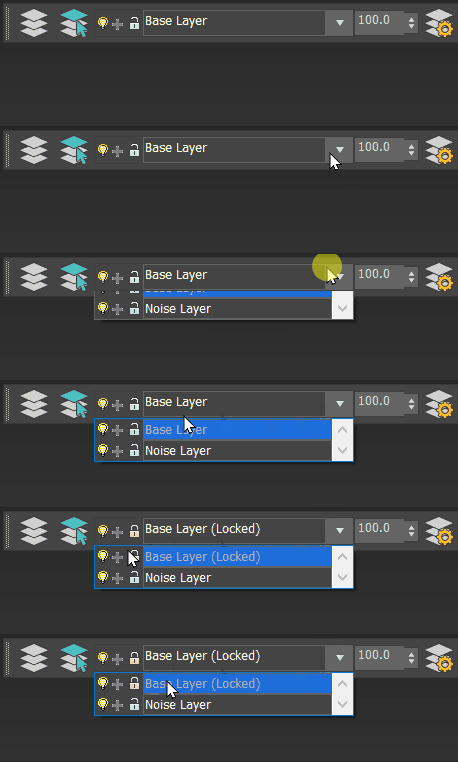
With the Base Layer still active, try to move the teapot.
You can’t, because the layer is locked. This protects the animation on that layer from inadvertent changes.
Open Track View and find the Position > Base Layer track for the teapot and expand it. Highlight the X Position track (or Y Position or Z Position), then right-click the highlighted track and from the top-left quadrant of the quad menu, choose Unlock.
The “(Locked)” text no longer appears after the Base Layer tracks.
Go back to the Animation Layers dialog and check the Base Layer lock icon.
It is no longer locked. This shows that locking and unlocking a track in an animation layer affects all tracks controlled by that layer.
Example: To link two objects with wire parameters using the Layer Controller's output track:
This procedure refers to a simple way to use the output track to control a cube's position through wire parameters. It continues from the previous procedure.
Make sure both layers listed on the Animation Layers toolbar are on, as indicated by the light bulb icons.
Create a box next to the teapot.
Right-click it and choose Wire Parameters from the quad menu.
Navigate through the pop-up menu and choose Z Position.
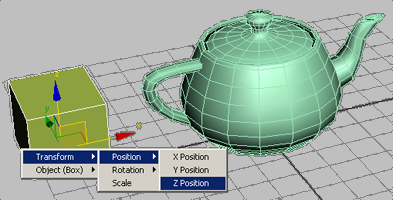
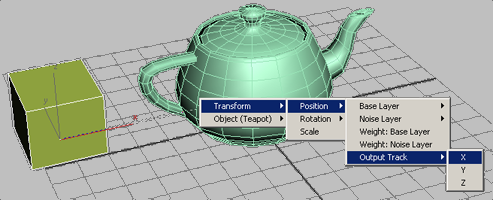
A dashed line appears. Click the teapot and choose the X Output Track from the pop-up menu.
3ds Max opens the Parameter Wiring dialog, with the two parameters highlighted. Click the left directional arrow button to control the cube's position using the teapot's animation.
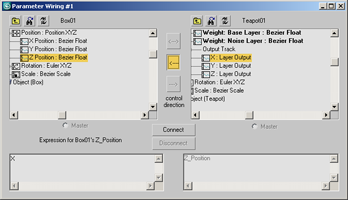
Click Connect and close the dialog. Drag the time slider and notice how the cube's position in Z matches the teapot's layered animation in X.
 Select the teapot and expand the layer list from the Animation Layers toolbar.
Click the plus-sign icon next to the Noise Layer.
This excludes the layer from the output track.

Drag the time slider again. The cube doesn't move erratically like the teapot.
Try including and excluding both layers in the list to see the results.
Example: To copy and paste a layer and update an active layer:
This procedure continues from the previous procedure and focuses solely on the teapot.
Make sure the teapot is selected and choose Base Layer from the animation layers list to make it active.
On the Animation Layers toolbar, click
 (Copy Anim Layer) to buffer this layer and the data it contains.
Click
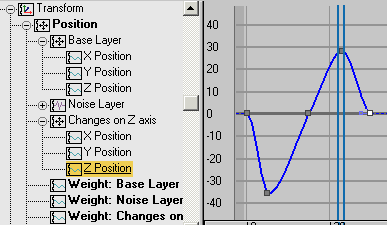
 (Paste New Layer). On the Rename Anim Layer dialog, enter “Changes on Z axis” as name and click OK.
This new layer becomes the active layer.
While
is on, move the teapot on the Z axis at frames 5 and 20.This animation update only affects the position tracks of the active layer.
Example: To collapse a layer:
This procedure continues from the previous procedure.
In the animation layers list, turn off Noise Layer. Then choose Changes on Z axis to make it active.
On the Animation Layers toolbar, click
 (Collapse Anim Layer).
This merges the layer onto the next available one (Base Layer), skipping Noise Layer, which is off.
Turn Noise Layer back on in the list.
Interface

Enable Anim Layers
Assigns a Layer controller to tracks you specify.
This opens the Enable Anim Layers dialog, which lets you turn on tracks to assign a Layer controller to.
The Position, Rotation, and Scale tracks are on by default. You can still animate attributes other than those enabled on this dialog, but they are not subject to control by the Layer controller.
If you enable animation layers for an object that has animation loaded in the Motion Mixer, the following dialog opens:
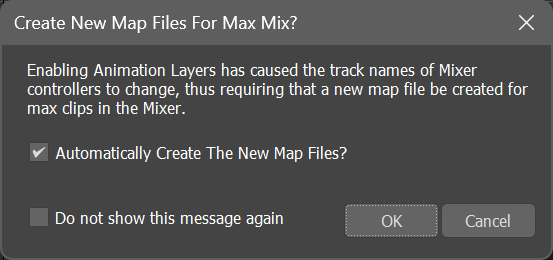
Remapping is necessary in this case because enabling Animation Layers causes the full controller names to change. For example, if a sphere's X position track before enabling Animation Layers is Sphere01\Transform\Position\X Position, then after enabling animation layers it might change to Sphere01\Transform\Position\Base Layer\X Position (the layer name is inserted into the controller name).
If you accept the default dialog option, to create the new map files automatically, 3ds Max automatically generates any necessary XMM files with the same names as the XAF files and places them in the same directory as the original map files, or if no map files exist, in the same directory as the XAF files. Thereafter, when you open this scene file the map file is loaded automatically and no additional mapping is required.
However, if you turn off Automatically Create The New Map Files? before clicking OK, no map files are generated, and the next time you open the scene file you're prompted to create map files. Without map files, the animation doesn't appear correctly.
 Select Active Layer Objects
Selects all objects in your scene that belong to the active layer.
[animation layer list]
Lists all existing layers for the selected object. Each layer in the list contains toggle icons to turn it on or off, as well as include or exclude it from the controller's output track. Set the active layer by choosing it from the list.
See Working with Animation Layers, preceding in this topic.
[weight]
Sets a global weight for the active layer, which affects If the active layer is shared by several objects (ex. Base Layer), changing its weight affects them all.
 Anim Layer Properties
Opens the Layer Properties dialog for the Layer controller, which provides global options for animation layers.
Add Anim Layer
Opens the Create New Animation Layer dialog, which lets you specify settings related to the new layer. This adds a new layer to every track that has a Layer controller.
 Delete Anim Layer
Removes the active layer, along with the data it contains. A confirmation dialog prompts you before deletion.
(Disable Anim Layer). Copy Anim Layer
Copies the active layer's data and enables Paste Active Anim Layer and Paste New Layer.
 Paste Active Anim Layer
Overwrites the active layer's controller type and animation keys with the copied data.
Paste New Layer
Creates a new layer with the copied layer's controller type and animation keys. Opens the Rename Anim Layer dialog, in which you can use the default layer name or enter your own.
Collapse Anim Layer
Collapses the active layer to the one below it, as long as it is not turned off. If it is, the collapsed layer cycles through the list until it finds an available layer.
Disable Anim Layer
Removes the Layer controller from the selected object. The animation keys on the Base Layer revert to the original controller. A dialog prompts for confirmation.