To Use the Modifier Stack
The modifier stack ("stack" for short) contains the accumulated history of an object, including its creation parameters and the modifiers applied to it. If a modifier or object has sub-objects, such as Vertex and Edge with editable poly objects, you can access these directly within the stack.
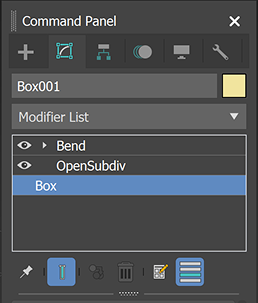
Upper part of Modify panel, with modifier stack (white outline)
Adjust a selected object's creation parameters:
Click the object's name in the stack.
Primitive objects have a Parameters rollout. Other types of objects, such as editable poly, have a variety of rollouts.
Use the rollout controls to adjust the object settings.
Remove a modifier from a selected object:
Do one of the following:
- Choose the modifier by clicking its name in the stack, and then click
 (Remove Modifier From The Stack). This button is one of the tools below the modifier stack.
 - Right-click the modifier's name in the stack and then choose Delete.
Disable the effect of a modifier on a selected object:
When you first apply a modifier to an object, the modifier is enabled by default. When a modifier is enabled, its light-bulb icon in the stack is white, as depicted in the preceding illustration.
Do one of the following:
Click the
 icon to the left of the modifier's name in the stack.
Clicking the icon toggles it between on and off.
Right-click the modifier in the stack display, and choose Off.
Alternatively, choose Off In Viewport or Off In Renderer to disable the modifier in one context but not the other.
Enable the effect of a modifier on a selected object:
Do one of the following:
Click the
 icon to the left of the modifier's name in the stack.
Clicking the icon toggles it between on and off.
Right-click the modifier in the stack display, and choose On.
Resize the modifier stack display vertically:
Position the mouse cursor over the shaded bar below the tool buttons beneath the stack list.
The cursor changes to an up-and-down resize arrow, as it does at the horizontal edges of a resizable window.
Drag the bar vertically to change the size of the stack display in the Modify panel.
Use the modifier buttons:
Click
 (Configure Modifier Sets), and choose Show Buttons.
This menu item is a toggle. It is either on or off. When you turn on Show Buttons, the current button set appears between the drop-down modifier list and the stack display.
Convert a selected modified object to an editable object:
Do one of the following:
Right-click the modifier stack, and choose Collapse All.
A dialog opens, warning you that the collapse operation cannot be undone, and gives you the option of performing a Hold before converting the object.
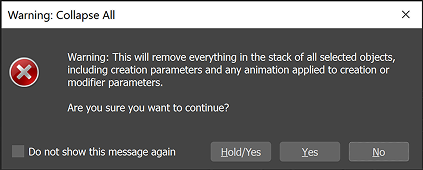 Note: The result of Collapse All depends on the contents of the stack. For example, if the object is a primitive modified by non-format-specific modifiers such as Bend and Twist, the result is an editable mesh. If the uppermost modifier is of a specific format, such as Poly Select, then the result is an object of the same type: in this case, editable poly. If the object is an editable poly and its modifiers don't change the format, the result is an editable poly.
Right-click the object in a viewport, and choose Convert To > Convert to Editable Poly or other editable format from the quad menu.
Tip: You can also convert a modified object to an editable patch or editable polygon surface. Use the quad menu to do this.
Adjust a modifier's component such as its gizmo or center point:
Expand the modifier's hierarchy by clicking the
 (plus-sign) icon.
Click the component to adjust, such as the Gizmo.
The component highlights to show it is active.
Adjust the component.
For example, you might use transforms to move a gizmo or a center point.
When done, you can hide the hierarchy display by clicking the
 minus-sign icon. The modifier itself is highlighted again.Tip: You can also view the entire hierarchy by right-clicking the stack and choosing Show All Subtrees, and view only objects and modifiers with Hide All Subtrees.
Access a sub-object level for a complex object:
Click the
(plus-sign) icon to display the object hierarchy.Click the sub-object level to adjust.
The sub-object level highlights to show it is active.
Adjust sub-objects.
When you add a new sub-object type, the modifier stack updates to show the new sub-object levels. For example, when you add a point curve sub-object to a NURBS surface, the Point and Curve sub-object levels appear in the stack.
To exit the sub-object level, click the name of the top-level object.
Tip: You can also view the entire hierarchy by right-clicking the stack and choosing Show All Subtrees, and view only objects and modifiers with Hide All Subtrees.