Track Bar
The track bar provides a timeline showing the frame numbers (or appropriate display units). It provides a quick alternative to Track View for moving, copying, and deleting keys, and changing key properties. Select an object to view its animation keys on the track bar. The track bar also displays keys for multiple selected objects.
- The track bar is located below the viewports, between the time slider and the status bar.
The track bar can be floated and docked, to customize your workspace.
The displayed keys use color coding, so you can easily determine what kind of key exists at that frame. Position, rotation and scale keys are red, green, and blue, respectively, and non-transformational keys such as modifier parameters are gray. You can customize the colors in the Customize User Interface dialog, and depends on the selected/unselected state of the key. The frame indicator is a similar bar displayed in blue.
A key on the track bar can represent any number of animated parameters for the selected objects. Transformations, modifiers, and animated material parameters can all have keys at a particular frame.
To display a list of all keyed values for a key on the track bar, right-click the key. Choose a key type from the right-click menu to display its key properties dialog. Delete keys and filter the track bar display using options on the right-click menu.
The track bar right-click menu contains a submenu that lists any procedural controllers (list controllers, expression, reactors, springs, noise, and so on) assigned to the current object selection. If you select one of the controllers from the submenu, the properties dialog for that controller displays in a modeless dialog.
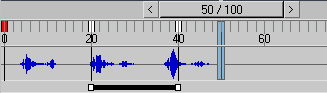
The track bar can display a waveform (. wav file) assigned to the Sound track in Track View. To display this feature, right-click the track bar and choose Configure > Show Sound Track (this command is also available on the Animation menu > Sound panel).
You can modify the active time segment by pressing Ctrl and Alt while dragging the track bar. Hold the left mouse button to slide the start of the range, the right mouse button to slide the end of the range, and the middle mouse button to change both the start and end frames together. A tooltip at the cursor and a status bar message will indicate the range you are setting.
While  is active, the time slider background is highlighted red, to indicate that 3ds Max is in automatic keyframing mode. See Using Auto Key Mode.
You can expand the track bar to show curves. Click  (Open Mini Curve Editor) at the left end of the track bar. The time slider and track bar are replaced with the controller and key windows and the Track View toolbars. You can resize the track bar window by dragging the border between the menu bar and the toolbars (do this in an empty toolbar area).
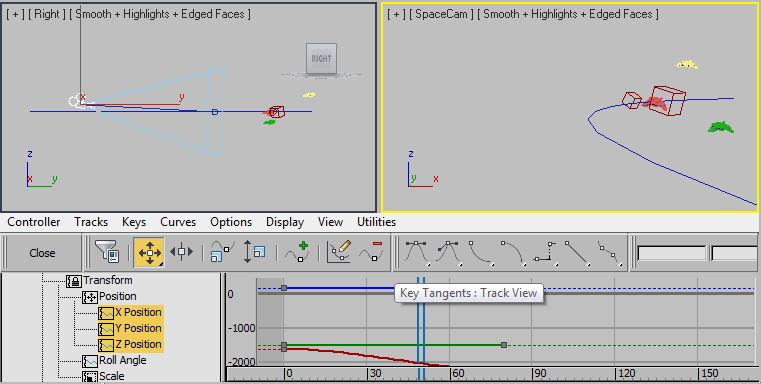
Track bar displaying curves
To close the Mini Curve Editor, click the Close button at the left side of the window.
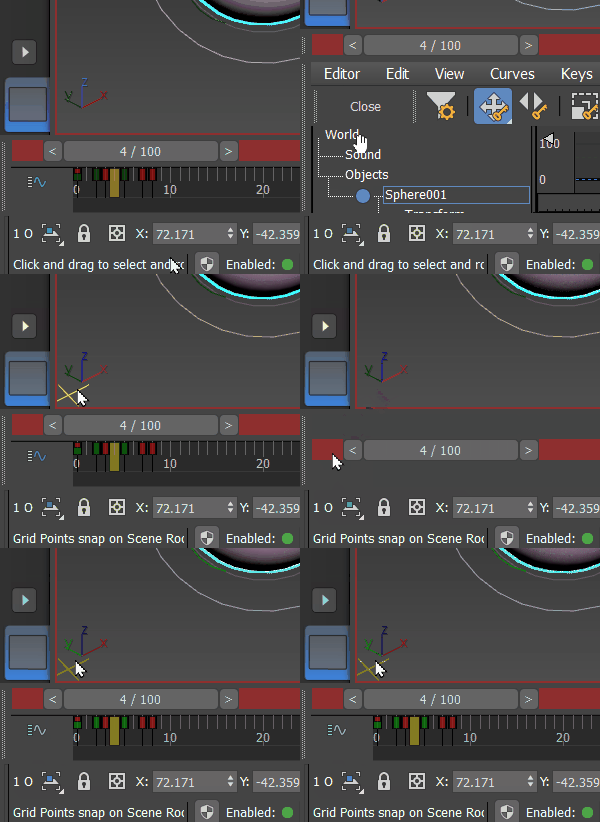
Opening and closing the Mini Curve Editor.
Procedures
To select keys on the track bar:
Click a key to select it.
Drag a window around a selection of keys to region-select multiple keys.
If the track bar right-click menu > Configure > Show Selection Range option is on, when you select multiple keys, the range of the selected keys is shown in the selection range bar at the bottom of the track bar. You can then scale the selected keys proportionally by dragging either end of the selection range bar, or move the keys by dragging the center of the bar.
To move or clone keys on the track bar:
While keys are moved or cloned, small lines on the track bar mark the original position of the keys. All keys at a particular frame are moved simultaneously using the following procedures.
Drag a key selection to move it in time.
Hold down
Shift, then drag a key to clone it.You can
Shift+drag to clone a selection of multiple keys.Right-click to abort a move or clone operation.
To move a single key from a frame with multiple keys:
If, for example, a frame has both a transform key and a material key for the selected object, and only the transform key must move, open the Transform Properties dialog and use the Time parameter to move the transform key.
Right-click a key on the track bar and choose a key on the pop-up window key list.
A Key Properties dialog opens.
Change the Time parameter in the Key Properties dialog.
The key slides along the track bar to a new location.
To delete keys on the track bar:
Make a key selection on the track bar and press
Delete.All selected keys are deleted.
Make a key selection on the track bar, right-click anywhere on the track bar to display the track bar menu, and then choose Delete Selected Keys on the pop-up window.
All selected keys are deleted.
To delete a single key type on a frame with multiple keys:
An object can have many keys for different animated parameters at a particular frame. Use this procedure to delete a key for a single parameter.
Right-click over a selected or unselected key on the track bar.
A pop-up window displays.
Move the mouse over Delete Key, then choose a key to delete in the submenu.
To change the length of the active time segment:
You can change the animation length using track bar.
Hold down
Ctrl+Altand drag on the track bar:- With the left mouse button to change the active time segment's start frame.
- With the middle mouse button to change the active time segment start and end frames simultaneously.
- With the right mouse button to change the active time segment end frame.
To hide or show the track bar:
Choose Customize > Show UI > Show Track Bar.
This menu item is a toggle: a check mark shows that the track bar is currently displayed.
To show curves on the track bar:
At the left-hand side of the track bar, click
(Open Mini Curve Editor).The track bar keys are replaced with a menu bar, toolbars and the controller and key windows.
Interface
Track Bar
Make an object selection in the viewports to display the object’s keys on the track bar.
Selected transformation keys are white; unselected keys are other colors.
Drag from an empty area of the track bar to region-select keys.
Drag a key to move it in time.
Hold down
Shiftand drag a key to clone it.Hold down
Ctrl+Altand drag the track bar to change the active time segment; that is, the animation range displayed on the track bar. The effect differs depending on the mouse button you drag with, as follows:- Drag with the left mouse button to change the active time segment's start frame.
- Drag with the middle mouse button to change the active time segment start and end frames simultaneously.
- Drag with the right mouse button to change the active time segment end frame.
Right-click to abort a move or clone operation.
During a move or clone operation, short, vertical, gray lines represent the original key locations.
The cursor changes to a cross when over unselected keys.
The cursor changes to a two-sided arrow over selected keys, signifying a move operation is possible.
Right-click anywhere on the track bar to display the track bar right-click menu. Right-click over a key to access its keyed values from the right-click menu, as well as other track bar-related commands.
Click
(Open Mini Curve Editor) to expand the track bar. When the track bar is expanded it displays the Track View menu, toolbars, controller and key windows. You can hide or unhide UI Elements such as scroll bars as well when this is expanded.
Track bar menu
Right-click a key on the track bar to display the track bar menu.
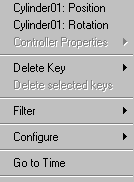
[list of keys]
Displays the object name and key type for all keys at the current position. Choose any of the keys in the list at the top of the track bar menu to display a key properties dialog. For more information on this dialog, see Key Info (Basic) and Key Info (Advanced).
- A key with a check next to the name indicates the key is shared with other instances in the list. Two selected objects might share the same Twist modifier, for example.
- The list displays keys for all selected objects. If there are more than 10 keys, then the list turns to a submenu under Key Properties in the track bar menu.
- If there is no key properties dialog for a key type, the key is unavailable.
Controller Properties
Displays a submenu that contains a list of all of the procedural controllers (list controllers, expression controllers, reactors, springs, noise, and so on) assigned to the object selection.
Delete Key
Displays a submenu similar to the key list at the top of the track bar menu. Choose a key type to delete an individual key, or choose All to delete all of the keys.
Keys do not need to be selected on the track bar in order to use Delete Key. Keys are deleted from the track bar key over which you right-clicked.
Delete selected keys
Deletes the keys selected on the track bar. If no keys are selected, this option is unavailable.
Filter
Displays a Filter submenu. Choose a filter to filter the track bar display; showing only transformation keys, for example.
Right-click anywhere on the track bar, place the cursor over Filter in the track bar menu to display the Filter submenu, then choose filter settings. The settings determine which keys appear on the track bar.
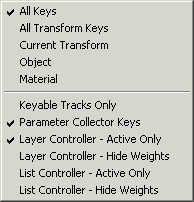
The upper section of the Filter submenu lets you choose one of the following:
- All Keys Displays all keys.
- All Transform Keys Displays only keys for position, rotation and scale.
- Current Transform Displays only keys that use the currently selected transform: position, rotation or scale.
- Object Displays object modifier keys. Excludes transformation and material keys.
- Material Displays material keys for the material assigned to the selected objects.
The lower section of the Filter submenu lets you toggle each of the following, for any combination of these filter options:
- Keyable Tracks Only Controls the display of keyable tracks on the track bar.
- Parameter Collector Keys Filters keys related to the Parameter Collector.
- Layer Controller - Active Only This filter lets you see only the keys of the active Layer controller. Otherwise, you see all the keys of all Layer controllers.
- Layer Controller - Hide Weights This filter hides the weight parameter keys of a Layer controller from the track bar.
- List Controller - Active Only This filter lets you see only the keys on the active control in a List Controller. Otherwise, you see all the keys on all the controls.
- List Controller - Hide Weights This filter hides the weight parameter keys of a List Controller from the track bar.
Configure
Displays a submenu that lets you change the track bar display and behavior.
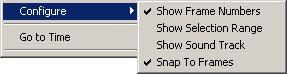
The Configure options are:
Show Frame Numbers Displays frame numbers in the track bar.
Show Selection Range Displays a selection range bar below the track bar, whenever multiple keys are selected.
You can scale all selected keys by dragging either end of the selection range. This lets you change the length of an animation segment while maintaining the relative distance between animation keys. You can also move the selected keys in time by dragging the selection range bar.
Show Sound Track Displays the waveform ( .wav file) that is assigned to the sound object in Track View.
Snap to Frames Keys snap to frame numbers when moved. If turned off, you can place keys between frames.
Go to Time
Moves the time slider to the cursor position.
Right-click anywhere on the track bar, and then click Go To Time.