InfoWorks ICM supports spatially varying rainfall by the use of rain gauge boundaries which define which region is covered by a particular rain gauge. Boundaries are imported or digitised onto the GeoPlan view and then associated with a Rainfall event. InfoWorks ICM can then apply the correct rain gauge to subcatchments, buildings and 2D mesh elements falling within the rain gauge boundaries.
Creating rain gauge boundaries using Thiessen Polygons
Rain gauge boundaries can be created automatically in InfoWorks ICM using the Thiessen Polygon method.
InfoWorks networks
- Create a new polygon to act as a bounding polygon within which the rain gauge boundaries are to be defined.
- Define rain gauge locations by:
- Selecting Rain gauge data
 Import from map data from the GeoPlan menu to import rain gauges from GIS.
- Creating new rain gauges using the New Object
 button and ensuring that the 'Rain gauge' option is selected in the New Object Type combo box on the GeoPlan Tools toolbar: Click on the location of the rain gauge in the GeoPlan view and type in a profile number for the rain gauge.
To 'move' a rain gauge; create a new rain gauge with the profile number of the rain gauge to be moved. The old point will be removed, and a new point will be created at the location clicked on in the GeoPlan view.
- Selecting Rain gauge data
- Select Rain gauge dataGenerate boundaries from the GeoPlan menu. Rain gauge boundaries will be generated using the Thiessen Polygon method.
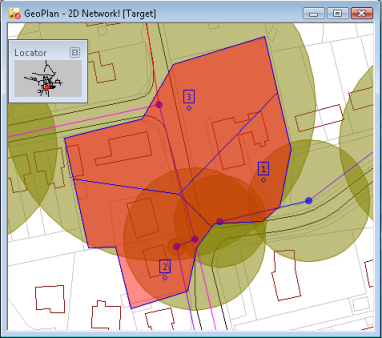
- Save the rain gauge boundaries by associating the boundaries with a Rainfall Event. See below for details.
SWMM networks
- Create a new polygon to act as a bounding polygon within which the rain gauge boundaries are to be defined.
- Define rain gauge locations by:
- Selecting Rain gage dataImport from map data from the GeoPlan menu to import rain gages from GIS.
- Creating new rain gages using the New Object
button and the New Object Type combo box on the GeoPlan
Tools toolbar to add rain gage types of
Point objects. In the
rain gage properties, ensure that the appropriate profile number is added to the Rainfall profile field and that the name of the rain gage is specified in the Rain gage ID field.
- Selecting Rain gage data
- Select Rain gage dataGenerate boundaries from the GeoPlan menu. Rain gauge boundaries will be generated using the Thiessen Polygon method.
- Save the rain gauge boundaries by associating the boundaries with a Rainfall Event. See below for details.
Importing boundary data from GIS
The process of importing rain gauge boundary data is the same regardless of the GIS component being used in the GeoPlan window. The file containing the data to import must included specific fields that are detailed below.
ArcGIS Desktop, ArcGIS Engine and ArcGIS Maps
Rain gauge boundary data can be imported from a theme or layer containing rain gauge boundaries appropriately coded so they can be associated with rainfall profiles in InfoWorks ICM. The layer for import must include a field named "PROFILE" of type, Number.
The profile numbers in the theme / layer must match the profile numbers in the rainfall events to which the boundaries are to be associated.
MapXtreme
Rain gauge boundary data can be imported from a MapInfo table containing rain gauge boundaries appropriately coded so they can be associated with rainfall profiles in InfoWorks ICM. The table for import must include a field of type Integer, that contains the profile numbers of the rainfall events to which the boundaries are to be associated.
To import rain gauge boundaries
- From the GeoPlan menu, select:
- Rain gauge dataImport from map data for
InfoWorks networks
- Rain gage dataImport from map data for
SWMM networks
This displays the Import Raingauge Boundary dialog.
- Rain gauge data
- Select the layer containing the rain gauge boundary data to be imported.
- The dropdown contains all the layers currently loaded that contain valid rain gauge boundary data.
- Click Change Layers to display the GIS Layer Control dialog to add the layer containing rain gauge boundary data if it is not currently loaded on the GeoPlan.
- Click OK on the Layer Control dialog to commit your changes.
- Check the Remove layer after import box to remove the layer from the GeoPlan after the polygons have been imported.
- Click Import.
The boundary data is now imported as a temporary boundary layer on the GeoPlan view. The next task is to assign these boundaries to one or more rainfall events. Details on how to continue can be found in Associating Rain Gauge Regions with a Rainfall Event.
Associating rain gauge regions with a rainfall event
To associate rain gauge boundaries with a Rainfall event
- From the GeoPlan menu, select:
- Rain gauge dataSave to rainfall event for
InfoWorks networks
- Rain gage dataSave to rainfall event for
SWMM networks
This displays the Common Tree Selection dialog.
- Rain gauge data
- Choose the rainfall event to which to save the boundary data and click Open.
InfoWorks ICM uses the rain gauge profile number to apply the boundary data to the rainfall event. If there is a profile in the rainfall event with a profile number that matches a rainfall boundary, the boundary information is added to the Gauge data field for the profile.
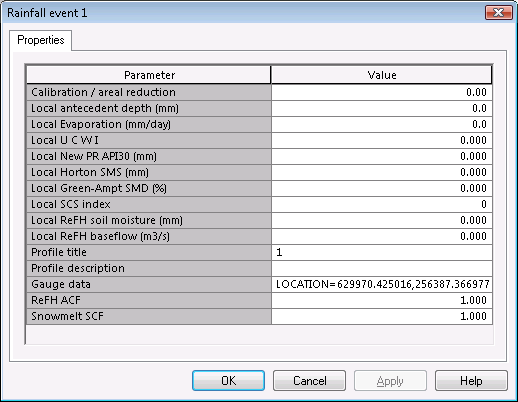
All profiles in the event must have boundary information before spatial rainfall can be used in simulations. Simulations will fail if there are profiles without boundary information.
Simulations will fail if subcatchment or building centroids fall outside of the defined rain gauge boundaries.
To check that rain gauge boundaries have been saved correctly
- Remove the existing temporary rain gauge layer by choosing from the GeoPlan menu:
- Rain gauge dataClear for
InfoWorks networks
- Rain gage dataClear for
SWMM networks
- Rain gauge data
- Drag and drop the rainfall event containing boundary data from the Explorer Window onto the GeoPlan view. The boundaries stored in the rainfall event are displayed. If the event has too few profiles, some of the original boundaries will be missing.
Copying rain gauge boundary information between rainfall events
Rain gauge boundary data associated with a Rainfall event can be loaded onto the GeoPlan window and then saved to a different rainfall event.
To copy rain gauge boundary information between rainfall events
- Open an InfoWorks or SWMM network in the GeoPlan view.
- Drag and drop the rainfall event containing boundary data from the Explorer Window onto the GeoPlan view. The boundaries stored in the rainfall event are displayed.
- Store the rain gauge boundaries in another rainfall event. Continue as described in the associating rain gauge data section.
As an alternative to stage 2 above:
- From the GeoPlan menu, select:
- Rain gauge dataLoad from rainfall event for
InfoWorks networks
- Rain gage dataLoad from rainfall event for
SWMM networks
- Rain gauge data
- Select a rainfall event that you have already associated with rain gauge regions and click Open. The boundaries stored in the rainfall event are displayed.
Clearing rain gauge boundaries from the network display
The temporary boundary layer that contains imported regions can be removed from the GeoPlan window by choosing, from the GeoPlan menu:
- Rain gauge dataLoad from rainfall event for
InfoWorks networks
- Rain gage dataLoad from rainfall event for
SWMM networks
When the GeoPlan view is closed the temporary layer will be removed automatically and will not be shown next time the network is opened.