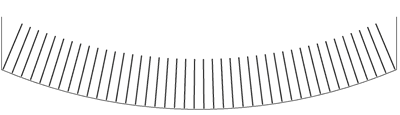
The process of placing a 3D path shape distribution is completed in two main steps: placing the main bar and selecting the distribution path.
- Place the Main Bar - place the bar as you would for shape-driven rebar. See
Place Rebar.
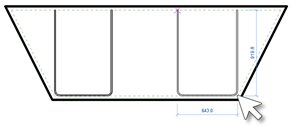
- Go to a section view through the concrete host.
- Select the rebar type, rebar set layout in the properties palette.
- Select a rebar shape either in the properties palette or in the rebar shape browser.
- Select the placement method By Two Points . For placement in section, you can use Current Work Plane as placement plane and Parallel to Work Plane as orientation.
- Click to place the rebar.
 Note:
Note:- At this step you can click Esc, select the placed bar and adjust its dimensions. You can copy bars already placed or place more bars, each with its own properties that are applied to the respective sets, even though only a single bar is visible at this step.
- You can use the other placement methods here as needed like, Expand to Host , with the same placement plane and orientation, or Sketch , to create a new shape or orient the shape to the concrete host.
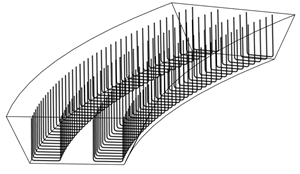
- Click Path in the Next panel to move to the next step. All sets created will share the distribution path defined in the following step.
- Select the Distribution Path.
- Select one or more continuous edges to define the desired distribution path.

- Click Finish to create the set.
- Select one or more continuous edges to define the desired distribution path.
You can follow the same steps to place the 3D Path Shape Distribution in simpler concrete hosts, like floors, without needing to create a section view.
-
Place the Main Bar - place the bar as you would for shape-driven rebar. See Place Rebar
- Go to a plan view through the concrete host.
- Select the rebar type, rebar set layout in the properties palette.
- Select a rebar shape either in the properties palette or in the rebar shape browser.
- Select the placement method By Two Points . For placement in plan view, you can use Near Cover as placement plane and Perpendicular to Work Plane as orientation.
- Click to place the rebar. During placement, press Space bar to rotate the shape within the bar plane.
- Click Path in the Next panel to move to the next step. All sets created will share the distribution path defined in the following step.
- Select the Distribution Path.
- Select one or more continuous edges to define the desired distribution path.
- Click Finish to create the set.
- Select one or more continuous edges to define the desired distribution path.
Note:
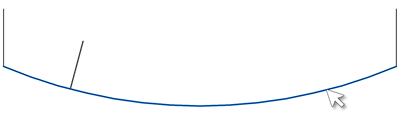
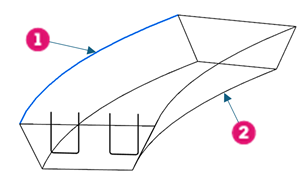
- When selecting, placing, or editing the set, the distribution path appears with the Distribution Path (1) line style. Edges of the concrete element are shown as needed, such as when you move to step 2 of edge selection for the distribution path, using the Concrete Edges (2) style. You can adjust these settings in Object Styles under Model Objects
 Structural Rebar or override them per view.
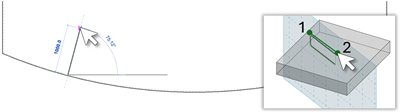
- In the first step of placement, the bar is rotated from the cross section to its position perpendicular to the distribution path. You can use the Bar Alignment property to make the bar parallel to a concrete face.