Select
>
 in the Rigging menu set to open the
Bind Skin Options window.
in the Rigging menu set to open the
Bind Skin Options window.
- Bind To
-
Specifies whether to bind to an entire skeleton or only to selected joints. Select from the following options:
- Joint Hierarchy
-
Specifies that the selected deformable objects will be bound to the entire skeleton, from the root joint on down through the skeleton’s hierarchy, even if you have selected some joint other than the root joint. Binding the entire joint hierarchy is the usual way to bind a character’s skin.
This is the default.
- Selected Joints
-
Specifies that the selected deformable objects will be bound to only the selected joints, not the entire skeleton.
- Object Hierarchy
-
Specifies that the selected deformable geometry is bound to the entire hierarchy of the selected joint or non-joint transform node, from the top node down through the entire node hierarchy. If there are any joints in the node hierarchy, they are also included in the bind. With this option, you can bind entire pieces of geometry to nodes like groups or locators.
Note: When using the Object Hierarchy option, you can only select joints or objects that cannot be skinned (for example, group nodes or locators—not pieces of geometry) as the initial influences in the bind.
- Bind Method
-
Specifies how joints influence nearby skin points during initial skinning. See also Bind methods for smooth skinning. Select from the following options:
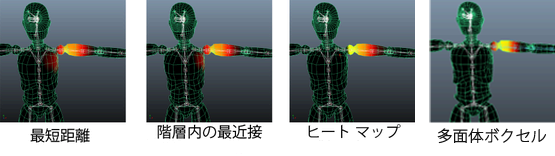
The following image uses the Paint Skin Weight tool to compare the effect of default weights assigned for a character's left arm joint with the four different bind methods. Bright yellow shows the areas where the effect of the bind is the strongest, and black shows areas that are uninfluenced. Both Closest Distance and Closest In Hierarchy have similar effects, and Heat Map and Geodesic Voxel show that their strength is more concentrated around the joint. To perform these comparisons, see Use the Paint Skin Weights tool to test skin binding.
- Closest Distance
-
Specifies that joint influence is based only on proximity to the skin points. When binding skin, Maya ignores the hierarchy of the skeleton.
In character setup, this method can cause inappropriate joint influences, such as a right thigh joint influencing nearby skin points on the left thigh.
- Closest In Hierarchy
-
Specifies that joint influence is based on the skeleton’s hierarchy. This is the default.
In character setup, this method can prevent inappropriate joint influences. For example, this method can prevent a right thigh joint from influencing nearby skin points on the left thigh.
- Heat Map
-
Uses a heat diffusion technique to distribute influence weights. Initial weights are set based on each influence object inside the mesh acting as a heat source, emitting weight values onto the surrounding mesh. Higher (hotter) weight values occur closest to the joint, and dissipate to lower (cooler) values as you move away from the object.
- Geodesic Voxel
-
Uses a voxel representation of the mesh to help calculate influence weights. See also Geodesic Voxel binding.
While legacy bind methods create artifacts, and Heat Map binding often fails on real-world meshes, the Geodesic Voxel bind method addresses these issues by using a voxelized representation of your character, computing the bind weights, and then applying the resulting weights to the existing closed-form skinning method, deforming the character's geometry.
- Skinning Method
-
Specify which skinning method you want to use for the selected deformable object. See also Smooth skinning methods for more information.
- Classic Linear
-
Sets the object to use classic linear skinning. Use this mode if you want basic smooth skin deformation effects, the same as in previous versions of Maya. This mode allows some volume shrinking and collapse deformation effects to occur.
When a mesh is set to linear skinning, it can lose volume in areas where it is influenced by a joint that is twisting on its axis.
- Dual Quaternion
-
Sets the object to use dual quaternion skinning. Use this method if you’re concerned with preserving volume in the mesh as it deforms around joints that twist.
When a mesh is set to use dual quaternion skinning, volume is preserved even as it is influenced by a joint twisting on its axis.
- Weight Blended
-
Sets the object to use a blend of classic linear and dual quaternion skinning, based on a per-vertex weight map that you paint. See Blend smooth skinning methods.
- Normalize Weights
-
This drop-down list lets you set how you want smooth skin weights normalized. These options can help you avoid letting the normalization process unintentionally set small weight values across many vertices.
Select from the following options:
- Interactive
-
When on, Maya normalizes skin weight values as you add or remove influences, and as you paint skin weights. (This is the default.)
As you work, Maya adds or removes weights from other influences in order to make the total weights on all influences add up to 1.0. You can view the exact weights used for deformation on the skinCluster node weightList attribute.
For example, if you change a weight from 1.0 to 0.5, Maya distributes the remaining 0.5 amongst neighboring influences. This mode replicates the normalization process in previous versions of Maya.
Use the Weight Distribution setting to determine how Maya creates new weights during normalization, if necessary.
- None
-
Turns off smooth skin weight normalization.
Important: Be aware that this option lets you create weights of greater than one or less than one, which can allow for odd or incorrect deformation as you exercise the character. - Post
-
When on, Maya calculates normalized skin weight values as you deform the mesh, preventing any odd or incorrect deformation. No normalized weight values are stored on the mesh, which lets you continue painting weights or adjusting interactive bind manipulators without having the normalization process change your previous skin weighting work.
Selecting this mode lets you paint or change weights without affecting the weights for other influences, and still have the skin normalization occur when you deform the mesh.
Note: Since Maya calculates the normalized weight values dynamically at deformation time, you cannot view the normalized values on the skinCluster node weightList attribute. Your mesh will deform with normalized values, but the actual weight values on your skinCluster node may add up to more or less than 1.If you use interactive skin binding, this mode is automatically selected for you. (See Interactive bind for smooth skinning.) As a result, for interactive binding, weights are not normalized until you deform the mesh.
For more information on skin weight normalization, see Smooth skin weight normalization and Set normalization mode and normalize weights.
- Weight Distribution
-
Available only when Normalize Weights mode is set to Interactive.
When you paint weights with Interactive normalization mode, Maya re-normalizes weight values after each stroke, scaling the available weights (those that already have some value and are not locked), so that the vertex weights still add up to 1.0. When possible, weights are scaled based on their existing value.
In situations where all other unlocked, available weights are zero, this setting lets you determine how Maya creates new weights during normalization.
Note: This setting also applies as you change weights in the Component Editor.Select from the following:
- Distance
-
Calculates new weights based on the distance of the vertex from the various influences to which it is skinned. Closer joints are given a higher weight. (This is the default).
- Neighbors
-
Calculates new weights based on the influences affecting the surrounding vertices. This prevents the vertex from getting weights to every joint in the skeleton, and gives it similar weights to the surrounding vertices. Only supported for polygon meshes.
- Initialize Skin Layers
-
Initializes the Skin Tools layer system on a Skin Cluster, enabling layer-based editing of skin weights.
This operation prepares the selected Skin Cluster for use with Skin Tools by creating the required layer structure.
- Allow Multiple Bind Poses
-
Lets you set whether you want to allow multiple bind poses per skeleton. This option can be useful if you are binding multiple pieces of geometry to the same skeleton.
When on, you can bind the separate pieces using different bind poses for each. When off, you must bind all pieces of geometry with the skeleton in the same bind pose.
- Max Influences
-
Specifies the number of joints that can influence each skin point on your smooth skin geometry. Default is 5, which produces good smooth skinning results for most characters. You can also limit the range of joint influence by specifying a Dropoff/Falloff Rate.
- Maintain Max Influences
-
When on, your smooth skinned geometry cannot have, at any time, a number of influences greater than that specified by Max Influences.
For example, if Max Influences is set to 3, and you paint or set weights for a fourth joint, one of the weights of the other three joints is set to 0 to maintain the total number of weighted influences specified by Max Influences.
This limits the redistribution of weights to a specific number of influences, and ensures that the primary joints are the ones that receive the weights.
Note: If you turn on Maintain Max Influences in the Attribute Editor, the skin weights are not modified until you reassign them by clicking Update Weights. - Remove Unused Influences
-
When on, weighted influences that would receive a zero weighting are not included in the bind. This option is useful when you want to reduce the number of calculations for your scene to increase playback speed.
Note: The Optimize Scene Size Options also let you remove any zero weighted influences from your character’s skin bind. You can turn on Unused Skin Influences in the Remove Unused section. - Colorize Skeleton
-
When on, bound skeletons and their skin vertices are colorized so that vertices appear the same color as the joints and bones that influence them.
Note: You can change the colors of individual joints and bones from the window. - Include hidden selections on creation
- Turn on to have the bind include geometry that is not visible, as by default, bind methods must have visible geometry to complete the bind process successfully. However, there are times when the geometry is not visible but you may still want the bind to succeed regardless of the mesh visibility state.
To avoid backwards compatibility issues, we added an explicit option that includes hidden geometry during the bind.
- Deformer Node
-
The Deformer Node menu lets you select the process used for the skin bind. Choose between Skin Cluster and Proximity Wrap.
- Skin Cluster
- Skin Cluster uses the "traditional skin binding" approach.
Note: If you add a second Skin Cluster on your geometry, a dialog box appears, asking you to confirm the use of multiple Skin Clusters.
- See Manage multiple Skin Clusters for more information.
- Proximity Wrap
- Proximity Wrap uses a deformer to perform the same skin binding using the Dropoff Rate Scale setting in the Proximity Wrap deformer options. Changing the Dropoff Rate Scale value lets you control the inverse distance weight from the driver.