You can create a material from the Material Browser dialog. The recommended method is to duplicate an existing, similar material and then edit the name and other attributes as required. For example, a machinery model could have many steel parts with a dull gray appearance. If one of the parts has a chrome-plated surface, you can create a suitable material by duplicating the steel material and then replacing the gray appearance with a chrome appearance, leaving the physical asset unchanged. If a similar material is not available, you can create a new material from scratch. However, this approach usually requires a bit more editing work, such as adding assets and changing properties.
To create a new material by duplication
- Select the source material in the Material Browser, and open it in the Material Editor panel, using one of the following methods:
- If the material is in the current project, select it in the project materials list.
- In the library materials list, select the material, and then on the right end of the material row, click Add - Edit
 . The material is also added to the project.
- In the Material Browser dialog, on the browser toolbar at the bottom, click the
 drop-down menu
  Duplicate Selected Material.
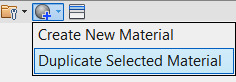
The new material is created with the same name as the source material, but with a digit appended. The new material opens in the Material Editor panel, and is added to the project materials list in the Material Browser.
- In the Material Editor panel, you can modify the name, information, assets, and properties of the new material as required. (See Editing Material Properties for more information.)
To create a new material from scratch
- In the Material Browser, on the browser toolbar, click .
The material, named Default New Material, is added to the project materials list in the Material Browser.
- In the Material Editor panel, just above the Assets list, enter a descriptive name for the new material, replacing the default name.
- Enter additional information, add assets if necessary, and edit properties to define the new material. (See Editing Material Properties for more information.)