Approval Workflows
Approval workflows are a key feature of Cost Management, designed to streamline the approval process for:
- Contracts
- Cost and budget payment applications (multiple workflows can be created based on conditions such as main contract)
- Expenses
- Change orders
- Internal budget transfers
By creating custom approval workflows, project administrators and members with full control permissions can streamline document routing for internal reviews, ensuring consistency and transparency across projects. For instance, a change order workflow can automatically route the document to the project manager, accounting department, and owner or supplier for approval. This automation offers several benefits:
- Reduces approval time and effort
- Prevents bottlenecks in the process
- Ensures that all necessary stakeholders are involved
- Enhances accountability and traceability
- Promotes standardised approval practices
In this article:
- Create Approval Workflows
- Edit and Modify Approval Workflows
- Review Process and Response Options
- Collaborators as Reviewers
- Restrictions During Review
Create Approval Workflows
Only project administrators can create and edit approval workflows. To create one:
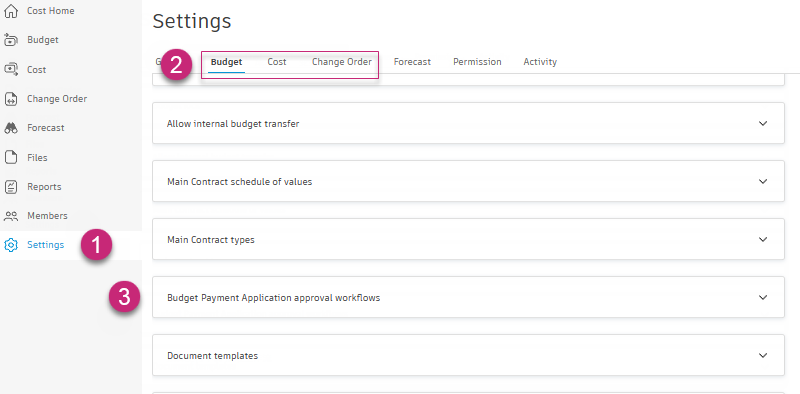
Select the Settings tool
 from the left navigation.
Select Module Selector


 , and then select the Services tab.
 Switch to the:
- Budget tab for budget payment applications and internal budget transfers.
- Cost tab for contracts, cost payment applications or expenses.
- Change Order tab for change orders (CORs, OCOs, SCOs, RFQs and PCOs used as RFQ or COR).
Click on the relevant drop-down menu depending on the type of approval workflow you want to create:
- Budget Payment Application Approval Workflows
- Internal Budget Transfers
- Contract Approval Workflows
- Cost Payment Application Approval Workflows
- Expense Approval Workflows
- COR approval workflows
- OCO Approval Workflows
- SCO Approval Workflows
- RFQ Approval Workflows
- PCO Supplier Quotation Approval Workflows (applied when a PCO is used as RFQ)
- PCO Change Request Approval Workflows (applied when a PCO is used as COR)
Click Create Approval Workflow.
Select the number of approval steps, and click Next.
Enter a name for the workflow.
Set conditions using drop-down menus to activate the workflow automatically. For example, activate when the approved value exceeds £10,000. Conditions vary by workflow type.
Tip: Use custom attribute types (text, number, drop-down, tick box) to route workflows. Learn more about custom attributes.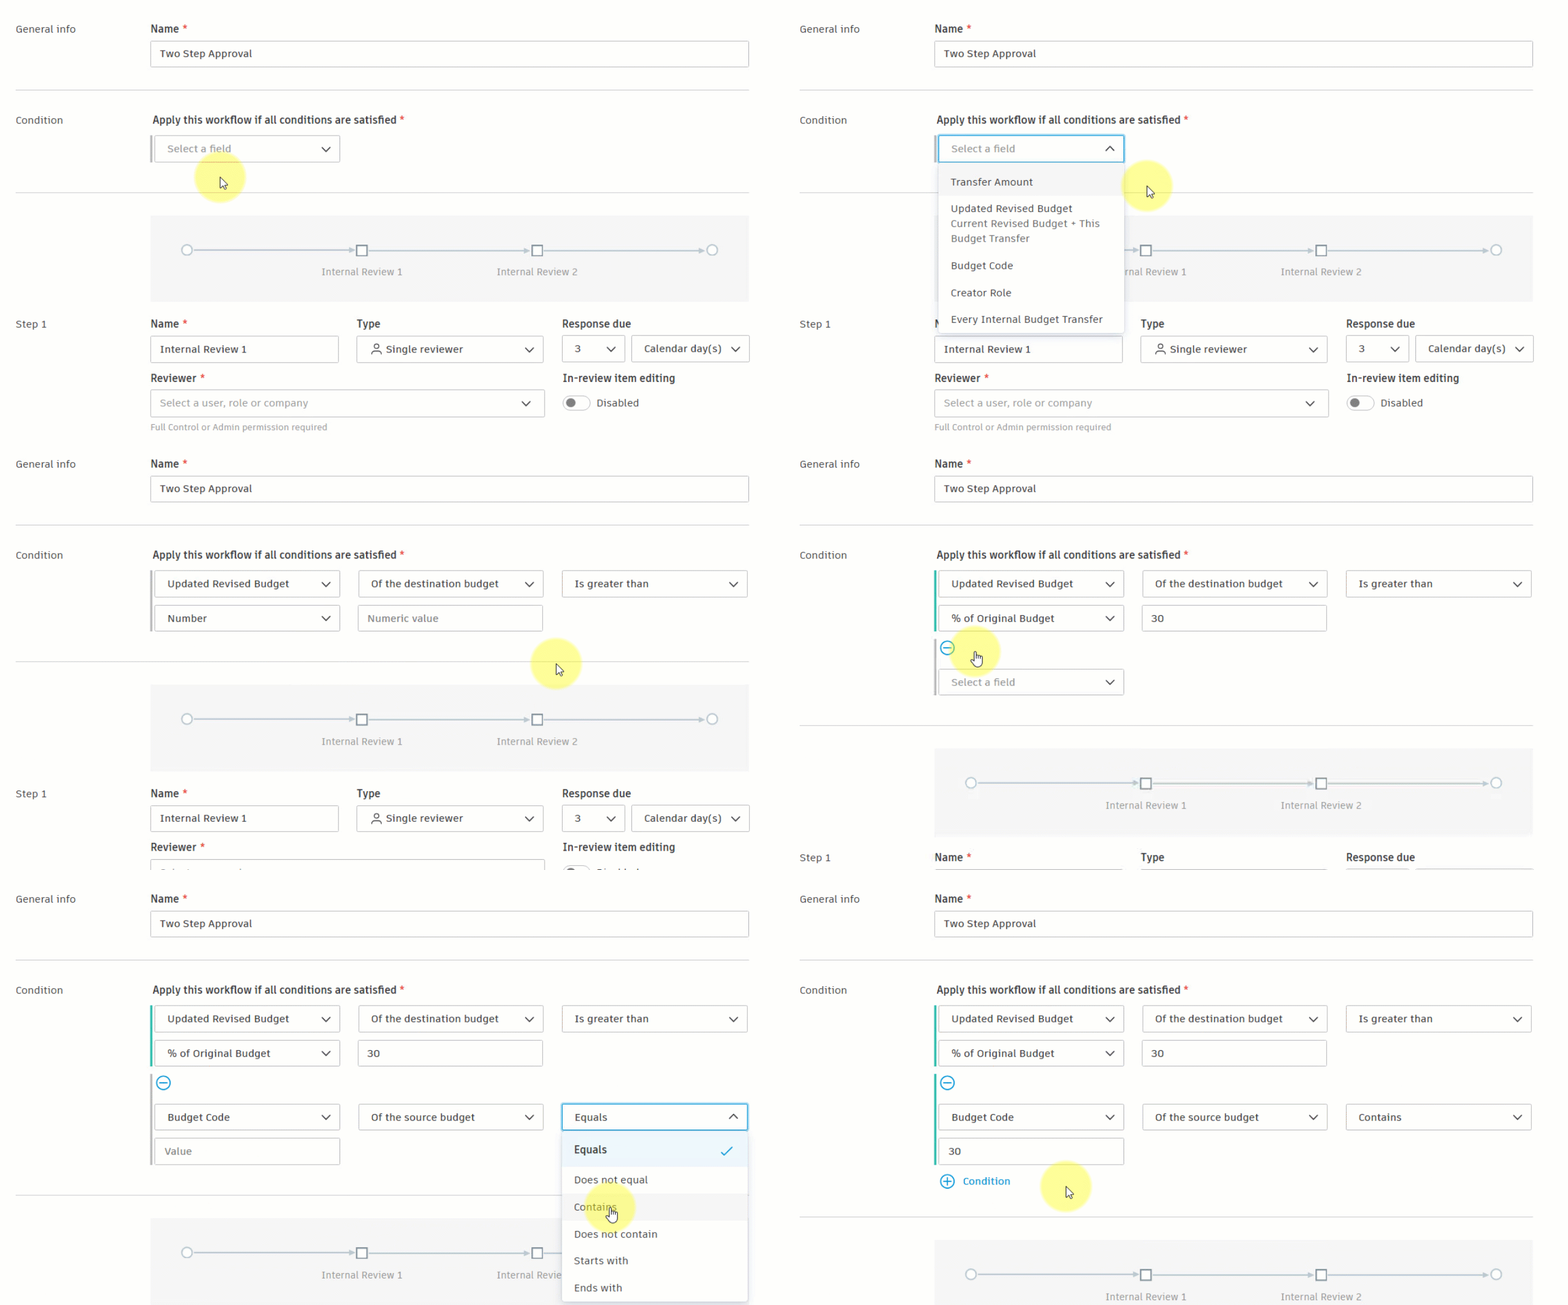
Assign reviewers for each step. For each step, you can:
Add a step name (for example, Review 1, Review 2, Review 3).
Set reviewer type (single or multiple). Specify whether all members must review or set a minimum number of reviewers.
Determine response due time.
Choose reviewers (member, role or company). The required permission level depends on the workflow type. See Permission Requirements for details.
Decide whether reviewers can edit items under review. Note that item editing requires Full Control or Admin permission even for workflows that allow Collaborate permission for reviewers.
Note: Workflow templates prefill the Reviewer Type field. For multi-step reviews, customise as needed.
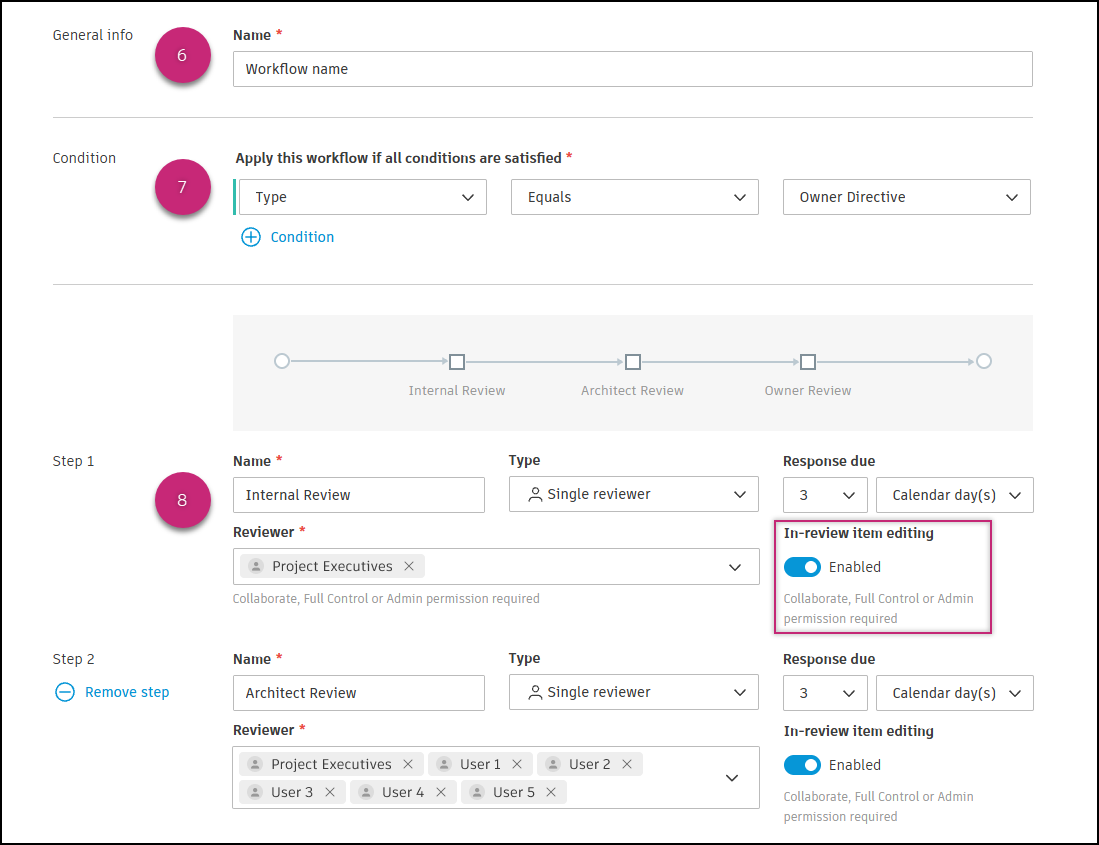
Add up to 12 steps per workflow. Click Remove step to delete one.
Configure the Action upon completion setting. This determines what happens when the final reviewer approves the item:
- Submitted (default): The item status changes to Submitted after all reviewers approve. This is useful when additional external approval (such as from the owner) is still required after internal review.
- Approved: The item status changes directly to Approved after all reviewers approve. This is useful when the workflow includes the final decision-maker as a reviewer.
Note: For OCO workflows, this setting affects the description shown to reviewers when they select a response. See Response Options for details.Note: For RFQ and PCO Supplier Quotation (PCO used as RFQ) workflows, Action upon completion is replaced by an Automatically generate SCO toggle. By default the toggle is off and the RFQ or PCO moves to Accepted when the final reviewer approves. When the toggle is on, the system also generates a draft SCO automatically and includes the SCO link in the workflow completion email sent to the Owner and GC contacts (in the Action upon Completion field of the email body). If the Simplified Supplier Change Order Process is on, the system generates the SCO directly in Sent status.Click Save.
Configure Main Contract Conditions for Budget Payment Workflows
For budget payment applications, you can create multiple approval workflows based on different conditions, such as the main contract being used. This allows you to have different approval processes for different main contracts within the same project.
Budget payment applications are evaluated by the workflow conditions in order from the top down. The first workflow with satisfied conditions is applied to the payment application. The Valid for column in the workflow list shows which main contract each workflow applies to.
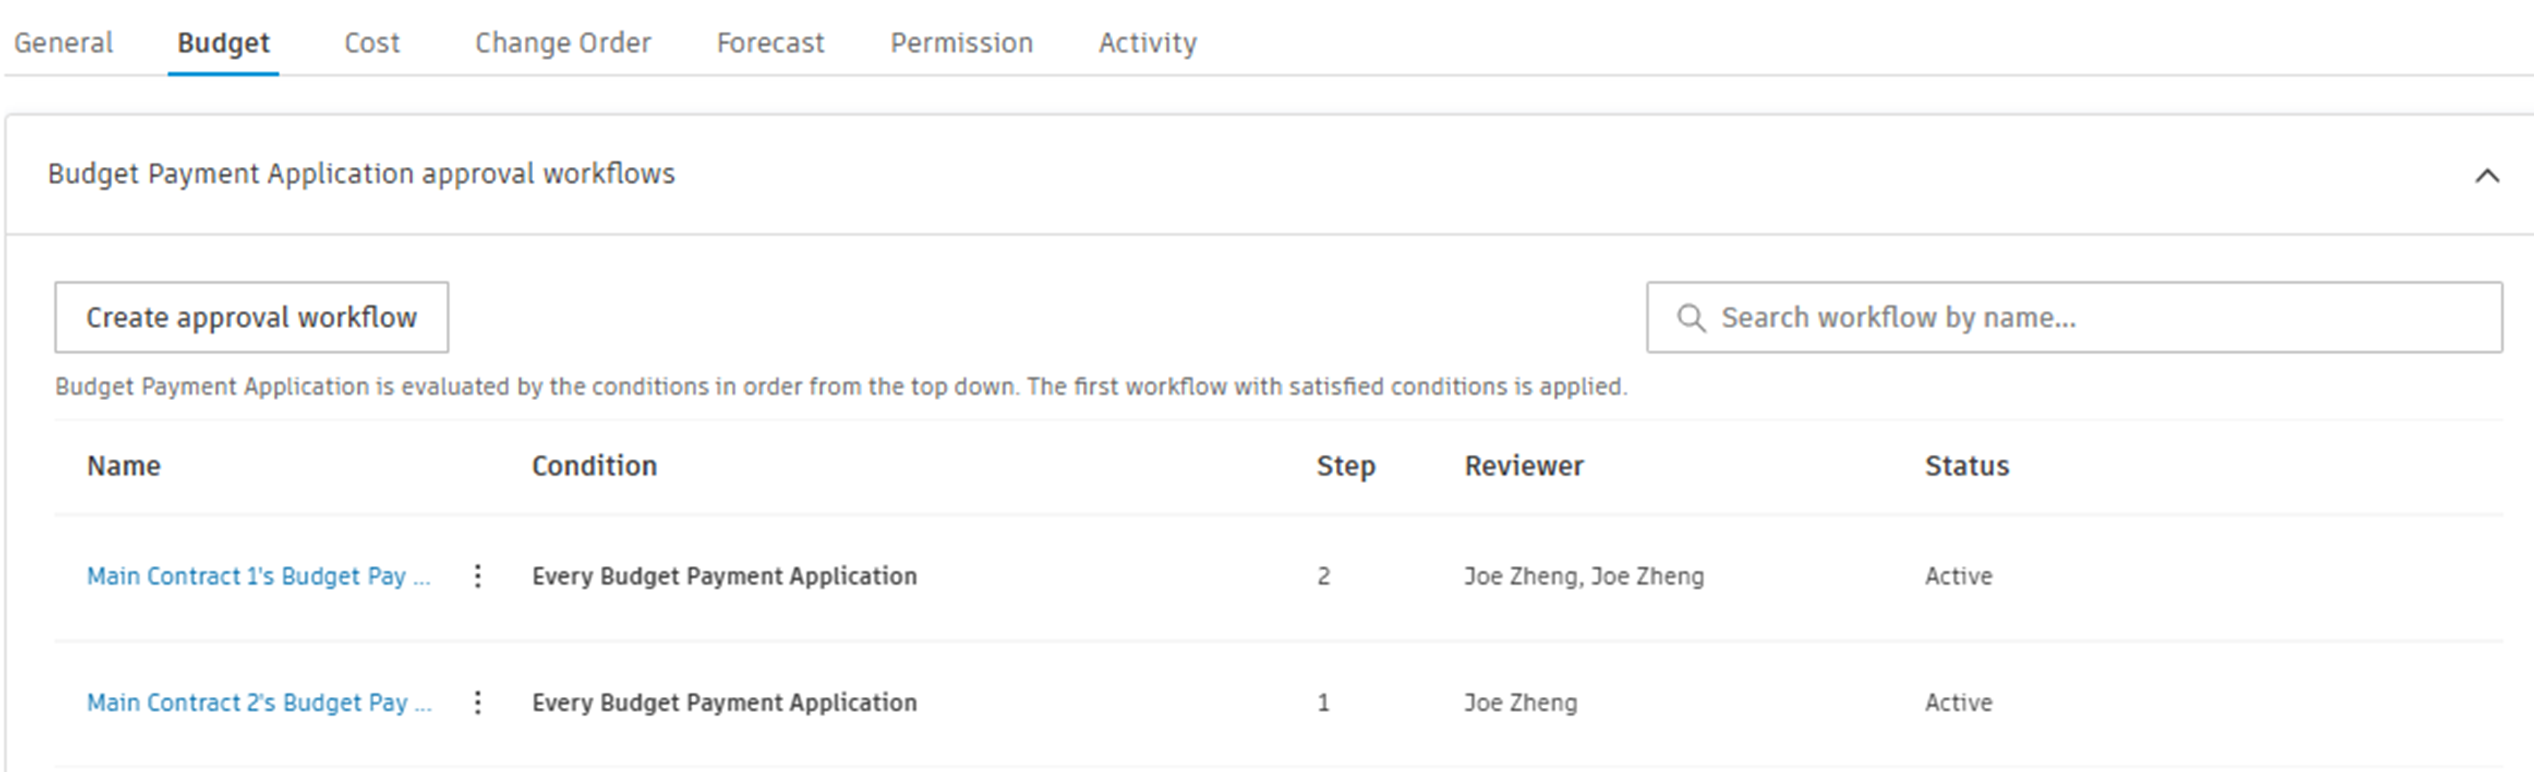
To configure a workflow based on main contract:
Follow the steps in Create Approval Workflows to begin creating a budget payment application workflow.
When setting conditions (step 7), select Main Contract Name from the first condition dropdown.
Select Equals from the operator dropdown.
Enter the main contract value in the Value field (for example, MC-01 or MC-02).
 Note: By default, the field value is "Default Main Contract". During project copying from a template or source project, this value is reset to "Default Main Contract" since main contracts do not exist on the destination project yet.
Complete the remaining workflow configuration steps and click Save.
The Valid for column will display the main contract code, making it easy to identify which workflow applies to which contract.
Using Multiple Configurations for OR Logic
A single workflow configuration only supports AND logic – not OR logic. This means you cannot create one configuration that triggers for multiple values, such as Contract Type = ‘Prime Contract’ OR ‘Subcontract’.
To achieve OR logic, create multiple workflow configurations that point to the same workflow. The system evaluates configurations sequentially by position, and the first matching configuration triggers its workflow.
When you submit an item (contract, expense, change order, etc.) for approval:
- The system evaluates all active workflow configurations in order by position (1, 2, 3, ...).
- The first configuration that matches triggers its associated workflow.
- Remaining configurations are not evaluated.
This sequential evaluation effectively creates OR logic between configurations.
Example: Multiple Contract Types
Business requirement: Trigger the ‘Executive Approval’ workflow when Contract Type equals ‘Prime Contract’ OR ‘Subcontract’ OR ‘Amendment’.
Solution: Create three separate workflow configurations:
| Configuration | Condition | Workflow | Position |
|---|---|---|---|
| Executive Approval – Prime Contract | Contract Type = ‘Prime Contract’ | Executive Approval (three steps) | 1 |
| Executive Approval – Subcontract | Contract Type = ‘Subcontract’ | Executive Approval (three steps) | 2 |
| Executive Approval – Amendment | Contract Type = ‘Amendment’ | Executive Approval (three steps) | 3 |
Result: When any contract is submitted, if its type is Prime Contract, Subcontract OR Amendment, the Executive Approval workflow is triggered.
Edit and Modify Approval Workflows
Project administrators can modify workflows by navigating to the relevant tab and approval section as described in steps 1–3 of the previous section. Then:
Expand the relevant workflow drop-down menu.
Select the More menu
 and choose:
- Configure: Edit the workflow. When you update the main contract condition for a budget payment workflow, the Valid for column will be updated accordingly.
- Duplicate: Copy and edit the workflow. Tip: Useful for creating similar workflows. Rename and adjust settings as needed.
- Deactivate: Prevent automatic activation when conditions are met.
- Move up/Move down: Change the workflow order. This is particularly important for budget payment application workflows since they are evaluated in order from top to bottom, and the first workflow with satisfied conditions is applied.
- Delete: Permanently remove the workflow.
Edit Reviewers Directly
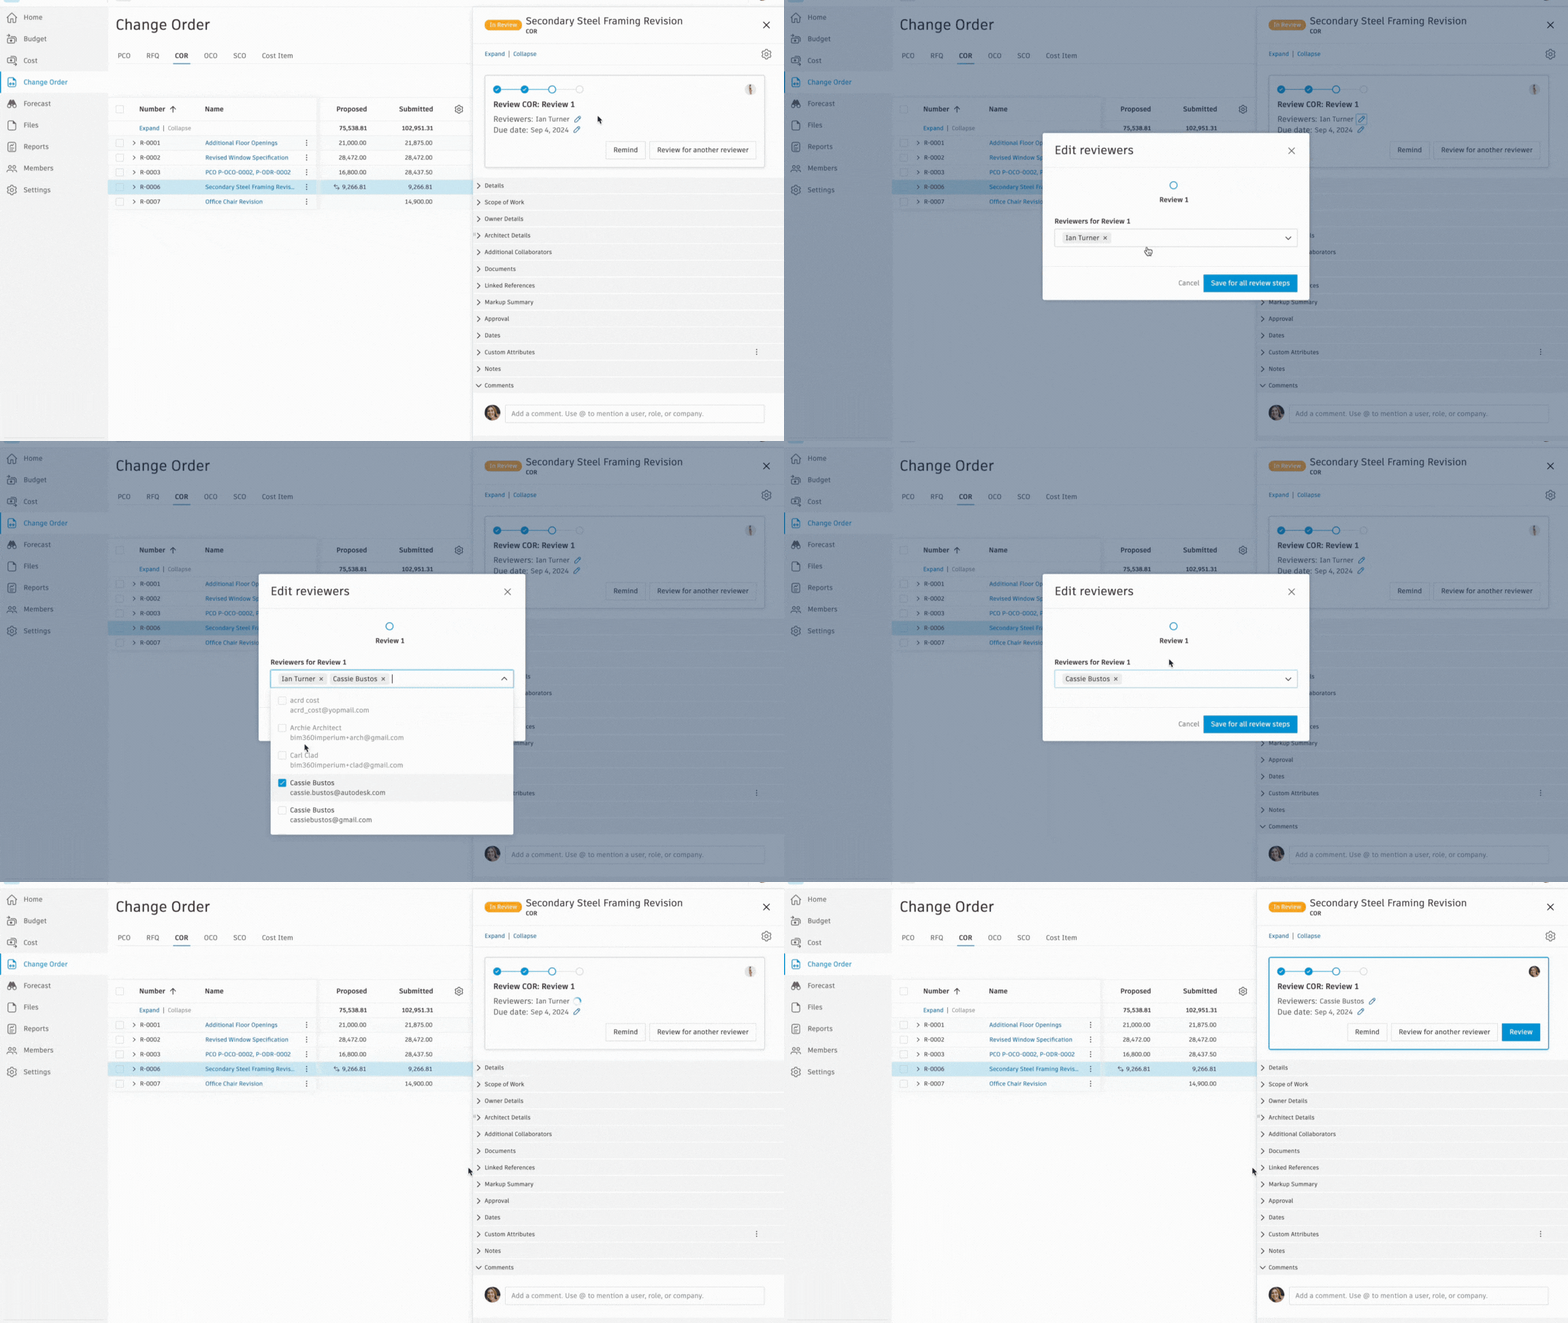
Project administrators can also edit reviewers directly in the workflow bar in the flyout:
- Navigate to the workflow bar.
- Locate the reviewer's name.
- Click the pencil icon
 next to the name.
 - In Edit Reviewers, select new reviewers.
Review Process and Response Options
When an item meets workflow conditions, a dialog box appears, detailing the workflow and allowing comments. You can view all reviewers across previous, current and upcoming steps. You can also send reminders to future reviewers before their review is due.
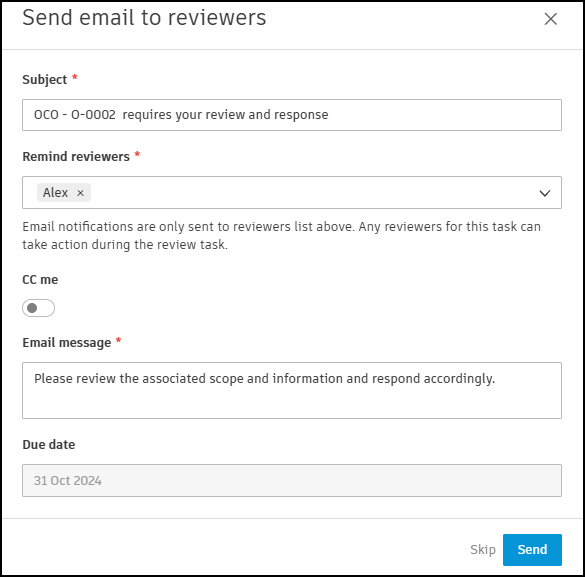
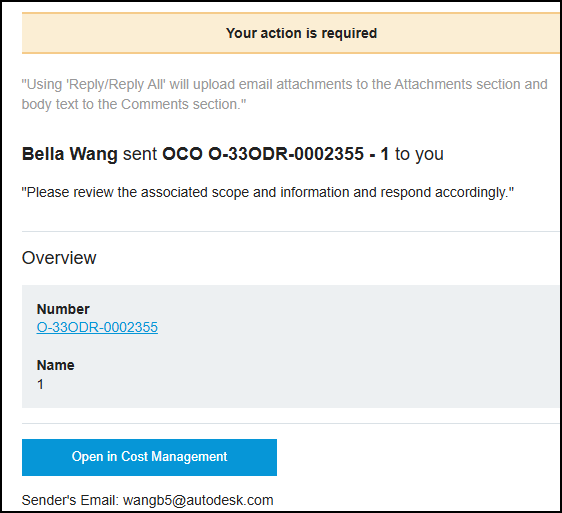
Reviewers are notified through email and respond from the workflow bar in Cost Management. For details on which workflow types also support replying directly to email notifications with attachments and comments, see Respond to Cost Management Emails.
Response Options
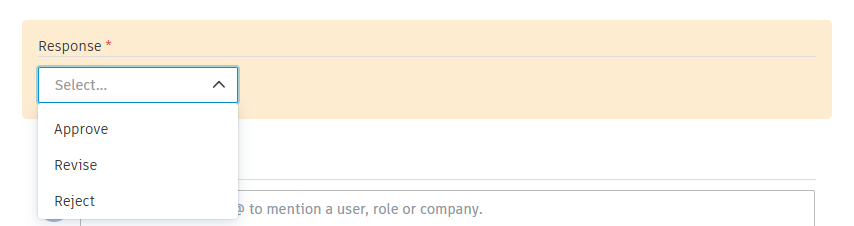
Reviewers can respond with Proceed, Revise or Reject. When a reviewer selects a response, a description is displayed to explain the outcome. The description varies based on the workflow type, the current step and the Action upon completion setting:
| Response | Condition | Description |
|---|---|---|
| Proceed | Last step AND Action upon completion = Submitted | Multiple reviewers: The item will be sent to the Owner once all required reviewers respond with 'Approve'. Single reviewer: The item will be submitted to the owner, architect and collaborators. |
| Proceed | Last step AND Action upon completion = Approved | Multiple reviewers: The item will be approved once all required reviewers respond with 'Approve'. Single reviewer: The item will be approved. |
| Proceed | Not the last step | The item will be submitted for the next review step. |
| Revise | N/A | The item will be sent back in the Revise and Resubmit status. |
| Reject | N/A | The item will be sent back in the Rejected status. |
Trigger Points for Change Order Workflows
The point at which a change order approval workflow is evaluated depends on the change order type. The table below shows what triggers each workflow, the status the item carries during review, and the status path once the final reviewer responds.
| Change order type | Trigger | Status during review | Status path on review completion |
|---|---|---|---|
| COR / OCO / SCO | A full control member clicks Submit or Set as Submitted. | In Review | Proceed: Submitted (or Approved, per Action upon completion). Revise: Revise and Resubmit. Reject: Rejected. |
| RFQ | A full control member clicks Set as Proposed, or a collaborator submits the supplier response. | In Review (cost items stay in Pricing or Revise and Resubmit) | Proceed: Pricing → In Review → Accepted (the Proposed status is skipped). If Automatically generate SCO is on, a draft SCO is generated when the RFQ moves to Accepted. Revise: Revise and Resubmit. Reject: Rejected. |
| PCO as RFQ | A full control member clicks Set as Proposed, or a collaborator clicks Edit and submit in the supplier response. | Cost status: In Review (cost items stay in Pricing or Revise and Resubmit) | Proceed: cost status Pricing → In Review → Accepted (the Proposed status is skipped). If Automatically generate SCO is on, a draft SCO is generated when the PCO moves to Accepted. Revise: Revise and Resubmit. Reject: Rejected. |
| PCO as COR | A full control member clicks Submit or Set as Submitted for the change request. | Budget status: In Review | Proceed: the system opens the Send email to Owner, architect and collaborators dialog. After the user clicks Send or Skip, budget status moves to Submitted (or Approved, per Action upon completion). Revise: Revise and Resubmit. Reject: Rejected. |
Cross-Workflow Concurrency Rules
Some change order workflows interact with related items. The following rules apply while a review is in progress:
- RFQ and SCO mutual block: While either side is in approval review, the other can't be submitted or moved forward. The system shows the error Couldn't proceed because the RFQ is linked to a SCO which is in review. Complete the review before proceeding. with a View SCO link to inspect the in-review SCO.
- Generate SCO hidden during review: When an RFQ or a PCO used as RFQ is in approval review, the Generate SCO option is hidden in the More menu until the review completes.
- Simplified Supplier Change Order Process bypass: When the Simplified Supplier Change Order Process is on, OCOs and SCOs created through the simplified flow bypass approval workflows entirely, even if approval workflows are configured for those types. Approval workflow settings remain visible but aren't applied to items generated through the simplified flow.
Collaborators as Reviewers
For OCO and Budget Payment Application workflows, you can add external collaborators as reviewers. This enables a multi-party approval process where architects, consultants and other upstream stakeholders can review items before they are submitted to the owner.
To add external collaborators as reviewers:
Ensure the external company has been granted Collaborate permission for the relevant module (OCO or Budget Payment Application).
When configuring the workflow, select the external company or specific members from that company as reviewers.
External reviewers will receive email notifications and can respond with Proceed, Revise or Reject (OCO only).
Permission Requirements
The following table shows the permission requirements for each workflow type:
| Approval Workflow | Collaborators as Reviewers | Required Permission |
|---|---|---|
| OCO | Yes | Collaborate, Full Control or Admin |
| Budget Payment Application | Yes | Collaborate, Full Control or Admin |
| SCO | No | Full Control or Admin |
| Contract | No | Full Control or Admin |
| Cost Payment Application | No | Full Control or Admin |
| Expense | No | Full Control or Admin |
Learn more about Cost Management Permissions.
Document Access During Review
Reviewers with Collaborate, Full Control or Admin permission can:
- View the item details and documents during review
- Add documents to the Attachments section (always enabled)
- Add documents to the Document Package section (enabled only if Item editing is enabled AND the reviewer has Full Control or Admin permission)
- Delete documents they have added
When approved, the final reviewer submits the item for external approval and signature. The workflow bar in the details flyout panel displays the item's status, ball-in-court and due date. Activity is logged in the item's activity log.
Restrictions During Review
The following restrictions apply when items are In Review:
| Item Type | Restrictions |
|---|---|
| Expense Items | Subitems cannot be added or deleted. Expense items cannot be deleted. Attachments can still be uploaded. Photo references can be edited. |
| Payment Applications | All fields are locked. Reviewers can review payment applications by individual line items. The parent line item is accepted only when all subitems are reviewed and accepted. |
| Change Orders (COR / OCO / SCO) | The parent change order is locked while in review. Reviewers with Full Control or Admin permission can edit allowed fields only when Item editing is enabled for their workflow step. |
| RFQs and PCOs used as RFQ | The parent item is locked. Cost items inside stay in Pricing or Revise and Resubmit during review. Generate SCO is hidden in the More menu until the review completes. If the linked SCO is in review, the RFQ or PCO used as RFQ can't trigger its workflow. |
| PCOs used as COR | The PCO is locked at the change order level during review. Exception: on the PCO-as-COR review page, if Item editing is enabled for the step and the PCO has no cost items, the PCO-level value can be edited. |