Creating Grading Limits
Learn to create grading limit geometry and assign its properties in a drawing.
Learning Objectives
- Recognise the importance of the boundary of the grading limit as the points along it will be fixed.
- Define the minimum drain slope to zero and understand why.
Define the Grading Limit Polygon
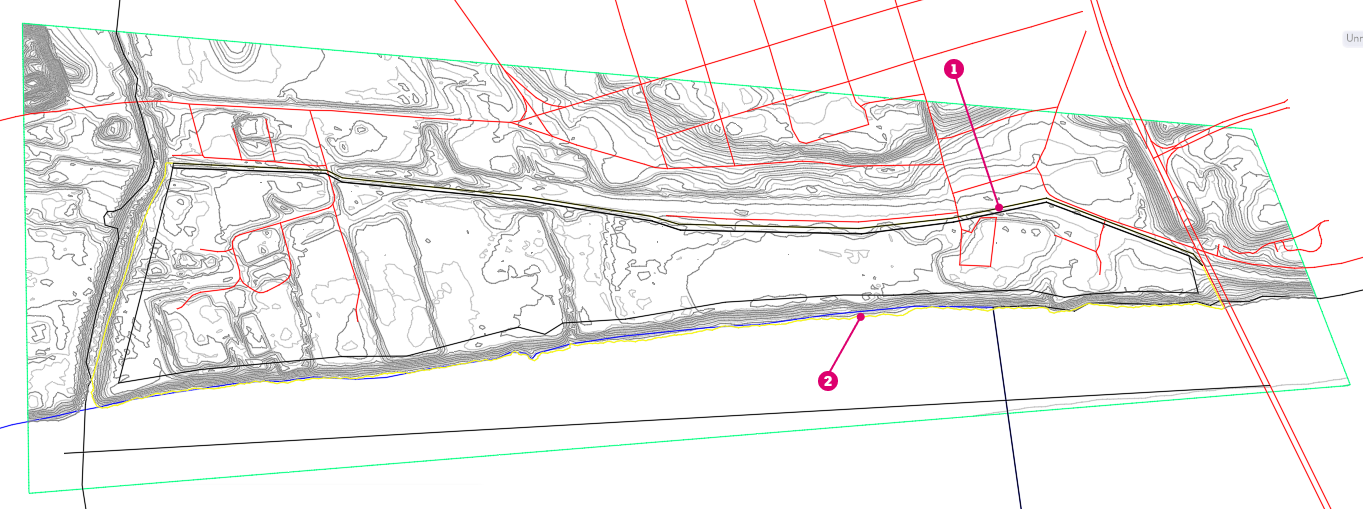
Open GO-Riverbank_1.dwg in Civil 3D Imperial and examine the surface.

 Property Line
 Riverbank
For most grading projects, there is a need to create a polygon that defines a Grading Limit.
The points on the boundary of a Grading Limit are fixed to the existing ground elevation.
The location and the elevation profile along the grading limit polygon are crucial for a successful grading optimisation. Because a regularly sloped benching from the riverbank up to the graded area is preferred, the grading limit must be exactly adjacent to the high water line of the river.

Create the polygon using Civil 3D sketching techniques from references in the drawing:
 The GIS line for the high water level of the river. The line is split at the south and north ends of the property.
 The GIS line representing the highway boundary for the existing road. The line is split at the south and north ends of the property.
 Two hand-drawn lines connecting the river line to the carriageway boundary. These lines must not cross the existing contours at a slope that will be steeper than the maximum allowed slope. Note that the second line to the right is not visible in the cropped image above.
The resulting boundaries create the yellow polygon in the drawing.
Assign a Grading Limit
Now that a boundary has been established, you can now assign the grading limit.
If not already visible, open the Grading Object Tools Palette. To do this, click Analyse tab > Grading Optimization panel >
 Grading Object Tools.
In the Grading Object Tools Palette, select
 Grading Limit.
In the drawing area, select the yellow polygon you created.
Press Enter.
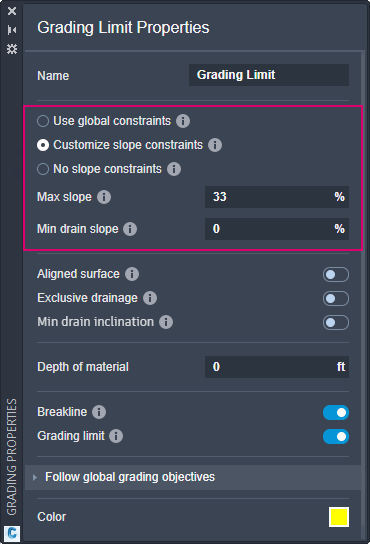
The polygon is assigned the property sets for a zone and the Grading Limit Properties panel opens. Review the current properties specified and note that Grading Limit property is enabled.
Change the name of the Grading Limit zone to 'Grading Limit'.
Adjust the Slope Settings
- In the Grading Limit Properties panel, select Customise slope constraints.
- Specify the Max slope to 33% (3:1).
- Specify the Min drain slope to 0%.

The minimum drain slope is a directional slope. This means that the minimum slope is required to direct towards the closest drain element, such as a drain line or a low point.
In a later tutorial, you will place a drain line that will make surface triangles within the grading limit incline towards the river. You will also discover you do not want all of the surface triangles to do this.