Batch Create Clash Issues
You can select multiple clashes or clash groups, and create multiple issues from them at once; one issue per clash or clash group.
Use the Models, Views or Clashes tool to open the required models or views in the viewer.
In the viewer, open the Clashes tab
 and either:
- Select a saved clash check from the drop-down list at the top of the panel.
- If you have more than two models open, use the Selection A and Selection B drop-down lists to select the content you want to see clashes between.
Based on your selection, relevant clashes and clash groups are shown.
Select the clash groups or clashes of interest.
Note: You can create a maximum of 50 issues per batch creation process.Click the arrow on the Create issue button at the bottom of the Clashes panel, and click Create issues (n), where n corresponds to the number of issues that will be created.
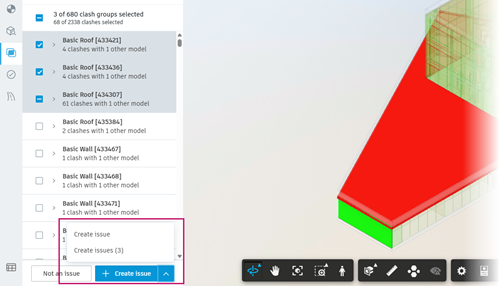 Note:
Note:You can't create issues if more than 200 models are open in the viewer. Once you start creating issues, the other tabs in the left-hand panel of the viewer are not available, and you can't add or remove clashes from the selection.
Use the Create (n) issues panel to add details that will be common to all of the issues created:
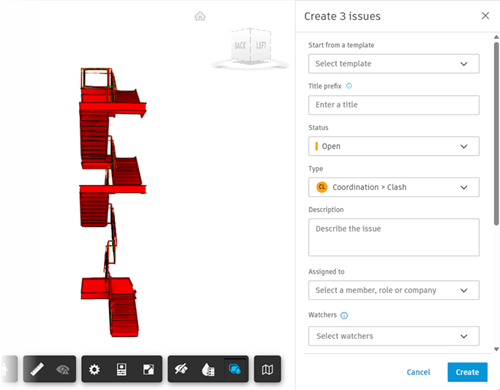
Optionally, use the Start from a template drop-down list to use an issue template.
Templates have an associated issue type and can contain prepopulated information to make creating issues faster. Templates are created in the Templates settings in Forma Data Management.
Note: Batch issues created using templates automatically have a status of Open at a minimum; the Draft status is not available. The fields available in the panel and the status of the created issues will vary depending on how the selected Template has been configured by your project administrator in Forma Data Management. See Edit Issue Details below for more details.Optionally, add a prefix that will be displayed in front of the issue titles.
Tip: Issue titles are generated automatically based on the clashes selected. Adding a prefix can be useful to help identify issues created as part of a batch process.Fill in the other issue detail fields as required. See the Add Issue Details help for more information.
Click Create to create the issues. This may take a few minutes, and the viewer may flicker as the thumbnails are generated for each issue.
When the issues have been created, the corresponding issue pins are shown in the viewer in isolation. You can select each issue pin to make changes to each issue as needed.
Tip: Once you navigate away from the Clashes tab, for example to the Issues tab, the viewer is reset and all issue pins will be shown again.Note: When batch creating issues, the issue pins are automatically placed on the primary model at the point of intersection with the clashing model.For clash and design issues, you can move issue pins to a new position, which can include to a different object or model. The moveable issue pins feature is currently a public Beta release. To provide feedback on this feature, fill in the form here.
Batch Issue Limitations
There may be a mismatch between the number of clashes you have selected, shown at the top of the Clashes panel, and the number of issues being created, shown in the Create issue button flyout.
Only 50 issues can currently be created in a batch.