Manage Account Members
The Member Directory is a master list of all members, including account and project administrators and executives, across all projects in an account. As account administrator, you can add, edit, and delete members, search for and filter the member list, enable or disable members, and export member reports.
A video demonstrating how to manage account members is shown below:
Add Account Members
Add individual members to the Member Directory or bulk-import multiple members using a spreadsheet. As a best practice, we recommend account administrators add their employees to the member directory first. Then, project administrators can use the search feature to more easily invite them to any project without creating duplicate entries. While this practice is recommended, it is important to note that project administrators can add new members directly to a project, even if they have not yet been added to the account member directory. As soon as these new members are added to the project, they are added to the account member directory as well.
Add individual members to the directory
In the Account Admin module, click the Members tab.
Click Add
 Add people to the member directory.
Enter the person's email address, press the Enter key, and click Add.
Tip: If necessary, you can add multiple members at once before clicking Add.Select the member's company and role from the lists and click Save.
You can change the default company and role later, if necessary.
Add multiple members to the directory
- In Account Admin, click the Members tab.
- Click Add
 Import members by spreadsheet.
 - Do one of the following:
- For a first-time import, download the member list template and open it with Excel. In the template, replace the example entries with your actual member details, one member per row, and save the file. Then click Choose File to select the spreadsheet.
- If you have a properly formatted member list spreadsheet, click Choose File and select the spreadsheet.
- Click Start Import.
Manage Member Status
Search for members or filter the member list. You can then edit a member's profile or delete that person from the account. You can also enable or disable members with pending project invitations to manage your user limits.
Member status attributes
A member's status can be one of the following:
| Member Status | Cause | Member Access | Counts Against User Limits? |
| Active | Active members have been invited to a project, given access to a service, and have activated their BIM 360 account. | Active members can access the account or project services they have been invited to. | Yes |
| Pending | Pending members have been invited to a project, given access to a service, but have not activated their BIM 360 account. | Pending members cannot access the project services until they respond to the invitation and activate their account. | Yes |
| Inactive | 1) Not Invited: A member has been invited to the account, but has not been invited to any projects within the account. 2) Disabled: An account administrator changed the member status to inactive by editing the member details. |
Inactive members don't have access to project services but can still be found in the Member Directory. | No |
Search for members
- In Account Admin, click the Members tab.
- In the Search by drop-down menu, select Email/Name, Project, or Default Company.
- Enter your search terms in the field.
Filter the member list
In Account Admin, click the Members tab.
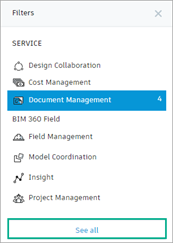
Select a filter from the Filters panel on the right to update the member list.
The following filters are available:
- Status: Select Active, Pending, or Inactive members.
- Access Level: Select Account Admin, Project Admin, or Other Member.
- Service: Select a service such as Field Management.
Tip: These filters work cumulatively; the member list can be filtered by any combination of the selected filters at once.To remove all applied filters, click See all.

Export an account member report
The account member report lists account-level information, including the last time the member logged into BIM 360 Document Management.
The report is exported as a CSV file that can be opened in Excel for further analysis. For example, use PivotTable analysis to quickly summarize the data.
- In Account Admin, click the Members tab.
- Click More Actions
 Export All Members.
The CSV file is downloaded to the default location specified by your browser download settings.
Edit or delete a member profile
In Account Admin, click the Members tab.
Select a member from the list.
To edit a member profile:
Click Edit.
Make your changes.
You can edit the member's role, access level, and company details.
Click Save.
To delete a member from the account, click Delete Member.
Manage pending members
Members with a Pending status are those who have been invited to a project and given access to a service but have not yet activated their BIM 360 account. Pending members count against your user limit. You can remind pending members by resending account invitations or you can disable pending members to free up additional users.
In Account Admin, click the Members tab.
Click the Pending filter in the Filters panel on the right to view all members whose status is Pending.
Select the checkbox for one or more pending members.
Click More Actions.
To remind members to activate their account, click Resend Invitation.
To disable a member, change the member status to Inactive.
Inactive members no longer count toward your user limits. Click the Analytics tab to see your updated user limits.
If you disabled a member and later realize that person needs access:
- In Account Admin, click the Members tab.
- Click the Inactive filter to view all members whose status is Inactive.
- Select the checkbox for an inactive member.
- Click More Actions
 Enable Member.