Potential Change Orders
The PCO (Potential Change Order) tab in Cost Management contains all potential cost and budget changes. It's the starting point of any change order. From a PCO, you can generate other change orders. If the PCO originated from an RFI you can go to the RFI in Project Management and add a reference to the PCO or create it from there. For more information see Submit RFIs to Reviewers.
In this article, you'll learn how to:
- Potential Change Order Tab Overview
- Create a Potential Change Order
- Apply a Financial Markup to a PCO
- Change Scope on Cost Item Level in Change Orders
- Generate Change Orders from a PCO
- Generate a Contract from a PCO
- Populate Pending Change Orders without an Open Subcontractor Change Order
- Export a PCO Report
- Related Articles
Potential Change Order Tab Overview
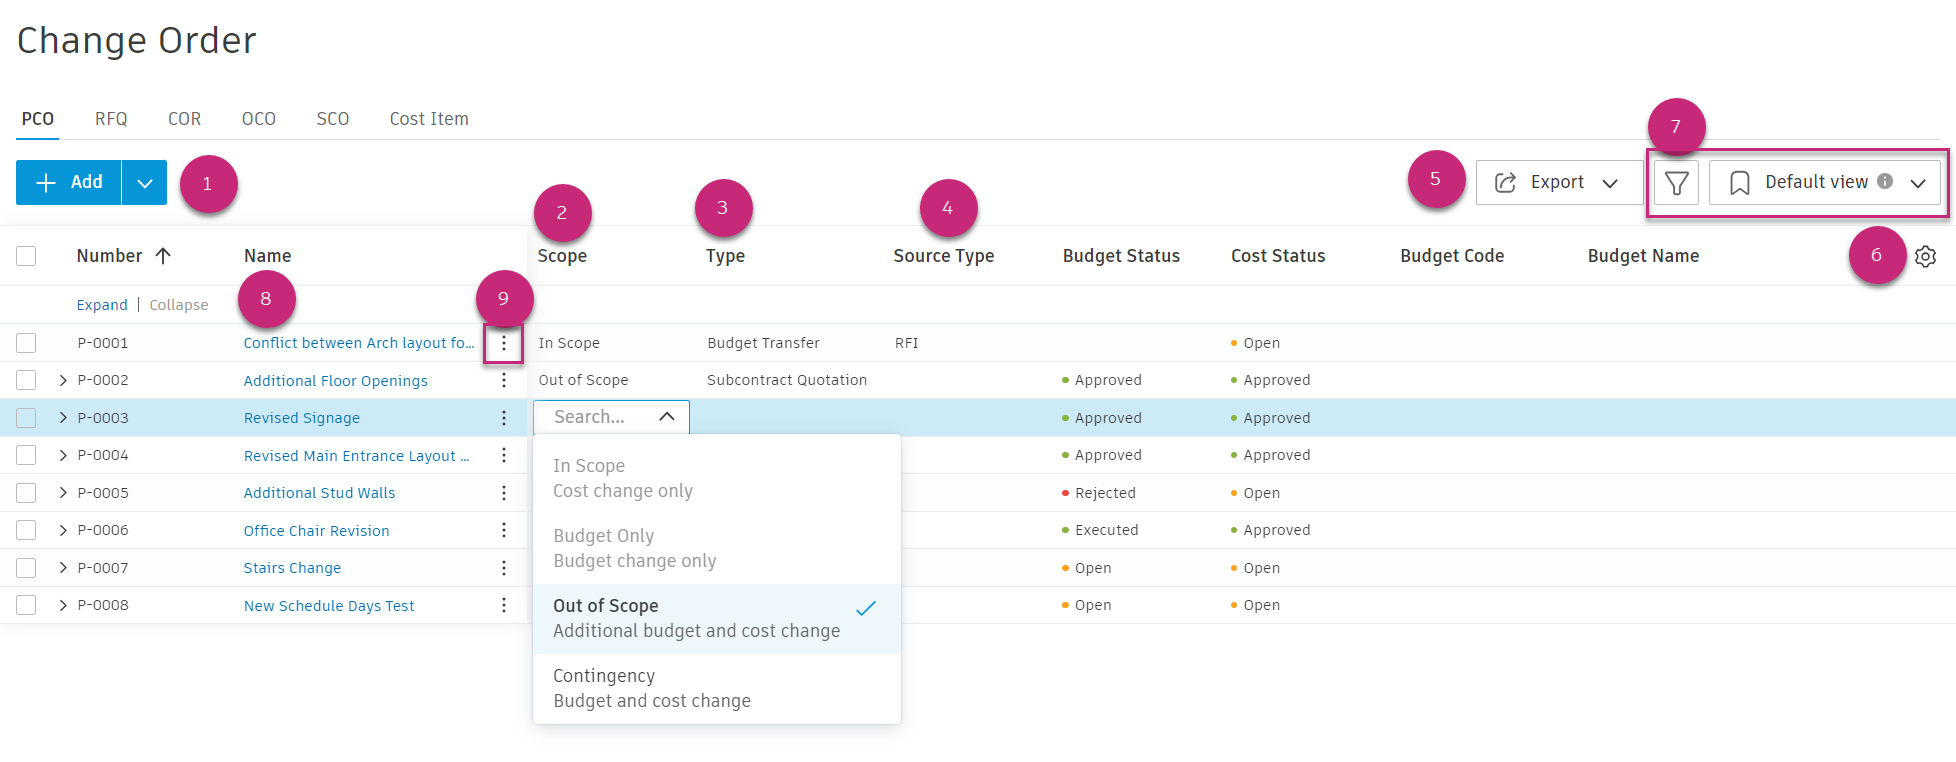
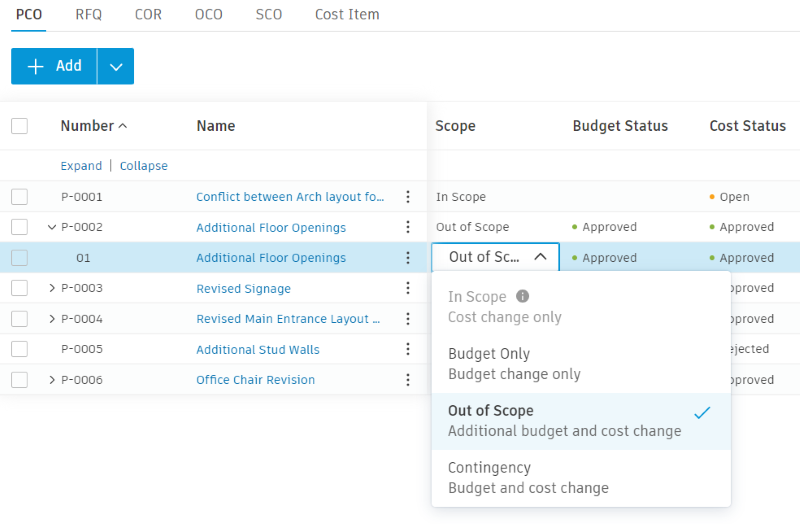
Select Add to create a PCO.
Select In Scope, Budget Only, Out of Scope, or Contingency to change order's scope. When a change is budget side only, simply do not add any values to the Estimated, Proposed, or Committed columns.
Type is an optional field if you’d like to be able to number, track, or group change orders by their type.
Source Type and Source Ref are also optional and you can use them to track or group based on the origin of the change.
Export allows you to export a PDF or CSV PCO report.
Column settings allow you to select the columns you wish to include in your view.
View selector allows you to store and recall your preferred grouping or column visibility. See the Filter and Group article to learn more.
Select the PCO name to open the flyout panel, the
 allows you to edit the name.
Select the More menu
 to add cost items, change status, and more. Tip: You can create up to 100 cost items at once by choosing Batch create Cost Item.
Create a Potential Change Order
PCO is a starting point for any change order. You can create it manually in the Change Order tab or create a PCO from an RFI.
To create a PCO:
Click Module Selector


 .
.Select the Change Order tab.
Select the PCO tab.
Click Add.
Enter a name for the PCO.
Choose a PCO Type.
Set the Scope to In, Budget Only, Out, or Contingency. The scope determines where the PCO appears in the budget and contract overview. You can also change the scope on the cost item level. Choose the scope from the available options:
In Scope: A cost change only.
Budget Only: A budget change only.
Out of Scope: A budget change as the item was not in the original scope. The owner will add another budget through a PCO to pay for it.
Contingency: An out-of-scope change that is billed to a different budget.
Tip: To learn more about scopes and how change orders populate in the budget and contract tables, see the Budget and Contract Tables article.
Choose a PCO Source Type. Available source types are:
- ASI: Architect's Supplemental Instruction
- CCD: Construction Change Directive
- INT: Internal
- ISSUE: Issue
- RFI: Request for Information
- RFP: Request for Proposal
- T&M: Time and Materials
Tip: You can deactivate the default types or add your own. See the PCO Source Types section in the Change Order Settings to learn more.Select or enter a Source Ref #. If the PCO is generated from an issue, you can select the issue. If the PCO is entered manually, you can enter any reference number.
After the PCO is created, you can add more or modify details:
Click the PCO name to open the details panel.
Add information to the applicable fields in the Details, Recipients, Scope of Work, and other sections, including:
- Name
- Description
- Cost Status
- Schedule Change (impact of the PCO, as measured in the number of days the project schedule is changed)
Modify any previously defined fields if necessary.
To add a location to a PCO use the Location field within the table. By doing this you can filter and group to see a location-based view of changes. Note, project administrators configure locations within the Build’s settings.
Now you can add more details to a PCO or generate a change order. Leaving a PCO as draft will mean that any costs are not shown or used in calculations in the budget or contract overview. Setting status to Open triggers those calculations and impact will be shown in the overview.
Create a PCO Through the Change Order Transfer
To do so:
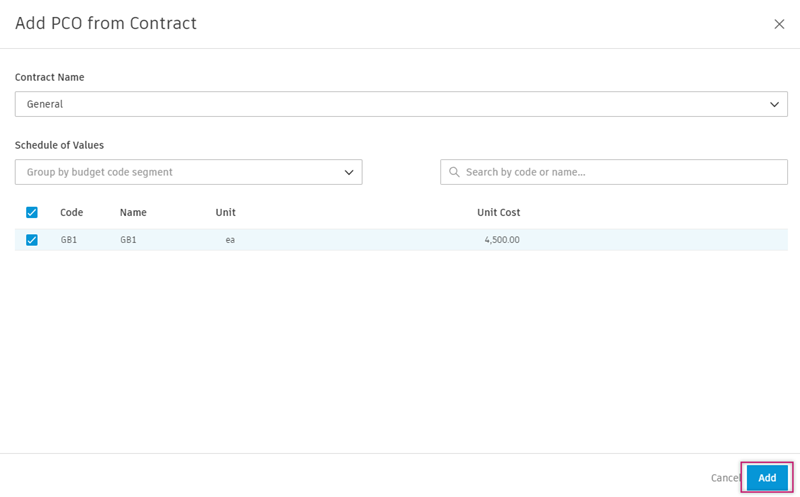
In the PCO tab, click the arrow next to the Add button.

Click Change Order Transfer.
Choose the budgets that you want to transfer between. The selected budgets must be associated with the same main contract.
Enter the amount to transfer.
Click
 icon to add multiple transfers. In the PCO Preview section, you'll see the transfers' breakdown.
Click Create PCO.
The new PCO is shown in the table under the name of Budget Transfer.
Create a PCO as a Collaborative Access User
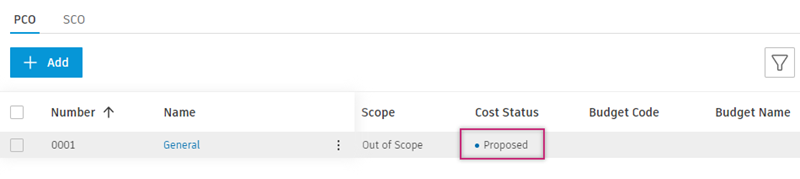
If you are a supplier with collaborative permissions and have been enabled by an administrator to create PCOs, you can submit a PCO.
To create a PCO as a Collaborative Access User, follow these steps:
Go to Change Order tool in the menu. Click the Add button.

Select the appropriate contract, and choose your budget. Confirm with the Add button.
Fill in the necessary fields and click Submit.

Your PCO is now proposed.
 Note: If you click Save and Close instead of Submit, the PCO will be saved as a draft (with the status Pricing). You can edit the fields later by clicking the More menu and choosing Submit.
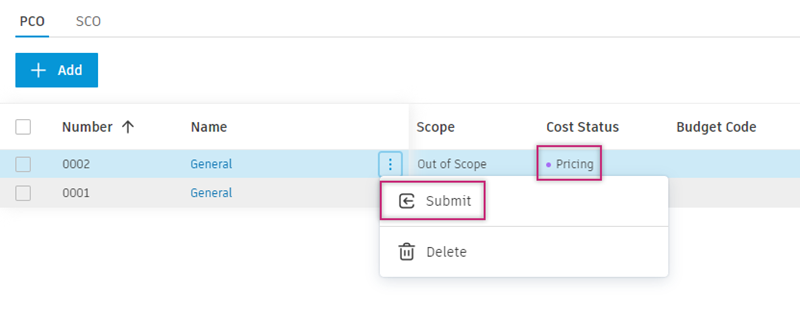
Apply a Financial Markup to a PCO
You can create financial markup formulas to be added to change orders. An example of a financial markup is an add-on such as a bond, contingency, or fee. Before you can apply a financial markup, a project administrator must create the financial markup formula in the Change Order settings tab.
After the financial markup formula is created, you can apply it to PCOs. To do so:
- Switch to the Change Order tab in the Cost module.
- Select the PCO tab within the Change Order tab.
- Click the More menu of the PCO you want to add markup formula to.
- Go to Add Markup and select the financial markup formula to use.
Expand the PCO to see that the financial markup is added to the PCO.
Change Scope on Cost Item Level in Change Orders
You can edit the scope field for individual change order subitems in cases where one or more cost items will be a budget-only transaction for a particular change order, such as transferring from a noncontingency, allowance, or fee budget item. Scope options include:
- In Scope: Cost Side Change Only
- Budget Only: Budget Side Change Only
- Out of Scope: Budget and Cost Side and will be funded by extra budget
- Contingency: Budget and Cost Side and will be funded by transfer from an existing budget
Although the overall change order will retain the originally selected scope setting, using this option at the cost item level ensures that specific items do not affect the budget overview in case they are not required, regardless of the populated cost stage.
Generate Change Orders from a PCO
You can generate CORs, OCOs, SCOs, and RFQs from a PCO. To do so, make sure that:
- The PCO's status is set as Open
- There is at least one cost item added
Then:
Click the More menu
next to the PCO.If the scope of the PCO is:
- In Scope - click Cost Change and choose Generate RFQ or Generate SCO.
- Budget Only - click Budget Change to generate COR or OCO.
- Out of Scope or Contingency - click Budget Change to generate COR or OCO and Cost Change to generate RFQ or SCO.
Tip: To learn more about scopes and how change orders populate in the budget and contract tables, see the Budget and Contract Tables article.

The new change order generates and you’ll be moved to the suitable tab to continue the workflow.
Generate a Contract from a PCO
Before generating a contract, make sure that:
- The PCO's status is set as Open
- There is at least one cost item added
Then:
Click the More menu
next to the PCO.Choose Cost Change.
Click Generate Contract.
Enter Contract Code and Contract Name. If the foreign currency setting is enabled in your project, you'll see the Currency and Exchange Rate fields as well.
- Choose the currency for your new contract.
- Edit the exchange rate if needed. The default exchange rate is fetched from the settings.
Enter the committed value or copy it from the cost item. If the foreign currency setting is on, the
 icon shows the converted value.
Click Generate.
Populate Pending Change Orders without an Open Subcontractor Change Order
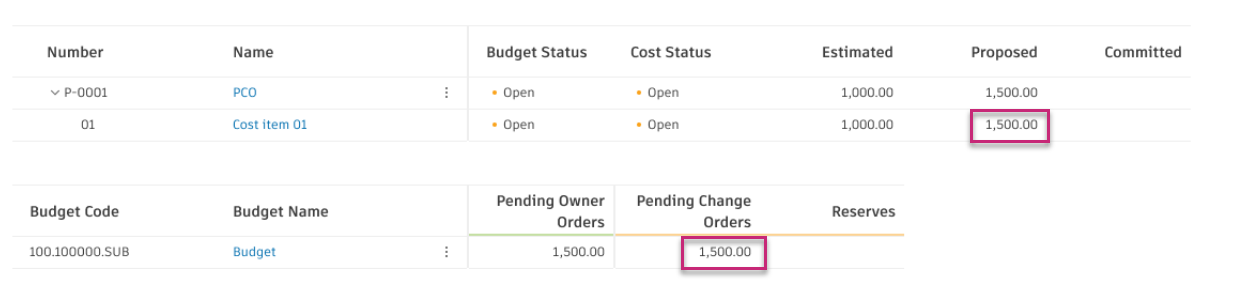
When a general contractor already knows the proposed price, they can populate pending change orders without creating an RFQ. To do so, enter a proposed value in the Proposed column on a cost item level when creating a PCO. The value is shown in the Pending Change Orders column in the Budget table.
Export a PCO Report
You can export a PCO report that will contain all details or a minimum number of them. To do so:
Select the Change Order tab.
Switch to the PCO tab.
Click Export
 .
. Add the report title.
Choose one of the following:
- PDF Report – to export a report in a noneditable PDF format.
- Excel Report – to export a report in an editable Excel format.
Choose the report template:
- Current View - you can export a report from the current view, for example with applied filters.
- System Default Report – you can export a report with all default columns.
Choose whether you want to include the cost item information in the report. By deselecting this option, you can export a report only with the minimum details.
Add an optional message.
Click Run report.
You’ll receive the report by email.
Reports for Collaborative Access Users
Members with collaborative access are able to export reports from change order tables (PCO/RFQ/COR/OCO/SCO).
For the change order report, the system displays the corresponding cost items along with their amounts. For instance, RFQ reports include proposed amounts. However, the budget code and name are not visible in these reports.