Work with Markups
Create, style, edit, and delete 2D and 3D design markups. Note the following markup-specific considerations:
- You can create private and public markups. Private markups can be created by members with View permissions (or higher) and can only be seen by their creator.
- Members with Edit permissions (and above) can publish markups. Public markups can be seen by all project members.
- By default, markups are private. Markups can be set to public when they are first created or when edited in the quick access toolbar. See Change Markup Status to learn more.
Create Markups
Open a 2D document or 3D model.
Select a tool from the markup toolbar on the right, and start creating your markup. Use the Freehand, Text, Cloud, Shape, or Arrow tools to create markups and annotations. See Markup Toolbar to learn more.
Use the styling options available in the styling toolbar to apply the desired line, fill, and text style.
 Note: To display the styling toolbar, click a markup. The available styling tools depend on the tool that you're using.
If needed, repeat Steps 2-3 to add another markup shape.
To share the markup, in the top toolbar, click


 . See Change Markup Status to learn more.
When done, in the top toolbar, click Save Markup.
If needed, add attachments to your markup. See Markup Attachments to learn more.
Edit Markups
In the viewer, click a markup you want to edit to display the quick access toolbar.
Tip: As an alternative, click in the top-left corner to open the Markups panel, then click
  Edit next to a markup to edit.
From the quick access toolbar, select
 .Tip: By default, all markup shapes are selected; to deselect them, click anywhere outside the markup.
Click a markup shape to edit.
Use the tools from the styling toolbar to make your changes, and then in the top toolbar, click Save Markup.
Tip: To apply the same styling to multiple markup shapes, press Shift + Click or Ctrl + Click, and then select the desired line and fill style from the markup toolbar on the right.Note: Project administrators can track any changes made to markups in the Activity log found in the Project Admin module. See Project Activity Log to learn more.
Change Markup Status
Publish markups
Publish markups to make them visible to all project members.
Open a 2D document or 3D model.
In the viewer, click the markup you want to publish to display the quick access toolbar, then click

 .Tip: As an alternative, click in the top-left corner to open the Markups panel, hover over a markup, and then click PRIVATE PUBLISH.
When prompted to confirm your choice, click Publish.
The markup is changed to Published and is now visible to everyone, not only to the person who created it.
Archive markups
Archive published markups to hide them from view by default.
Open a 2D document or 3D model.
In the viewer, click the markup you want to archive to display the quick access toolbar.
From the quick access toolbar, select
 .Tip: As an alternative, click in the top-left corner to open the Markups panel, hover over a markup, and then click Archive next to the markup to archive.
When prompted to confirm your choice, click Archive.
The markup is changed to Archived and is no longer visible. If necessary, you can use the filters in the viewer to view archived markups. See Filter Markups.
Delete Markups
Delete your private markups.
Open a 2D document or 3D model.
In the viewer, click a markup to delete to display the quick access toolbar, and then click
 . Tip: As an alternative, click in the top-left corner to open the Markups panel, hover over a markup, and then click Delete next to the markup to remove.
When prompted to confirm your choice, click Delete.
Review Markups history
When you add a markup, it is added to the document's markup history.
On the left of the viewer, click ![]() to open the Markups panel. You can track the revision history as the team responds and add more markups. When a markup is created, it is set to Open.
to open the Markups panel. You can track the revision history as the team responds and add more markups. When a markup is created, it is set to Open.
Filter Markups
Apply a filter to display a subset of markups.
Open a 2D document or 3D model.
Click
in the top-left corner to open the Markups panel, click the Filter drop-down list, and select one or more filtering criteria. Tip: If needed, select Show archived to include archived markups in the filtering results.Click Apply.
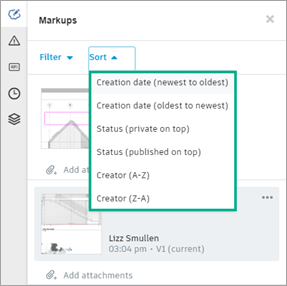
Sort Markups
Change the order of the markup list.
Open a 2D document or 3D model.
Click
in the top-left corner to open the Markups panel, click the Sort drop-down list, and then select the desired sorting option.