Coordinate Models
Before creating a coordination space, a project administrator must add the relevant members to the project and give them access to Model Coordination. For more information, see Manage Member Access.
Create Coordination Spaces
Project administrators create coordination spaces and configure them against folders in Document Management. Coordination spaces can be set up with automatic clash turned on or off, for use in clash detection or model review workflows respectively. Coordination spaces can also be configured to only include specific file formats.
Project members need at least View permissions for the main folders that the coordination spaces are configured against, to ensure they can access the coordination spaces.
Click the Module Selector
 > Project Admin.
Click the Services tab.
Select Model Coordination from the left panel.
On the Coordination spaces tab, click Create coordination space.
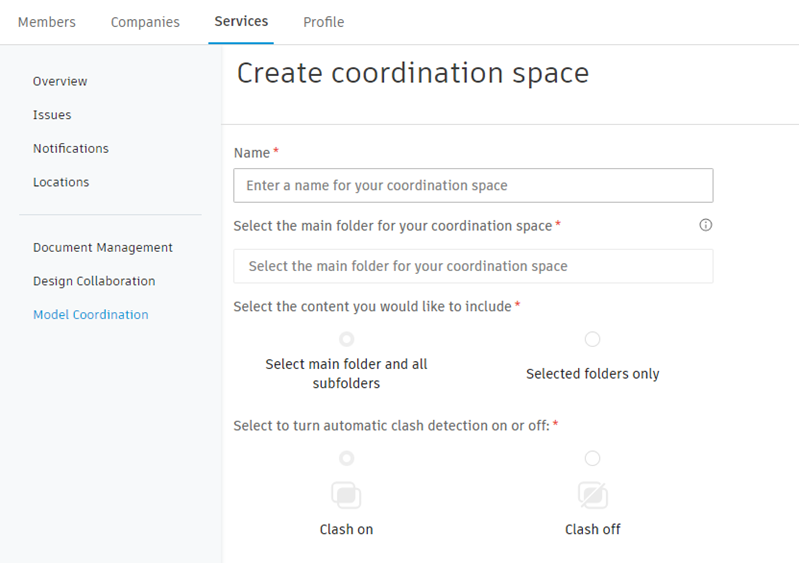
Enter a name for the coordination space.
Browse to select the folder in Document Management that you want to create your coordination space against. This becomes the main folder for your coordination space.
Important: The main folder selection can't be changed later.Note: Some accounts can create coordination spaces against the Plans folders and its subfolders. However, the Plans folder only supports V1 coordination spaces, and doesn't support features such as creating coordination spaces with automatic clash detection turned off, or the ability to select content from only specific subfolders to appear in a coordination space. Coordination spaces created against the Project Files folder and its subfolders support V2 coordination spaces, which benefit from the latest features and updates. Project Files coordination spaces also work more easily with existing design data, for example, data from Revit that is used in the Design Collaboration module already exists in the Project Files folder. See Organize Files with Folders and Folder Permissions for more information about setting up a folder structure.Specify whether you want automatic clash detection turned on or off.
Important: The automatic clash detection setting can't be changed later.Click Select content to open the Edit coordination space content dialog, and choose which content you would like to include in the coordination space.
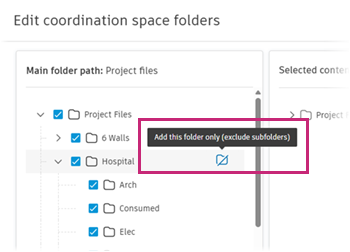
By default, all folders in the Main folder path panel are selected to be included. Expand the folder tree to deselect any subfolders that you don't want to include the content from. You can also explictly select a parent folder, which automatically deselects all its subfolders:
 Note: Folder structure is not replicated in the coordination space. All models will be listed alphabetically in a single, flat repository structure in the Model Coordination module > Models tab.
In the Selected content panel, select the file formats that you want to include.
Tip: By default, no file formats are selected in the drop-down lists. This corresponds with all file formats being included for all folders, as indicated by the All formats label. When you select file formats to be included specifically, the deselected formats are filtered out.Use the drop-down list at the top right to select the required file formats for all included folders. This global setting applies to all parent folders and all subfolders unless overridden (see step 2 below).

- Click Clear to deselect all file formats and return to the default All formats setting.
- Click Apply to all to apply the selected file format settings to all folders as the global setting.
Note: The global file format setting is not tied to the main coordination space folder. It applies to all the selected folders and subfolders, even if the main folder itself has not been selected for inclusion. If you change the global setting, this change is automatically applied to all folders that inherit that setting.Use the drop-down lists next to each folder to specify the required file formats at the individual folder level.

- Click Clear to deselect all file formats and return to the default All formats setting.
- Click Global to apply the global setting to the selected folder.
Note: By default, subfolders will inherit file format settings from their parent folder. However, the ability to apply folder-level settings means that a parent folder and its subfolders can have different settings applied, and that the global setting can be overridden for specific folders as needed.The different file format settings are indicated by the following icons:
 - File formats are inherited from the global setting.
 - File formats are inherited from the parent folder.
 - File formats are set at the individual folder level, and are different from the global setting or parent folder.
If necessary, click the delete
 icon to remove a folder from the selected content.
Click Save to save your selections and settings.

Click Create.
Tip: For coordination spaces with clash detection turned off, selected file format settings are applied immediately. For coordination spaces with clash detection turned on, file format settings won't be reflected in the Models tool until the latest clash check has finished processing.Repeat this process to create more coordination spaces as needed.
You can create multiple coordination spaces to represent separate areas or phases of a project, or different trades or teams, for example teams set up in Design Collaboration. There is no limit to the total number of coordination spaces that you can create, but you can only configure them against 150 unique folders
Note: You can have a maximum of 20 active coordination spaces at one time. Any coordination spaces that are inactive for 60 days or more are deactivated until a new model is uploaded. You may have different versions of clash on coordination spaces in your project. See Coordination Space Versions for details.Tip: Coordination spaces can also be created in Design Collaboration using the Shared or team folders that are created during setup.
See the Model Coordination FAQ topic for details on technical and system limitations related to coordination spaces.
See the Coordination Space Versions topic for details about potential different versions of clash detection on coordination spaces in your project.
Upload Models for Coordination
A project administrator should check that any project members that need to upload models for coordination have the correct permissions to view and upload models to the designated main folder in Document Management. Project members can then upload the models to the coordination folder to check for clashes.
Click the Module Selector
> Document Management  .
.Click the Folders tab.
Navigate to the coordination space folder.
Upload or copy the models to the folder.
Note: Only 3D RVT and DWG files, NWC files exported from Revit and AutoCAD verticals, and IFC files exported from AutoCAD (architecture, MEP, and Civil 3D 2018 and onwards), ARCHICAD, Revit, MagiCAD for Revit, Siemens NX, Strakon, Tekla Structures, and VectorWorks are currently supported for clash detection. Other NWC files, other IFC files, and VUE files are supported for aggregation and can be viewed in combination with other supported file formats, but don't support clash detection. Any other file types that are supported for upload to Document Management will not be displayed in Model Coordination.For coordination spaces with clash detection turned on, clashes between models in the selected folder are automatically detected and can be viewed in Model Coordination. See View and Filter Clashes.