Import Files and Folders from Another Project
In the Bridge tool, you can import files and folders from other Autodesk Forma projects into your current project.
To import files and folders, you must have:
- View + Download permission or higher for the file/folder you want to import into the project
- Edit permission or higher for a folder in the current project
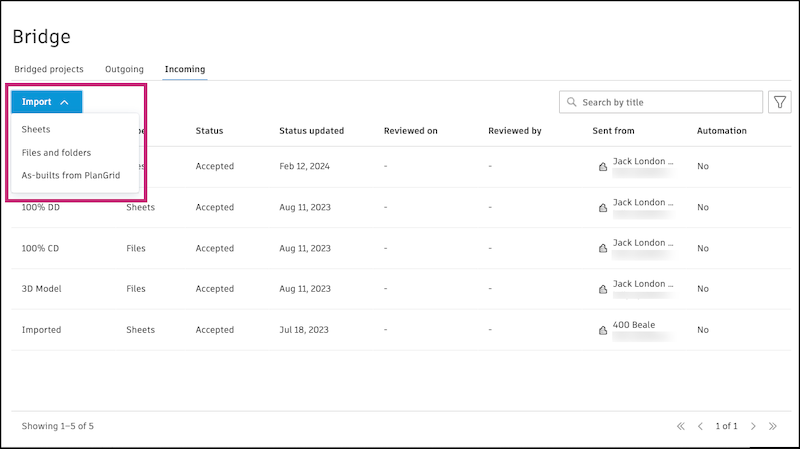
Navigate to the Bridge tool using the left navigation menu.
Click the Incoming tab.
Click Import and select Files and folders.

Select a project to import files or folders from.
Use the search field to search for files or folders by name.
(Optional) Select Automatically import folder updates into target project to create a folder automation. In a folder automation, when updates are made to the selected folders in the source project, the target project will receive the updates. This feature is useful for making sure that the stakeholders you shared the folders with will always automatically have the most updated files.
Note:- Automations aren't supported on individual files.
- When you create a folder automation and the project you are importing from isn't bridged to the current project, a bridge will be created. The project will appear in the Bridged projects tab in Bridge. You can manage automations in the Bridge tool.
- New subfolders created in the source folder after the initial share won't be automatically synced to the target project. You will need to share those new subfolders separately if you want them to be synced.
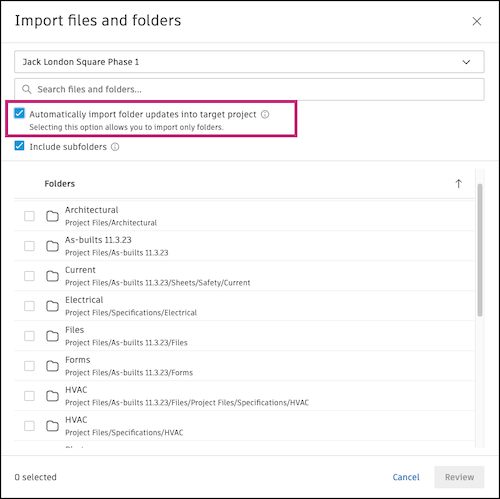

(Optional) Include subfolders will be selected by default. All subfolders within the selected folders will be shared. You can deselect this option if you want to only share the parent folders you select.
Select files or folders that you want to share.
Click Review.
(Optional) Enter a title. A title will help you track what has been received by your project in the Incoming tab in the Bridge tool.
Select the target folder. This is the folder in the current project you want to import the files or folders into.
Review your selected items.
Note: There is always an Attributes section in the selected items. File attributes can be shared when sharing files with another project.To add or remove which custom attributes can be shared, a project administrator can adjust the Attributes Settings in the Bridge tool. Custom attributes will be shared if they are applicable and meet the required criteria. Learn more
(Optional) Enter a message about the shared files or folders to provide context for the recipients. The message will appear in relevant emails and on the Detail page for this share in the Outgoing tab.
Click Import # items or Import # items with automation based on your selection.
When the process is complete, the imported files and folders will be found in the Files tool in your current project. You can track imported files and folders in the Incoming tab in the Bridge Tool.