Cost Items
Cost items are individual items in a change order that are linked to associated budgets and contracts. They can be viewed, dynamically grouped, and filtered in multiple ways in the Cost Item tab.
Cost items include five values:
- Estimated: For one PCO, a general contractor (GC) estimates the value.
- Proposed: The GC asks the supplier to provide the estimation of the cost item of an RFQ (Request For Quotation) and records the estimation into the Proposed value.
- Submitted: The cost item value appears in the Submitted column when a GC submits the COR (Change Order Request) for an owner's review.
- Approved: After an owner's initial review, a GC combines multiple CORs into one OCO (Owner Change Order) and signs the legal change order document with the owner. The OCO value is recorded as Approved.
- Committed: After the OCO or COR is approved, a GC signs an SCO (Subcontractor Change Order) with the supplier. The value is recorded as Committed.
Cost item's values populate in the Change Order tool's tables:
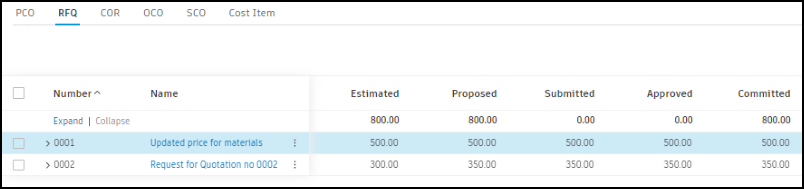
Two additional columns — Budget Impact and Cost Impact — show the currently active value on the budget and cost sides, respectively. These columns are available in the change order and cost item tables and can be enabled from the  icon. See the Change Order Tables and Columns section to learn more.
Learn more about Cost item statuses.
In this article:
- Add a Cost Item
- Add a Cost Subitem
- Assign Cost Items
- Generate a Change Order from a Cost Item
- Generate a Contract from a Cost Item
- Related Articles
Add a Cost Item
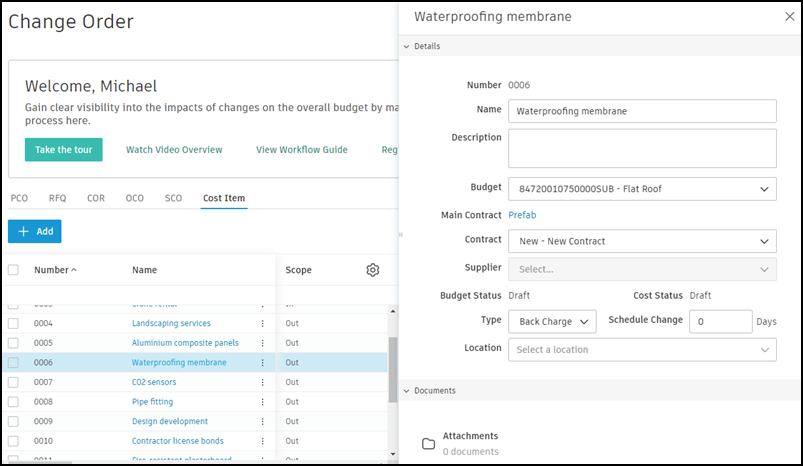
Cost items can be added in the Cost Item tab:
- Click the Change Order tool from the left navigation.
- Switch to the Cost Item tab.
- Click Add.
- Enter a name for the cost item.
- Select a Budget Code from the drop-down list.
- Enter an estimated price.
- Select a Location for the cost item from the location breakdown structure.
- Select the checkbox next to the cost item.
- Click Assign.
- Select a PCO from the PCO drop-down list.
Copy a Location of a Cost Item
If a location for one cost item applies to other cost items within the same PCO, you can copy the location. To do so:
From the PCO tab, hover your cursor over the Location field of the cost item assigned to a PCO.
Click
 to copy the location to the other cost items in the PCO.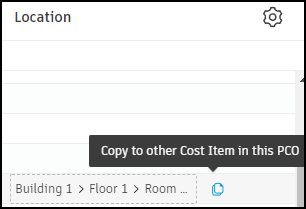
Copy a Cost Item's Amount
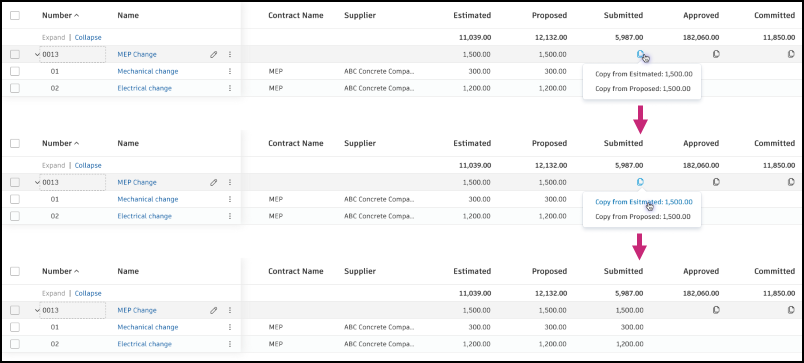
You can copy all cost items' amounts of the same change order to the current column:
- Click next to the cost item in the Estimated, Proposed, Submitted, Approved, or Committed column.
- Choose one of the available values to copy from.
Add a Cost Subitem
Within individual cost items, you can:
- Add subitems that roll up into the parent cost item.
- Define a cost item hierarchy for each of the Estimated, Proposed, Submitted, Approved, and Committed tabs.
- Determine a subitem hierarchy for each tab or inherit a subitem hierarchy from another tab.
- Use a hierarchy from a contract schedule of values (SOV).
- Import subitems from an Excel spreadsheet.
To add a cost subitem:
Click a cost item name to open the details panel.
Select a tab in the Cost Summary section.
Note: The tab you select determines which column in a table a subitem total appears in.Click the Define Hierarchy menu.
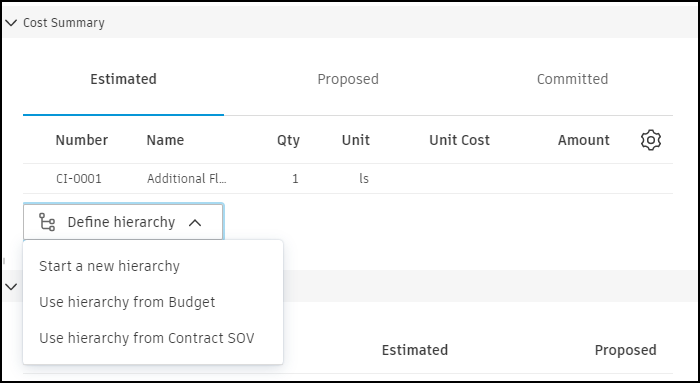
Choose between:
- Start a New Hierarchy: Enter the Code, Name, Quantity, Unit, and Unit Cost for a subitem.
- Use Hierarchy from Budget: This option is available when the cost item is linked to a budget. Select the checkbox for SOV to use and then click Save.
- Use Hierarchy from Contract SOV: Select the checkbox for SOV to use and then click Save.
 Note: When an Estimated, Proposed, Submitted, Approved, or Committed value is already provided, you can use its hierarchy by selecting Use hierarchy from ..., for example, Use hierarchy from Proposed.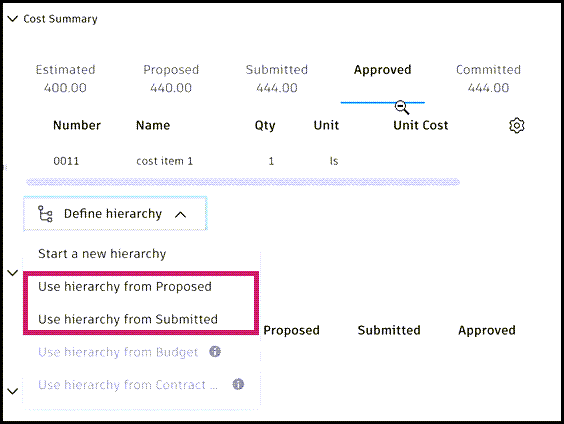
To add more subitems:
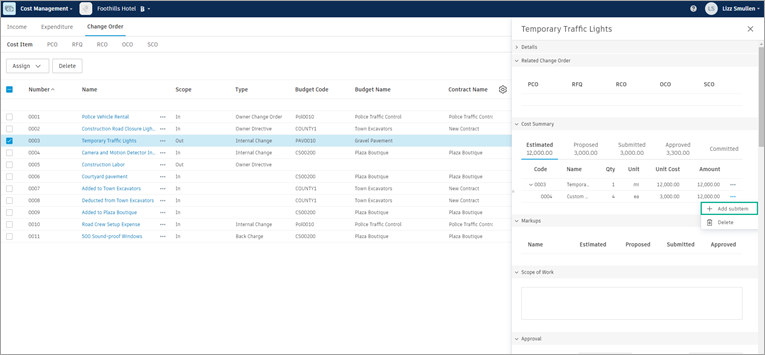
Hover your cursor over the parent or subitem.
Click the More menu
 .
.Click Add Subitem.
Enter the data for the new subitem.
As required, switch between the remaining tabs, click the Define Hierarchy menu, and select one of the available options.
To import subitems from an Excel spreadsheet:
- Click the Define Hierarchy menu.
- Select Import subitems and Import Excel file.
- Choose the file you want to upload, then click Import.
Assign Cost Items
From the Cost Item tab, select one or more cost items and use Assign to link them to an existing change order. You can assign cost items to a PCO (Potential Change Order) or to an SCO (Subcontractor Change Order) that is already created.
Assign Cost Items to a PCO
Existing or new cost items created directly in the Cost Item tab can be assigned to a PCO. To do so:
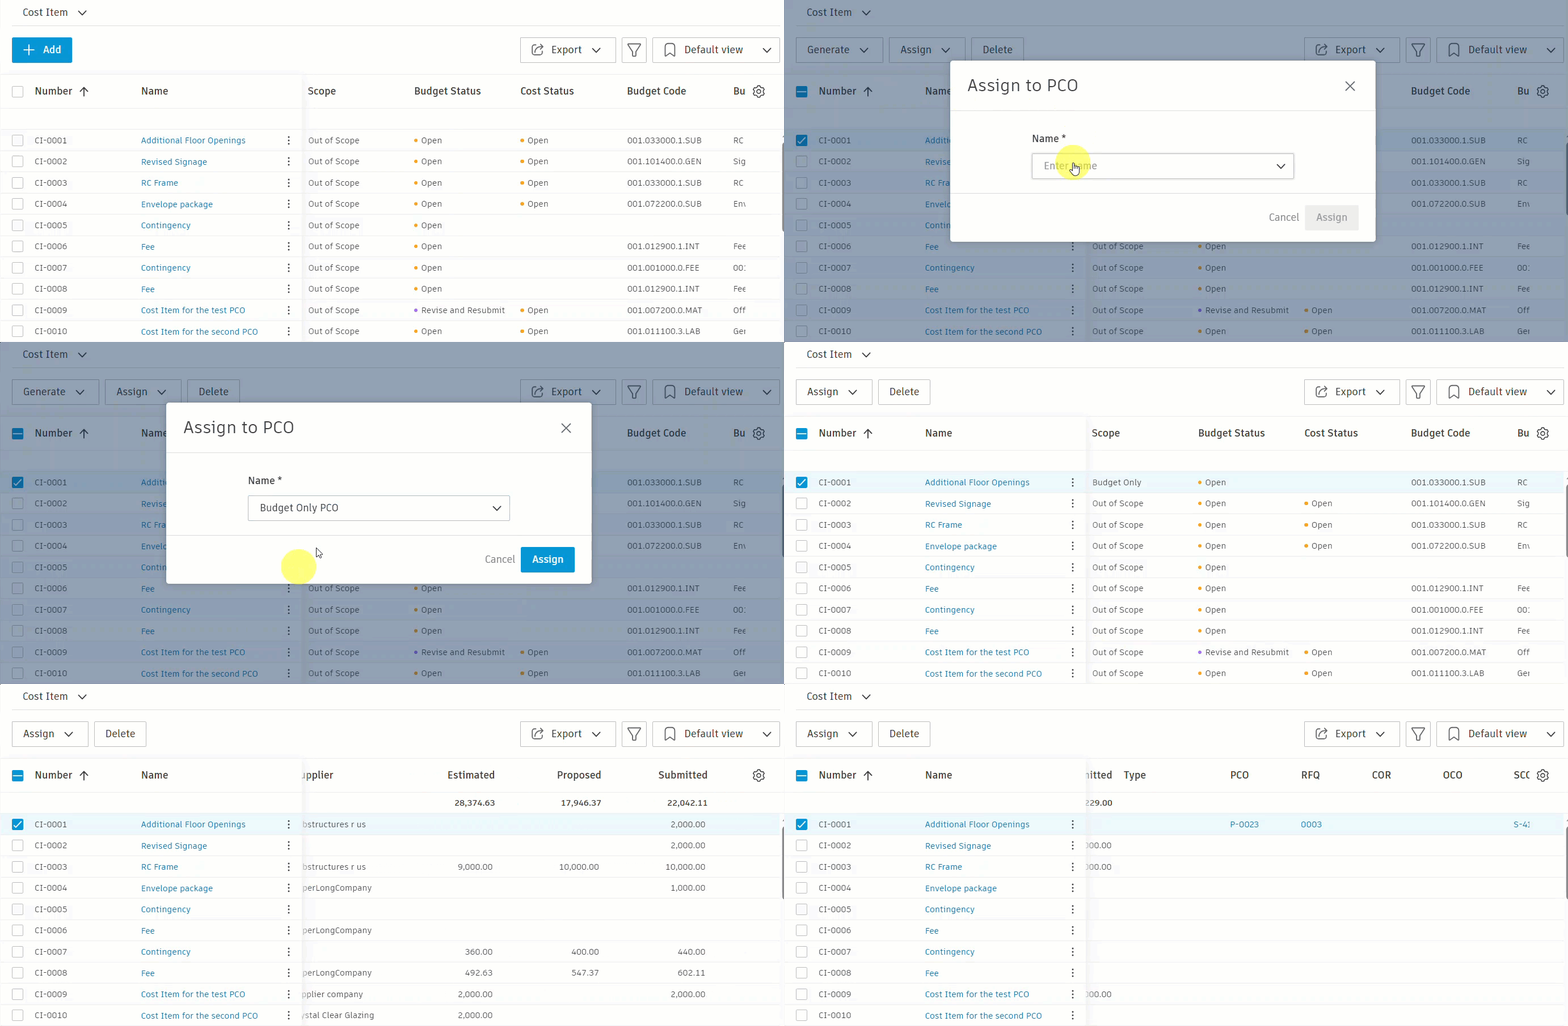
- Select the checkbox next to one or more cost items in the Cost Item tab.
- Click Assign, and then select PCO.
- In the dialog, select the PCO to add the cost items. You can type search criteria to filter the list.
- Click Assign.
Assign Cost Items to an Existing SCO
You can add cost items to an SCO that already exists — the same way you assign cost items to a PCO from this tab. This is useful when the SCO is already in the project and you need to attach additional cost items without generating a new SCO.
Before you assign
- Each selected cost item must already be linked to a PCO.
- The cost item must not already be linked to an SCO.
- The cost item's contract must match the SCO's contract.
- The SCO must be in Draft or Open status.
- The cost item typically needs a Committed value and an eligible cost status (for example Open or Accepted). If the Assign option is unavailable, check these values on the selected cost items.
To assign cost items to an existing SCO from the Cost Item tab:
Click the Change Order tool from the left navigation.
Switch to the Cost Item tab.
Select the checkbox next to one or more cost items.
Click Assign, and then select SCO.
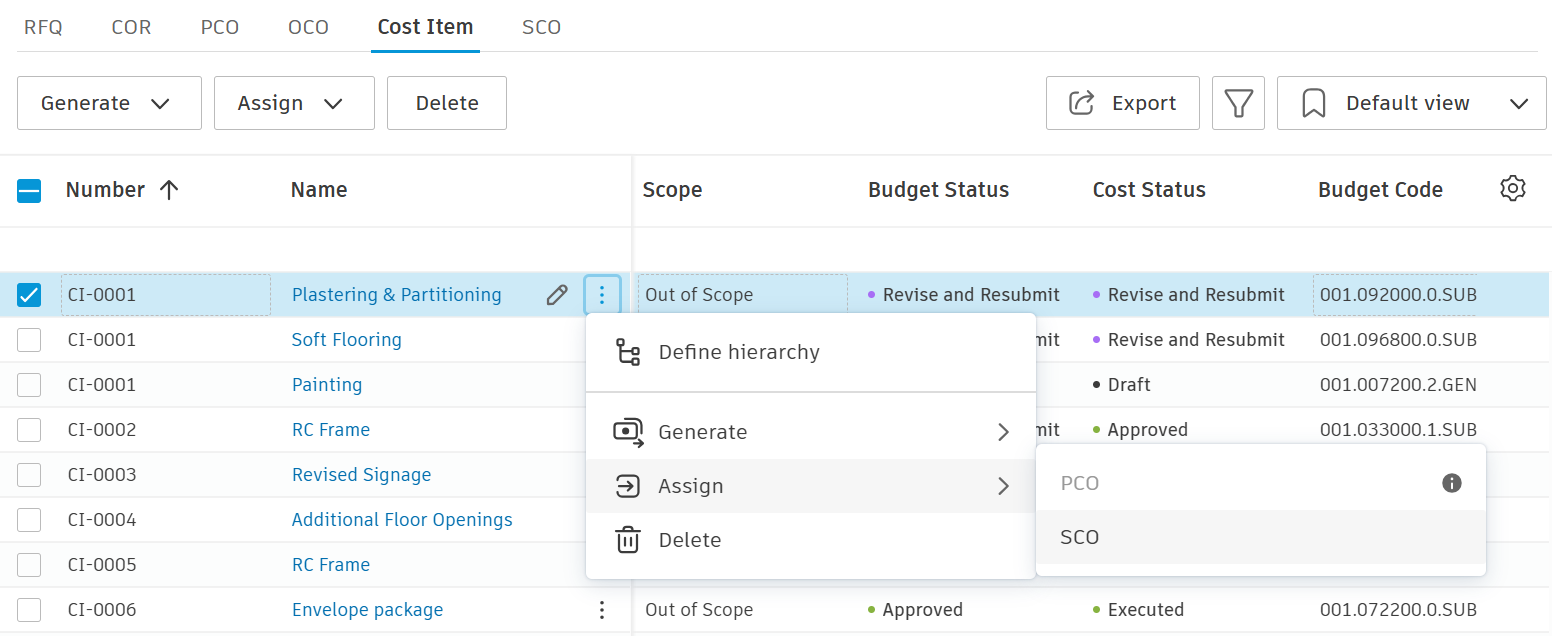
In the Assign to SCO dialog, select the target SCO from the Name drop-down list. Only SCOs that match the selected cost items' contract and status appear.
You can also assign a cost item to an existing SCO from the PCO tab — select the cost item, open the More menu , choose Assign, and then SCO.
Generate a Change Order from a Cost Item
Use Generate when you need to create a new change order. Use Assign when you need to link cost items to a change order that already exists. See Assign cost items.
To generate an RFQ or SCO from a cost item, click the More menu next to the cost item, and then choose Generate RFQ or Generate SCO from the Generate category.
Generate a Contract from a Cost Item
You can generate a contract from a cost item when the cost item meets the following conditions:
The PCO status is one of the following: Open, Pricing, Proposed, Accepted, Revise and Resubmit.
The PCO scope is In Scope, Out of Scope, Contingency, or empty. The option is not available when scope is set to Budget Only.
The Use markup for setting is set to Budget change. The option is not available when set to Cost change because markups affect cost-side values and are aggregated at the PCO level - generating a contract from an individual cost item would bypass this aggregation.
The cost item is:
- Not associated with an existing contract.
- Not associated with an existing SCO.
- In the same main contract.
The budget of the cost item isn't already allocated to a contract.
To generate a contract from a cost item:
Click the Change Order tool from the left navigation.
Switch to the PCO tab.
Click the checkbox to the left of a cost item within a PCO.
Click Generate, and then Contract.
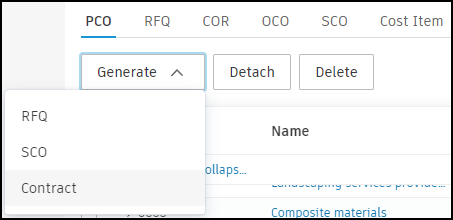 Tip: You can also click the More menu to the right of a cost item. Choose Generate, and then Contract.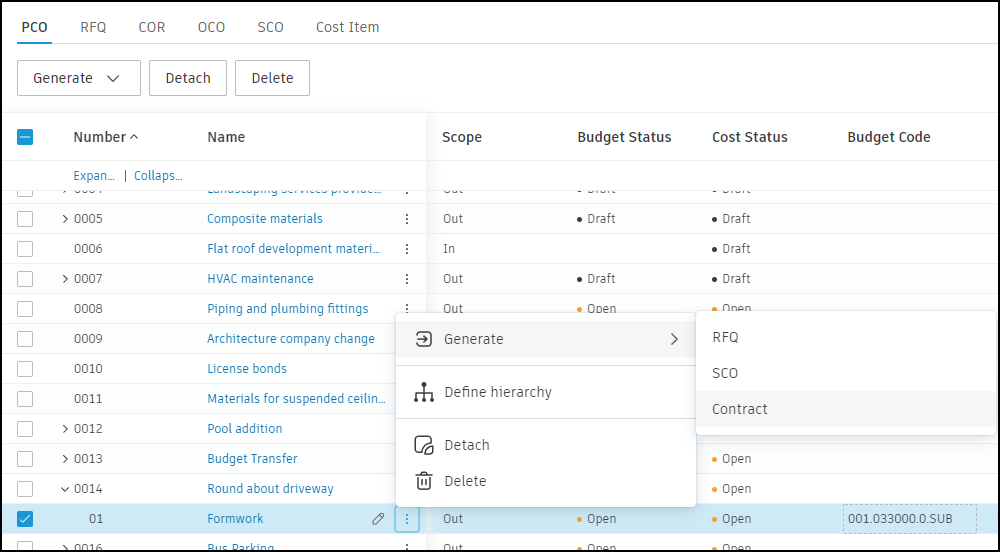
Enter a Contract code and a Contract name. If the foreign currency setting is enabled in your project, you'll see the Currency and Exchange Rate fields as well.
- Choose the currency for your new contract.
- Edit the exchange rate if needed. The default exchange rate is fetched from the settings.
Enter the committed value or copy it from the cost item. If the foreign currency setting is on, the
 icon shows the converted value.
Click Generate.