Potential Change Orders
Potential Change Orders (PCOs) are the starting point of any budget or cost change. You can generate other change orders from a PCO. Link cost items to provide a connection back to the affected budget, contract, and supplier. However, cost items can also be created directly in the Cost Item tab and assigned to a PCO later.
In this article:
- Potential Change Order Tab Overview
- Create a Potential Change Order
- Edit Existing PCOs
- Duplicate a PCO
- Generate Change Orders from a PCO
- PCO Document Storage in Forma Data Management
- Populate Pending Change Orders without an Open Subcontractor Change Order
- Reconcile Pending Owner Changes in the Budget Table
- Create an Internal Budget Transfer from PCO
- Generate a Contract from a PCO
- Apply a Financial Markup to a PCO
- Add Cost Items to a PCO
- Export a PCO Report
- Related Articles
Potential Change Order Tab Overview
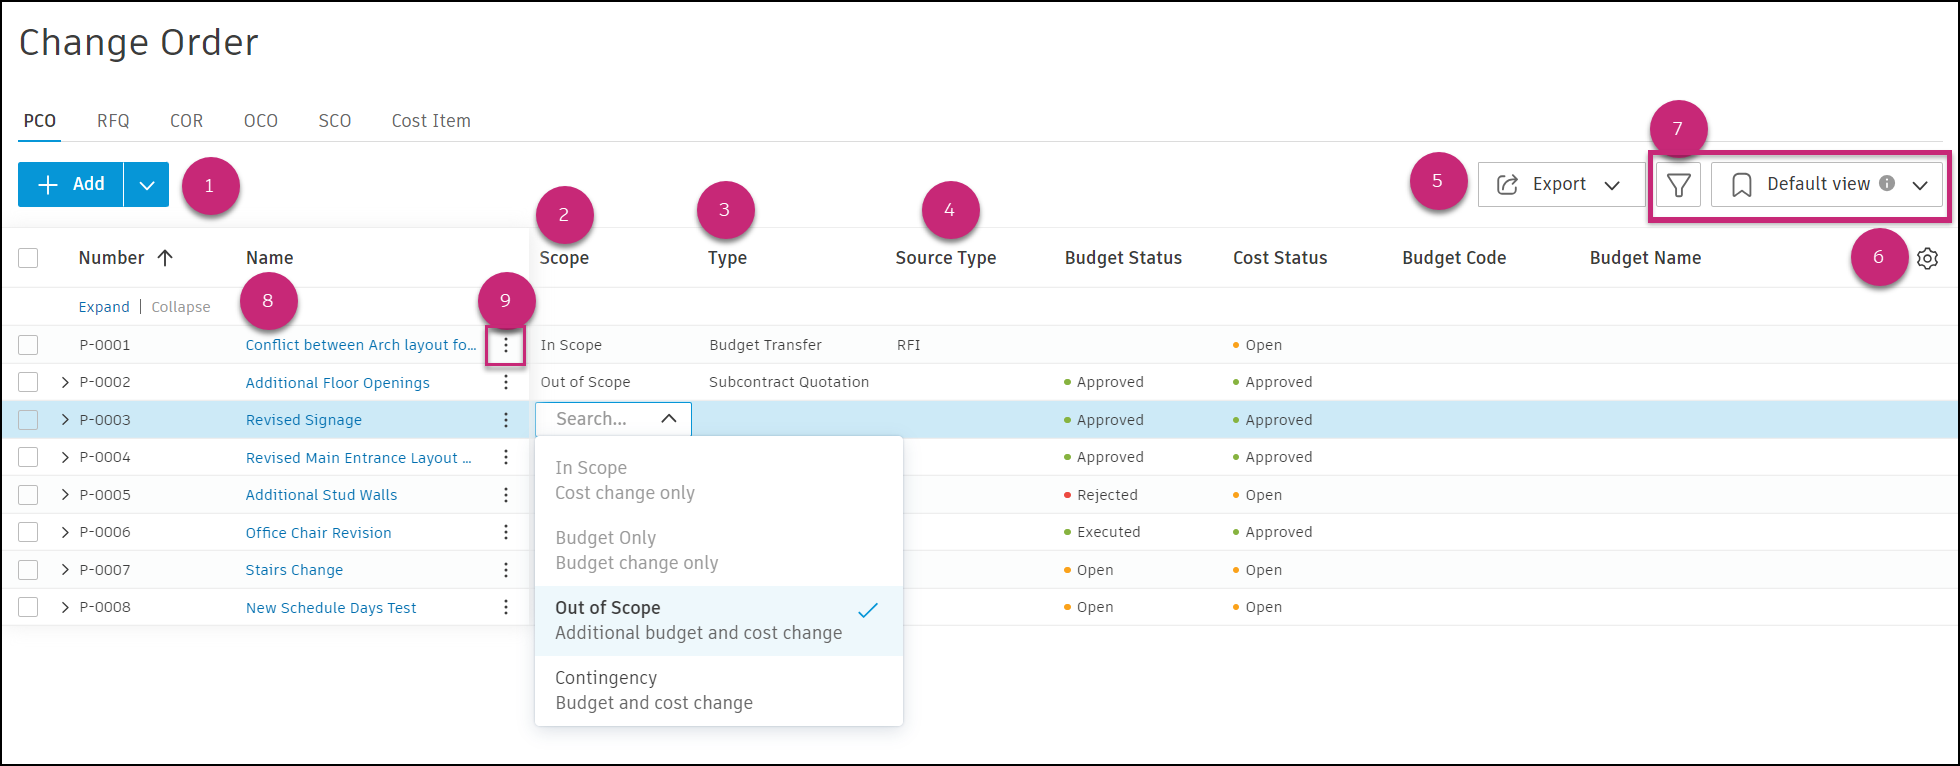
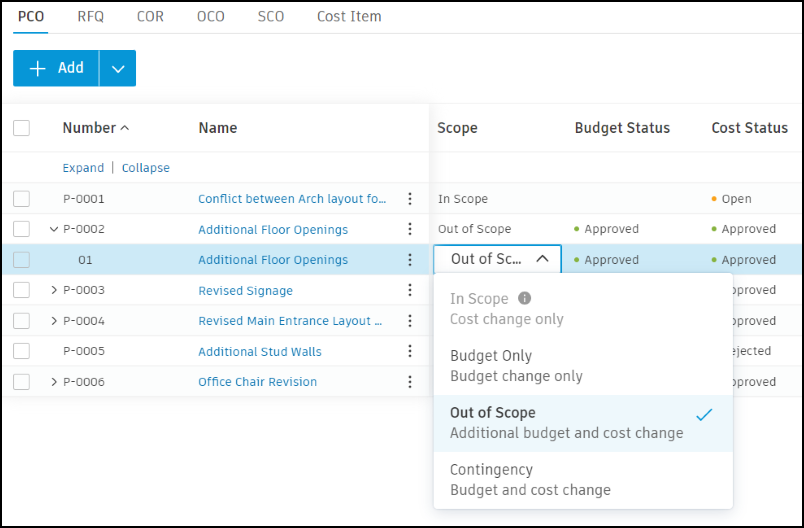
Select Add to create a PCO.
Select In Scope, Budget Only, Out of Scope, or Contingency to change the order's scope. When a change is budget-side only, simply do not add any values to the Estimated, Proposed, or Committed columns.
Type is an optional field if you’d like to number, track, or group change orders by their type.
Source Type and Source Ref are also optional, and you can use them to track or group based on the origin of the change.
Export allows you to export a PDF or CSV PCO report.
Column settings allow you to select the columns you wish to include in your view.
The view selector allows you to store and recall your preferred grouping or column visibility. See the Filter and Group article to learn more.
Select the PCO name to open the flyout panel. The
 allows you to edit the name. Scroll down to edit the Cost Summary section, where you can edit Qty, Unit, Unit Cost, and Amount for each status.
Select the More menu
 to add cost items, duplicate, change status, and more.Tip: You can create up to 100 cost items at once by choosing Batch create Cost Item, or import cost items and sub-items from Excel by choosing Import Cost Item.
Create a Potential Change Order
A PCO is the starting point for any change order. You can create it manually in the Change Order tool or create a PCO from an RFI, Issue, or Submittal Item.
To create a PCO:
Select the Change Order tool from the left navigation.
Select the PCO tab.
Click Add.
Enter a name for the PCO.
Set the Scope to In Scope, Budget Only, Out, or Contingency. The scope determines where the PCO appears in the budget and contract overview. You can also change the scope on the cost item level. Choose the scope from the available options:
- In Scope: Represents a cost-side change only, without affecting the budget.
- Budget Only: Indicates a budget-side change only, with no cost-side impact.
- Out of Scope: Refers to a budget-side change for items not included in the original scope. The owner will allocate extra budget through a PCO to cover the cost.
- Contingency: Denotes a change that is out of scope funded by transferring amounts from an existing contingency budget.
Tip: To learn more about scopes and how change orders populate in the budget and contract tables, see the Budget and Contract Tables article.Choose a PCO Source Type. Available source types are:
- ASI: Architect's Supplemental Instruction
- CCD: Construction Change Directive
- INT: Internal
- ISSUE: Issue
- RFI: Request for Information
- RFP: Request for Proposal
- T&M: Time and Materials
Tip: You can deactivate the default types or add your own. See the PCO Source Types section in the Change Order Settings to learn more.Select or enter a Source Ref #. If the PCO is generated from an issue, you can select the issue. If the PCO is entered manually, you can enter any reference number.
To add a location to a PCO, use the Location field within the table. By doing this, you can filter and group to see a location-based view of changes. Project administrators configure locations within Build’s settings.
Now you can add more details to a PCO or generate a change order. Leaving a PCO as a draft will mean that any costs are not shown or used in calculations in the budget or contract overview. Setting the status to Open triggers those calculations, and the impact will be shown in the overview.
Create a Potential Change Order (PCO) from Project Management Workflows
It’s common for an Issue or RFI to incur a potential cost change. In such cases, Forma Build members can generate a Potential Change Order directly from the item. This streamlines the process and creates a connection between the workflows, reducing the risk of data loss and capturing the origin of the change order.
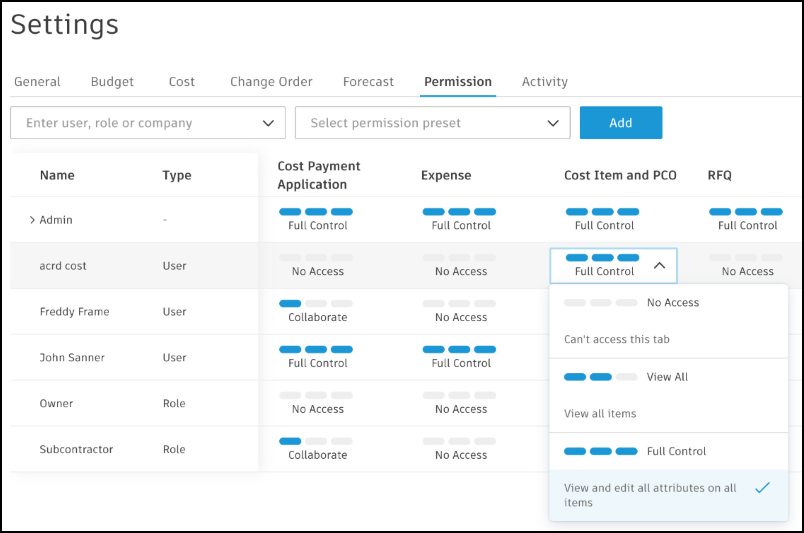
To work with this workflow, members need Full Control permission level for Cost Item and PCO in Cost Management.
Create a PCO from an RFI, Issue, or Submittal Item
From either a new or existing RFI, Issue, or Submittal item record:
Scroll to References and select Add reference.
Choose PCO.

In Add PCO Reference, select Create.
Fill in the PCO name and description, then select Create.
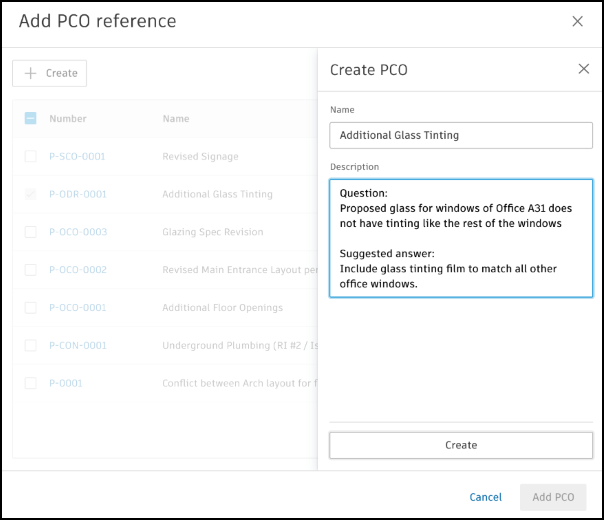
This information will populate the new PCO record within Cost Management, where it can be altered later.
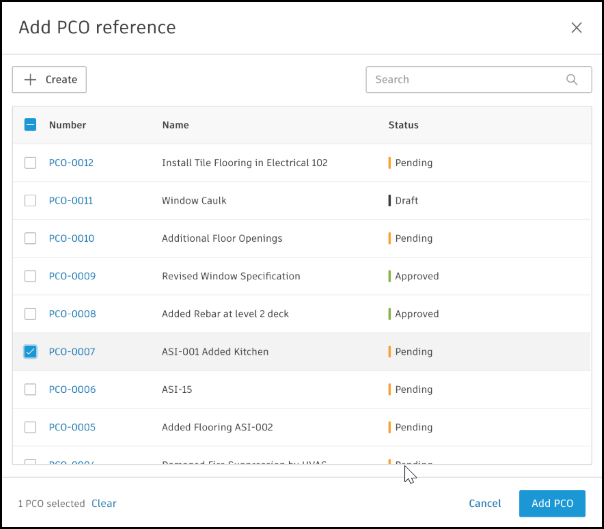
Link Existing PCO(s) to an RFI, Issue, or Submittal Item
To link existing PCO(s) to project management items, follow the steps in the previous section, but instead of creating a PCO, choose the existing PCO(s) from the list and click Add PCO.
Within the RFI, Issue, or Submittal item list view in the Linked References column, select the PCO number to open the PCO in Cost Management. If the member does not have the correct permission level, this option will not be accessible.
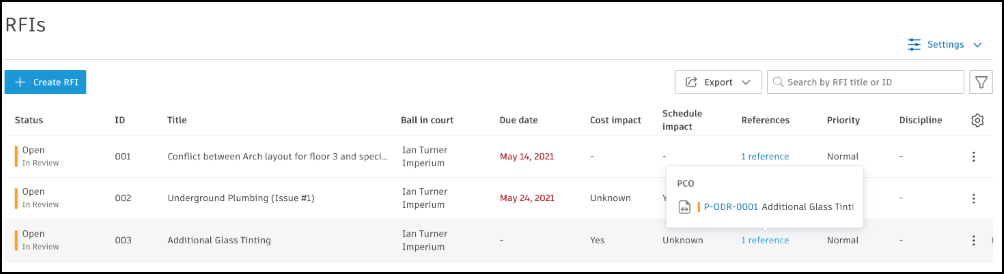
An RFI is also shown in the Linked References section in the change order's details panel when:
- A PCO is linked to the RFI
- An RFQ, COR, OCO, or SCO is generated from the PCO

Learn more about the RFI workflow.
Create a PCO Through the Change Order Transfer (Collaborative PCO)
Collaborative PCO users with Collaborate permission can generate change order transfers, which are net-zero PCOs that move budget from one item to another without changing the total budget.
To create a change order transfer:
Go to the Change Order tool in Cost Management and select the PCO tab.
Click Change order transfer.

In Add change order transfer from Contract:
- If your company has only one associated supplier contract, the contract field will autopopulate.
- Use the Schedule of Values picker to select the SOV items for the transfer (only budget-associated SOV items are listed).
- Select From and To budgets to create the transfer.
Review the PCO preview showing the combination of positive and negative cost items:
- If budgets in From and To are linked to the same contract, positive and negative cost items are combined in the same PCO.
- If not, positive and negative cost items are placed in separate PCOs.
Click Add PCO.

Submit the change order transfer PCO through the normal PCO workflow. See Create a PCO as a Collaborative Access User for further instructions.
Create a PCO from Forecast Adjustment
You can create a PCO from forecast adjustment to request extra budget. This can be done when project administrator set revenue forecast.
To do so:
- Open the Budget tool in Cost Management.
- Click the blue triangle in the Budget Forecast Adjustments column in the Budget Forecast section of the table. Those are visible if revenue forecast is on. The bottom flyout opens.
- Click the More menu next to the forecast adjustment.
Tip: You can also batch create PCOs from forecast adjustments. To do so, check all the boxes next to forecast adjustments in the bottom flyout and click Generate PCO.
- Choose Generate PCO.

The Generate PCO window opens. You can generate from budget forecast adjustment, cost forecast adjustment, or both.

After the PCO is generated, you'll see changes in the Pending Owner Changes. If you generated from budget forecast adjustment, Budget Forecast Adjustment Qty is set to 0. As a result, Amount is also set to 0. Unit Cost is not changed. There are three activity logs after this procedure.

It's the similar rule for other options. If you generated PCO from cost forecast adjustment, you'll see changes in Cost Forecast Adjustment section and so on. If from both - you'll see changes in both places and there will be five activity logs.
Create a PCO as a Collaborative Access User
If you are a supplier with collaborative permissions and have been enabled by an administrator to create PCOs, you can submit a PCO.
To create a PCO as a Collaborative Access User, follow these steps:
Go to Change Order tool in the menu. Click Add.

Select the appropriate contract, and choose your budget. Confirm with the Add button.
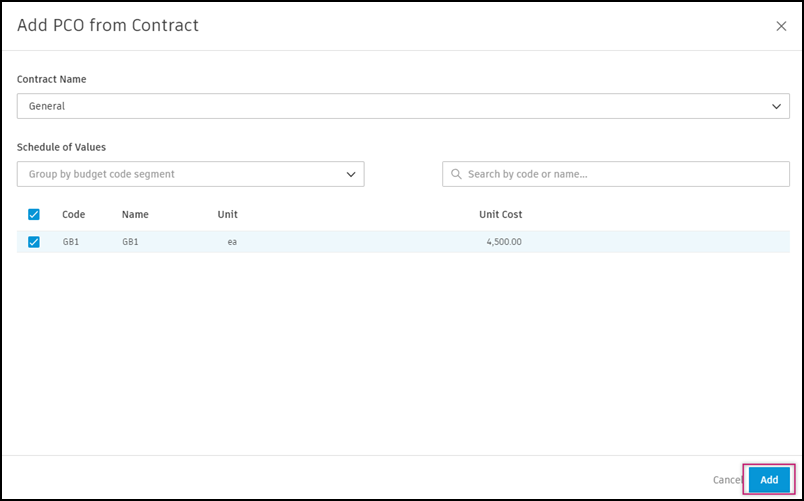
Fill in the necessary fields and click Submit.
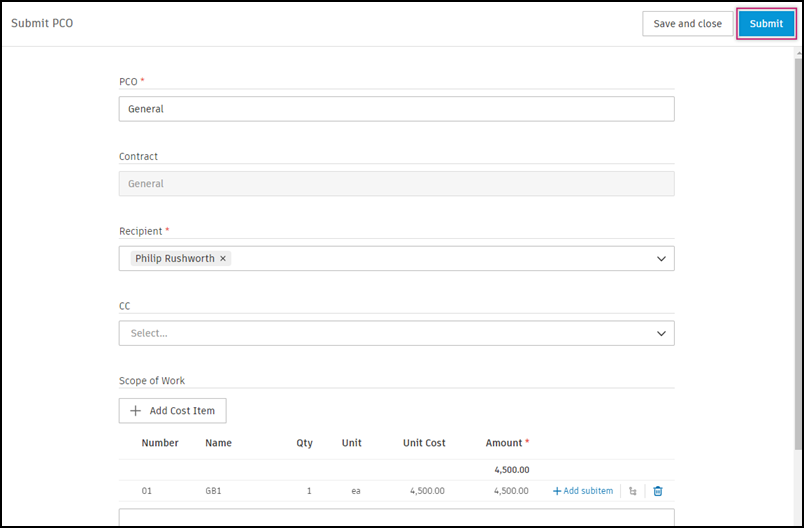
Your PCO is now proposed.
 Note: If you click Save and Close instead of Submit, the PCO will be saved as a draft (with the status Pricing). You can edit the fields later by clicking the More menu and choosing Submit.
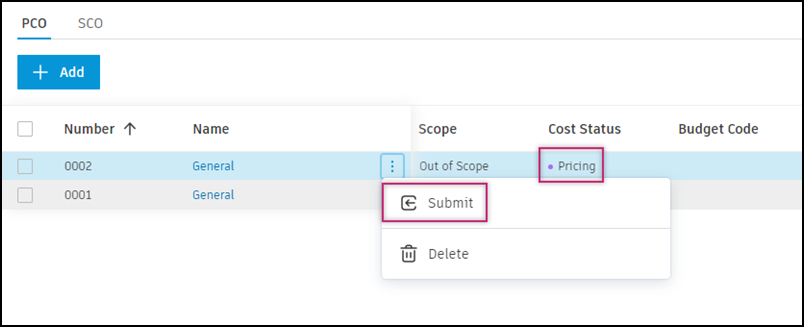
Submit PCO as COR Without Cost Items
When working with PCOs in an early estimation phase, you can submit a PCO for review without creating detailed cost items. This streamlines the workflow when you need to get budget approval quickly.
To submit a PCO without cost items:
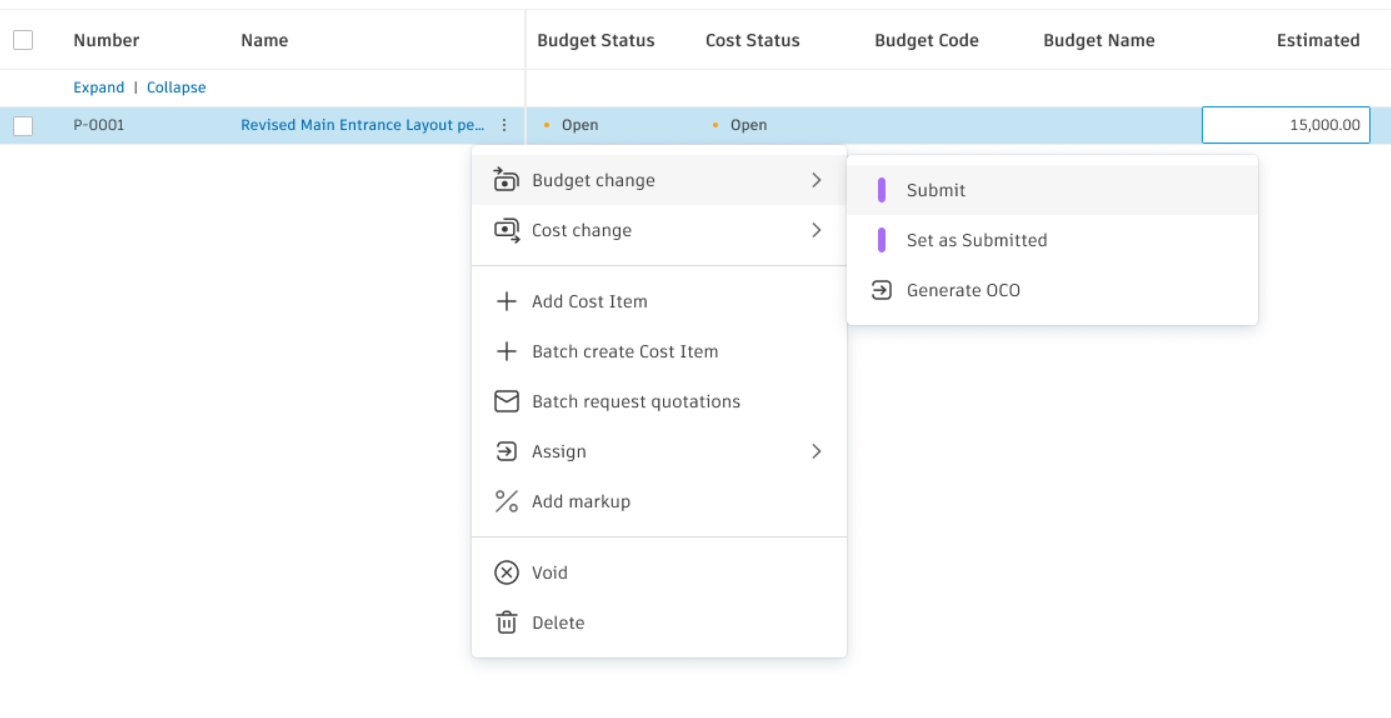
Create a PCO and enter values in the Estimated, Proposed, or Submitted columns at the PCO level.
Click the More menu
next to the PCO.Choose Budget Change, then Submit.
If there is no Submitted value, the Submit PCO modal will only show the PCO level. Enter the Submitted value and click Submit.
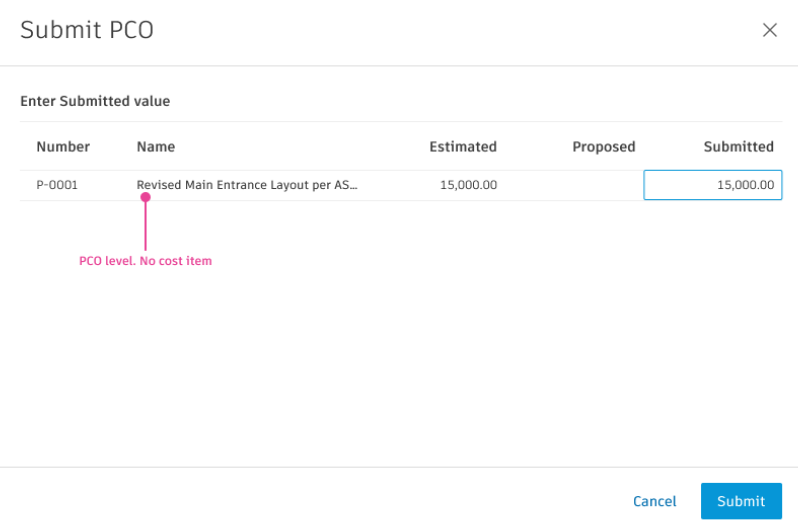
If there is a Submitted value, the PCO as COR can also be submitted with the Send for signature action. Once the document is signed and returned, PCO as COR will be automatically set as accepted.
Respond to a PCO Without Cost Items
When responding to or reviewing a PCO that has no cost items, the interface displays information at the change order level only, simplifying the review process.
If there is no cost item, the CO level is shown in the Scope of Work (SOW) section. This applies to:
- RFQ response page
- COR approval workflow review page
The change order level values are displayed but not editable during the response or review process. However, there is an exception: on the PCO as COR approval workflow review page, if editing is enabled and the PCO has no cost items, the PCO level value can be edited.
When viewing a PCO without cost items, the total on the summary line is removed since there are no subitems to aggregate.
Edit Existing PCOs
After the PCO is created, you can add more or modify details. To do so:
Click the PCO name to open the details panel.
Add information to the applicable fields in the Owner Details or Main Contractor Details, Recipients, Scope of Work, and other sections, including:
- Name
- Description
- Cost Status (learn more about change order statuses)
- Schedule Change (impact of the PCO, as measured in the number of days the project schedule is changed)
Modify any previously defined fields if necessary.
Edit PCO Values Directly
When there are no cost items attached to a PCO, you can edit the PCO's values directly in the table. This is useful for early estimation workflows when you need to create high-level estimates before breaking them down into detailed cost items.
- If there is no cost item, the PCO values (Estimated, Proposed, Submitted, Approved, Committed) can be directly edited.
- If there is any cost item, the PCO values will no longer be editable. To change the values, you'll need to edit them at the cost item level.
Duplicate a PCO
Duplicate an existing PCO to quickly create a PCO with similar content. This is useful when you have standard indirect budget codes required on all PCOs (like internal labor), or when you need to create multiple similar change orders.
Permissions required: Full Control permission for both PCO and Cost Item. See Cost Management Permissions to learn more.
To duplicate a PCO:
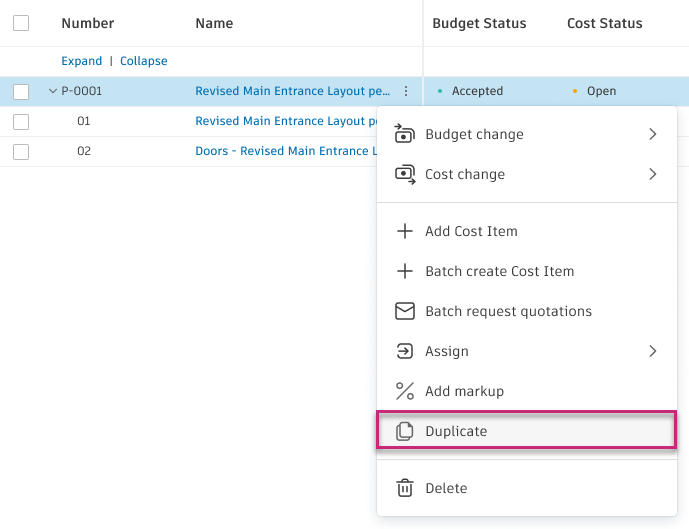
Click the More menu
next to the PCO that you want to duplicate.Select Duplicate.
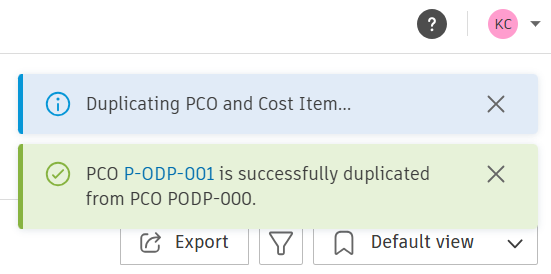
A toast message appears to show the duplication is in progress.
Once complete, a success message appears with a link to the new PCO.
The duplicated PCO includes:
- Content: Name, scope, description, schedule change days, cost items (with their details like budget code, contract, supplier, type, location, and amounts)
- Custom attributes and notes
The duplicated PCO does NOT include:
- Numbers: The new PCO gets a new number
- Statuses: Both the PCO and cost items are created in draft status (Budget Status and Cost Status are both draft)
- Dates: Created, revised, and status change dates are reset
- Documents and attachments
- Linked items: Related change orders (RFQ, COR, OCO, SCO) and budget transfers
- Markups applied to cost items
- Activity logs
- Integration state
Generate Change Orders from a PCO
You can generate CORs, OCOs, SCOs, and RFQs from a PCO. To do so, make sure that:
- The PCO's status is set as Open
- There is at least one cost item added
Then:
Click the More menu
next to the PCO.If the scope of the PCO is:
- In Scope - click Cost Change and choose Generate RFQ or Generate SCO.
- Budget Only - click Budget Change to generate COR or OCO.
- Out of Scope or Contingency - click Budget Change to generate COR or OCO and Cost Change to generate RFQ or SCO.
Tip: To learn more about scopes and how change orders populate in the budget and contract tables, see the Budget and Contract Tables article.

The new change order generates and you’ll be moved to the suitable tab to continue the workflow.
How Data Flows When Generating Change Orders from PCO
When generating change orders from a PCO, data flows through specific fields at two levels:
- Change Order Level: Used for general descriptions and the overall scope of work, which applies to the entire change order and all associated trades.
- Cost Items Level: Used for detailed descriptions and scope of work specific to individual budget codes or trades.

Example scenarios:
Single PCO to OCO. If you generate one OCO from a single PCO:
- The PCO description is copied to the OCO.
- The scope is aggregated from the PCO and its cost items.

Multiple PCOs to OCO. If you generate one OCO from multiple PCOs:
- Descriptions from all PCOs are aggregated and copied to the OCO.
- Scopes from all PCOs and their cost items are aggregated and copied to the OCO.

This workflow reduces manual data entry and helps carry relevant details forward accurately to the appropriate levels. By following this process, you can maintain consistency and streamline the generation of change orders from PCOs.
Change Scope on Cost Item Level in Change Orders
You can edit the scope field for individual change order subitems. This may be helpful in cases where one or more cost items are a budget-only transaction for a particular change order, such as transferring from a noncontingency, allowance, or fee budget item. Scope options include:
- In Scope: Cost Side Change Only
- Budget Only: Budget Side Change Only
- Out of Scope: Budget and Cost Side and will be funded by extra budget
- Contingency: Budget and Cost Side and will be funded by transfer from an existing budget
Specific cost items can be excluded from the budget overview, even if the overall change order retains its original scope.
PCO Document Storage in Forma Data Management
When you generate or upload documents for a PCO, they are stored in the corresponding company's folder in Forma Data Management based on the PCO scope:
| PCO Scope | Documents Stored In |
|---|---|
| Out of Scope | Owner company folder |
| Contingency | Owner company folder |
| Budget Only | Owner company folder |
| In Scope | Main Contractor company folder |
This folder mapping reflects the workflow logic: "In Scope" work is the contractor's responsibility, so documents go to their folder. Out-of-scope, contingency, and budget-only items require owner review, so documents go to the owner's folder.
Keep in mind:
- If documents already exist and you change the PCO scope or company, existing documents will not move to the new folder. Only newly generated or uploaded documents will be saved in the new folder.
- If auto-grant folder permission is enabled, the corresponding company automatically receives folder permission when documents are created.
Populate Pending Change Orders without an Open Subcontractor Change Order
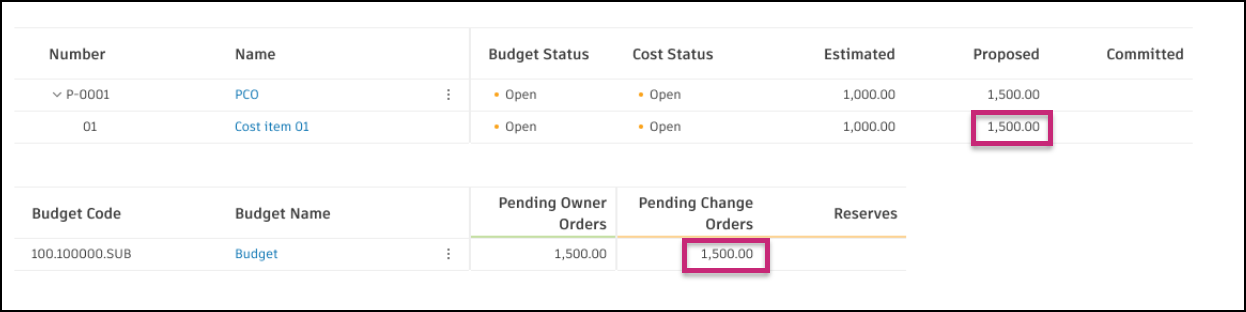
When a general contractor already knows the proposed price, they can populate pending change orders without creating an RFQ. To do so, enter a proposed value in the Proposed column on a cost item level when creating a PCO. The value is shown in the Pending Change Orders column in the Budget table.
Reconcile Pending Owner Changes in the Budget Table
When you set PCO budget statuses such as Submitted and Accepted, values roll into Pending Owner Changes in the budget overview. The default rollup includes pre-submitted and submitted owner changes across scope.
If you need a separate budget column for accepted owner changes only (or other status, scope, and change order type combinations), configure budget overview columns in Settings. See Reconcile Pending Change Orders in Create Custom Columns for the full workflow, including how to duplicate Pending Owner Changes, create custom project values, and compare totals in the Budget tool.
Create an Internal Budget Transfer from PCO
Project administrators and members with both Budget and SCO full control permissions can create internal budget transfers directly from PCOs. This is useful when you need to move money from one budget item to another to pay for change orders without requiring extra approvals.
To create a budget transfer from a PCO:
Go to the Change Order tool and select the PCO tab.
You can create a budget transfer in several ways:
- From a PCO: Click the More menu next to the PCO, click Budget change, and select Transfer budget.
- From multiple items: Select multiple PCOs or cost items, then click Transfer budget in the batch actions.

- From a PCO: Click the More menu
Then, in Internal budget transfer:
- Each selected cost item with a nonzero Committed value creates one transfer line.
- For positive Committed values (money allocated), the system automatically uses the cost item's linked budget in the To field.
- For negative Committed values (money being removed), the system automatically uses the cost item's linked budget in the From field.
- The Amount is automatically set to the absolute value of the Committed amount.
- A note is automatically added referencing the source cost item.
Click
 to add more transfers, even those that are not linked to the cost items. Those transfers are separated in the table.
Click
 to delete a transfer from the list.
 You can use Copy to all "From" or Copy to all "To" buttons to quickly populate all transfer lines with the same budget.

Click Save to create one or more internal budget transfers.
You'll receive confirmation that the budget transfer was completed.
Generate a Contract from a PCO
Before generating a contract, make sure that:
- The PCO's status is set as Open
- There is at least one cost item added
Then:
Click the More menu
next to the PCO.Choose Cost Change.
Click Generate Contract.
Enter Contract Code and Contract Name. If the foreign currency setting is enabled in your project, you'll see the Currency and Exchange Rate fields as well.
- Choose the currency for your new contract.
- Edit the exchange rate if needed. The default exchange rate is fetched from the settings.
Enter the committed value or copy it from the cost item. If the foreign currency setting is on, the
 icon shows the converted value.
Click Generate.
Apply a Financial Markup to a PCO
You can create financial markup formulas to be added to change orders. An example of a financial markup is an add-on such as a bond, contingency, or fee. Before you can apply a financial markup, a project administrator must create the financial markup formula in the Change Order settings tab.
After the financial markup formula is created, you can apply it to PCOs. To do so:
- Switch to the Change Order tool.
- Select the PCO tab within the Change Order tab.
- Click the More menu of the PCO that you want to add markup formula to.
- Go to Add Markup and select the financial markup formula to use.
Expand the PCO to see that the financial markup is added to the PCO.
If you see that your calculated markups are out of sync, select the line item and in the Apply Markup drop-down select the necessary markup from the list.
Add Cost Items to a PCO
While you can create and work with PCOs without cost items for initial estimates, certain actions require cost items to be added. The system will guide you through adding cost items when needed.
Add cost items to a PCO before:
- Applying financial markup formulas
- Generating change orders (RFQ, COR, OCO, SCO)
- Generating contracts
Adding Cost Items
When you select Add Cost Item from the More menu, the system displays a modal to help you add cost items:
Select budgets from the budget picker.
Choose the cost items that you want to add to the PCO.

Click Add.
The first cost item that you add will inherit the value from the PCO level, and the default cost item name will be copied from the PCO name.
If you attempt an action that requires cost items (such as applying markup or generating a change order) without having cost items attached, the system will display a modal prompting you to add cost items first with the message "Cost Item must be added before [action name]" and guides you through selecting the appropriate budgets and cost items.
Import Cost Items From a Spreadsheet
You can import cost items and sub-items into an existing PCO from an Excel spreadsheet instead of adding them one at a time. Create the PCO manually first, then import the cost breakdown.
You need Full Control permission for PCO and Cost Item to import cost items. Members with collaborative access and PCO create permission can also use this workflow.
To import cost items into a PCO:
Select the Change Order tool from the left navigation.
Select the PCO tab.
Create a PCO or open an existing one.
Click the More menu
on the PCO row and select Import Cost Item.
On the Cost Item Import page, click Download template in the Notes panel.
Fill in the template with cost items, sub-items, budget codes, and estimated amounts. See Prepare the cost item import spreadsheet for formatting rules.
Drag a file into the preview area, or click Choose file to select your spreadsheet.
 Note: The file must be in
.xlsxformat and cannot exceed 10 MB.Click Import.
Imported cost items and sub-items appear under the PCO. Amounts populate the Estimated column only. Update Proposed, Submitted, Approved, and Committed values through the normal change order workflow.

Prepare the Cost Item Import Spreadsheet
The template includes example data and formatting rules in the Notes section.

Before you import:
- Enter data in columns A through H.
- Use the Number, Name, Qty, Unit, Unit Cost, Amount, and Budget Code columns for each cost item and sub-item.
- To add more hierarchy levels, insert columns between columns A and C.
- Enter budget codes only on parent cost item rows, not on sub-item rows.
- Use the unformatted full code format for budget codes. For example, use
0011251007SUBinstead of001-125-100-7-SUB. - Remove the notes from the template before importing.
- Only the first sheet in the workbook is imported.
If you leave the Budget Code column empty for a cost item, manually assign a budget code to that line after import.
Automatic Budget Code Linking
When you include budget codes in the import spreadsheet, the system automatically links each budget code to the corresponding cost item during import.
To use automatic budget code linking:
- Download the cost item import template from the Cost Item Import page.
- Fill in the Budget Code column for each parent cost item row in your spreadsheet.
- Import the completed spreadsheet.
The system matches each budget code to the appropriate cost item. After import, you can verify the budget code associations in the PCO table or cost item details panel.
Export a PCO Report
You can export a PCO report that will contain all details or a minimum number of them. To do so:
Select the Change Order tool from the left navigation.
Switch to the PCO tab.
Click Export
 .
. Add the report title.
Choose one of the following:
- PDF Report – to export a report in a noneditable PDF format.
- Excel Report – to export a report in an editable Excel format.
Choose the report template:
- Current View - you can export a report from the current view, for example with applied filters.
- System Default Report – you can export a report with all default columns.
Choose whether you want to include the cost item information in the report. By deselecting this option, you can export a report only with the minimum details.
Add an optional message.
Click Run report.
You’ll receive the report by email. You can also find and download it from the Reports tool.
Reports for Collaborative Access Users
Users with collaborative access are able to export reports from change order tables (PCO/RFQ/COR/OCO/SCO).
For change order reports, cost items and their amounts, such as proposed amounts in RFQ reports, are displayed. However, budget codes and names are not included in these reports.