Create an RFI
Before starting to work with the RFI tool see RFI Administration to learn more about permissions, custom fields, types and more.
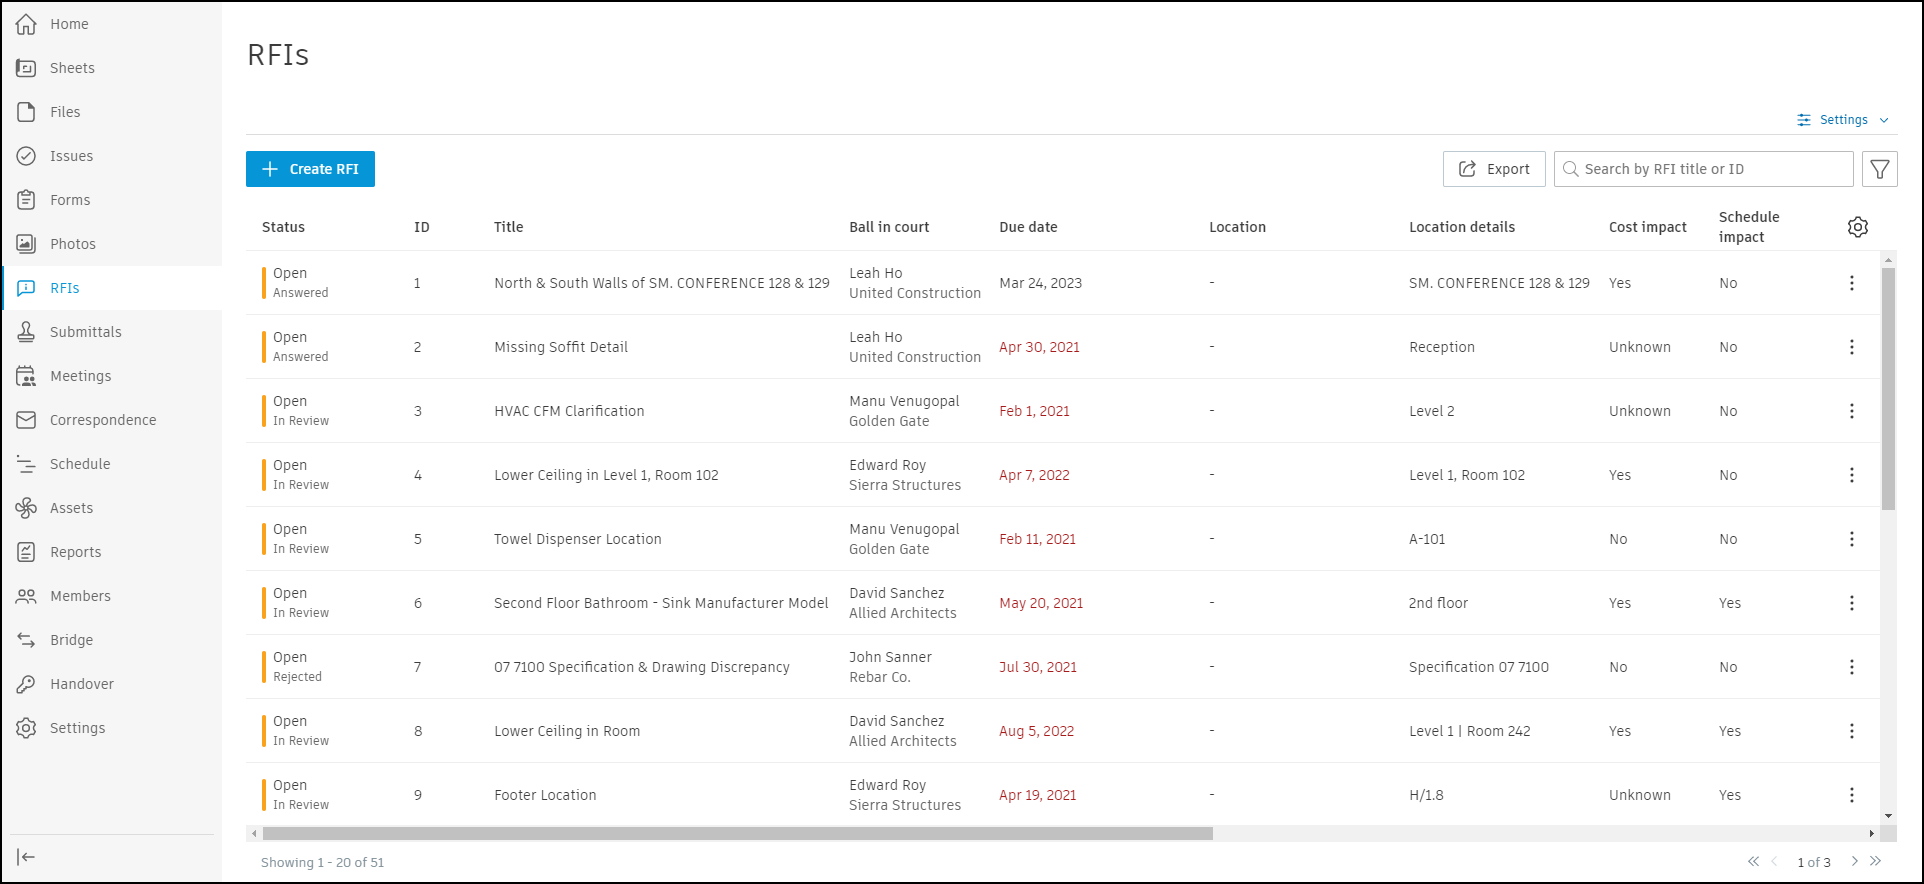
To create RFIs on the web:
Click
 in the top left corner.
Choose a Status. To learn more, see RFI statuses
RFI managers and administrators can select the Open for Manager status when creating an RFI to assign it directly to another RFI manager in the project.
Enter an RFI number. To learn more, see RFI numbering
Enter a Title.
Select an RFI Type. The fields available in the creation form are determined by the field visibility settings configured for the selected RFI type. See RFI Types for more information.
Note: When you change the RFI type during creation, the form fields update to match the selected type's field visibility settings. Any values entered in fields that are hidden in the new type will not be retained.Choose the Ball in court, reviewers, and Optional Reviewers as needed. You can select up to 10 reviewers. For the Ball in court field, you can select an individual project member, a company, or a role. Optional reviewers can respond at any point but don't block workflow progression. See Optional reviewers for details.
Attach References. Select Files, Sheets, Photos, Submittals, Issues, Schedule, Assets, PCO, Forms, other RFIs, or upload files from your device.
Note: If an account administrator has turned off a tool it is hidden in the selectable references. See Products and Tools for more information.Fill in additional fields as needed.
Click Create.
RFI AI Agent
The RFI AI Agent helps you decide whether an RFI is needed before you submit one. When you type a question and click outside the Question field, the agent automatically searches your project's specifications and closed RFIs.
TODO IMAGE: RFI AI Agent banner in the Create RFI form showing analysis in progress
How the analysis runs
- In the Create RFI form, type your question in the Question field.
- Click anywhere outside the Question field.
- A banner appears while the agent analyzes your question. You can continue filling in other fields.
- When the analysis is complete, the banner updates. Select View results to open the results panel.
Banner states
| State | What it means |
|---|---|
| Analysis in progress | The agent is searching your project data. Continue drafting the RFI. |
| Results ready | The agent found relevant information. Select View results to see the results. |
| Unavailable | The analysis couldn't complete. Select Retry, or continue creating the RFI. |
Results panel
The results panel shows information from your project relevant to your question:
- Specifications — specification sections related to your question. Select a section to open it in a new tab.
- Similar RFIs — previously closed RFIs that match your question. Select an RFI to open it in a new tab.
The panel also shows one of these verdicts:
- No RFI needed — the answer already exists in your project data. Review the sources before closing the form.
- RFI recommended — the agent didn't find an existing answer. An RFI is warranted.
- Couldn't determine — the agent didn't find enough relevant information to make a recommendation.
To create an RFI from the results panel, select Create RFI. The Create RFI form opens with your question pre-filled and relevant references attached.
For accuracy and legal information, see Autodesk Assistant in Autodesk Forma Legal Disclaimer.
You can also generate an RFI with AI to automatically populate fields in the RFI creation form from a simple text prompt.
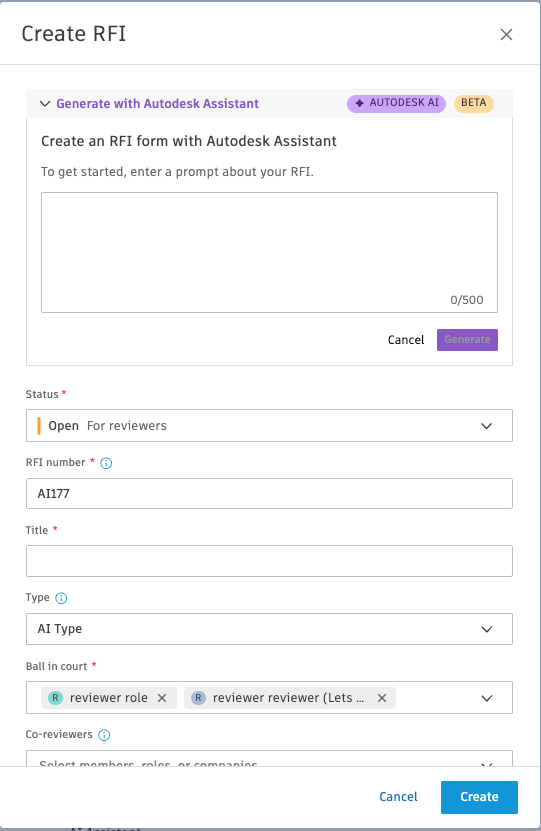
How it Works
- Inside the create form, input a descriptive prompt of your RFI. Autodesk AI will analyze your text and fill in the relevant fields, which will be highlighted for your review.
- User Responsibility: You must review all auto-populated information for accuracy and completeness. You can edit any field as needed, which will remove its highlight.
- Permissions: This feature is available to all users who have permission to create RFIs.
- Field Visibility: Autodesk AI will only populate fields that are visible for the selected RFI type. Hidden fields will not be filled by the AI-generated response.
Supported Fields
Autodesk AI currently supports the following fields:
- Title
- Question
- Category
- Discipline
- Cost Impact
- Schedule Impact
- Priority
- Location Details
RFI Type Behavior
For fields with defined default values, the AI-generated response will not override these existing defaults.
Regenerate Option
You can regenerate the AI-generated response if needed:
- All supported fields will be repopulated with new AI-generated content
- Review and verify all regenerated content before proceeding
Activity Log
RFIs generated using AI will be logged in the activity log.
Tips for Writing an Improved Prompt
- Be specific about the issue or information needed. Avoid vague or general phrasing.
- Use clear, complete sentences that describe the RFI question. Use as much detail as you can.
Limitations
Query Limits
Is there a limit to the number of queries I can make?
- There is a limit of 100 queries per 24-hour period for each project member.
- There is a limit of 10 queries per 1 min period for each project member.
- There is a limit of 500 queries per 24-hour period for the entire project.
Trust and Legal
Accuracy and Reliability
How accurate and reliable are the responses generated by Autodesk GenAI Assistant?
- Responses are AI generated, so information provided as an answer may not be complete or accurate. It is your responsibility to verify answers.
Data Usage
Is my data used to train the AI model?
- Autodesk Assistant in Autodesk Forma is using pretrained third-party models and we do not share any customer data with those third-party providers.
Legal Disclaimer
Where can I find a legal disclaimer for Autodesk Assistant in Autodesk Forma?
Per Section 11.1 of the Autodesk Terms of Use, our Offerings are tools that are intended to assist you, in the case of the Autodesk Forma services, with your construction management and planning activities. Our tools are not a substitute for your professional judgment or independent expertise. It is your responsibility to:
- (a) determine whether the use of an Offering is appropriate for your purposes
- (b) determine the appropriate use for the Offerings
- (c) select the Offerings and other computer programs and materials, in each case to help achieve your intended results or output
You are solely responsible for:
- (i) your use of the Offerings and any results produced by the Offerings, including any output
- (ii) establishing the adequacy of independent procedures for testing the reliability, safety, accuracy, completeness, compliance with applicable legal requirements and industry standards, and other characteristics of any output, including insights, recommendations, and all items designed with the assistance of the Offerings.
For additional information, please review the Autodesk Terms of Use and visit the Autodesk Trust Center.
The default RFI number is taken from the last created or renamed RFI with the number incremented by one. This default number can be changed as long as the number is unique.
To change the RFI number:
- Choose and open an RFI item.
- Edit the number field in the top right corner.

To edit an RFI on the web:
- Choose and open an RFI item.
- Adjust desired fields.
To create an RFI on the mobile app:
- Tap Create RFI button.
- Select a Status.
- Enter an RFI number.
- Enter a Title.
- Select an RFI Type.
- Choose the Ball in court.
- Attach References:
- Select Files, Sheets, Photos, Submittals, Issues, Schedule, Assets, PCO, Forms or other RFIs
- Upload files from your device
- Fill in additional fields.
- Press Create.
You can place an RFI pushpin directly on a sheet to create an RFI in context. The sheet stays visible while you fill in the details.
Permissions: RFI Creator, Manager, or Administrator.
To create an RFI from a sheet (web):
- Open a sheet in the document viewer.
- Select the RFI icon from the markup toolbar.
- Click the location on the sheet where you want to place the pushpin.
- Fill in the RFI details in the panel that opens on the right.
- Click Create.
The pushpin remains on the sheet after creation. Its color reflects the current RFI status. The RFI Placement field automatically shows the current document.
To create an RFI from a sheet (mobile app):
- Open a sheet in the document viewer.
- Tap the RFI icon in the markup toolbar.
- Tap the location on the sheet where you want to place the pushpin.
- Fill in the RFI details in the panel that opens.
- Tap Create.
View RFI pushpins on a sheet
Pushpins mark the location of each RFI on a sheet. Pushpin color reflects the current RFI status. Void RFIs don't appear as pushpins. Pushpins disappear when the Issues, Assets, or Location panel is active.
- Click a pushpin to view RFI details.
- Drag a pushpin to move it to a new location. Moving a pushpin updates its position in the current sheet version only. You must have edit permissions for the RFI to move the pushpin.
The fields available in the RFI creation form depend on the field visibility configuration for the selected RFI type. Project administrators and RFI managers can customize which fields appear and which fields are required for each type. See RFI Types for configuration details.
When changing RFI type during creation, fields update to match the new type's configuration.
To edit an RFI on mobile:
- Tap an RFI.
- Tap Edit.
- Edit the relevant fields.
- Tap the back arrow.
When working with markups or issues, you can now create a new RFI directly from the reference picker. After creating an RFI, you'll be automatically redirected back to the Choose RFI screen with your new RFI pre-selected, ready for use. Remember, this feature is only available to users with permission to create RFIs.
Proper numbering conventions for RFIs are an important best practice in construction project management.
Assigning clear, logical numbers to RFIs allows project teams to easily track and sort these information requests throughout the construction process. Custom alphanumeric formats help differentiate between RFI types and trades while supporting proper chronological sorting. Numbering also enables the reuse of voided RFI numbers by appending identifiers like "-void".
Overall, implementing thoughtful RFI numbering and revision schemes ensures efficient information sharing and management across large, complex construction projects with multiple stakeholders.
RFIs Numbering Best Practices
Administrators and managers can assign custom numbers to RFIs in the Open status, which are then sent to reviewers.
Supported RFI numbering formats:
- Alphanumeric combinations, such as BID-1. To ensure proper sorting, letters must precede numbers
- Multiple RFI numbering series, for example, BID-1 and ARCH-1
- Custom numbering schemes with a maximum length of 15 characters
To reuse a number, rename voided RFIs, such as changing BID-2 to BID-2-void. The suggested number for a new RFI might belong to a different numbering group or be appended to a "void" number.
RFI Revision Numbers
If you need to revise an RFI, it is recommended to duplicate the existing RFI and assign it a new number that indicates it is a revision of the original. The revised RFI with the new number can then be edited as needed and proceed through the process like a new RFI.
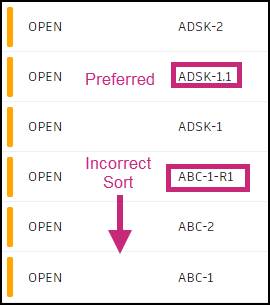
To ensure proper sorting, use the RFI revision format X.1 when creating revision RFIs.
- Period-delimited names, like BID-1, are the preferred method for related information requests
- Using letters between number groups (for example, RFI-001-rev1 or RFI-001r1) can cause sorting issues
For example, if the original RFI was numbered RFI-001, the duplicate would be numbered RFI-001.1 to indicate it is the first revision of RFI-001. If further revisions were needed, the next revision could be numbered RFI-001.2, and so on.
See the sort order of the two revision methods: