Virtual Environments
Overview
Desktop Connector can be deployed in a variety of virtual desktop environments, including persistent and roaming profile setups, with minimal configuration. This guide outlines tested scenarios, requirements, and recommended steps to ensure reliable operation in virtualized environments.
While Desktop Connector can work in virtual environments, Autodesk does not officially support these configurations due to the wide variety of virtualization vendors and setups. For more information, see Technical support for virtual installation.
Security Consideration: Multiple users should not have elevated (administrator) permissions on the same machine. See Multiple users launching Desktop Connector on the same device for more info.
Tested Virtual Environment Configurations
Persistent + Non-Roaming Environments
- No special configuration required.
- Applies to both single-user and multi-user persistent VDI environments with only one concurrent user logged in at any given time, and the operating system is a Windows client edition (not a server edition).
- Change Workspace:
- Desktop Connector version 16.9.1.2222 or later is required if the workspace location is changed.
- For single-user machines, you can set the workspace location anywhere (even outside the user profile). The path can be set in either the HKLM or HKCU registry.
- For multi-user machines, the workspace path must be set in the HKCU registry hive and each user should have a unique folder name for their workspace.
Roaming Profile Environments
Requirements
- Operating System: Windows 11, version 24H2 (OS Build 26100.3775 or later) which includes the patch KB5055523, Single-Session, or Multi-Session
- Date published: April 8, 2025
- Profile Management: FSLogix 25.04, version 3.25.401.15305 or later
- Date published: April 8, 2025
- Note: You will need to identify your specific VDI and RUP management vendors preferred methods for performing the steps listed below. Our examples reference FSLogix.
- Operating System: Windows 11, version 24H2 (OS Build 26100.3775 or later) which includes the patch KB5055523, Single-Session, or Multi-Session
Configuration required:
- You must configure the SyncRootManager registry value. The Forma Connector icon registry value is optional. See Configuration Steps for Admins below.
Change Workspace is not recommended in roaming profile environments. If you must use it:
- The workspace location must be within the
%userprofile%path and set in the HKCU registry hive. - This removes nearly all the advantages of using Change Workspace (such as shortening paths or standardizing across users). This is because profile management tools like FSLogix only preserve data within the user profile when storing it on a centralized server. If the workspace is outside the user profile, it will not roam with the user and may cause data loss or sync issues.
- The workspace location must be within the
Configuration Steps for Admins
If you are using a persistent, non-roaming environment, no special configuration is required. The steps below apply only to roaming profile environments.
Option 1: Use pre-made FSLogix policies (Recommended for FSLogix environments)
For FSLogix environments, pre-configured policy files that automatically handle the required registry redirection and icon location setup are provided.
Download and Installation:
Download the FSLogix policy files
Unblock the files:
- Right-click each
.fxror.fxafile - Select Properties
- In the General tab, check the Unblock checkbox if available
- Click OK
Note:
The "Unblock" option may not appear for all organizations depending on Windows security policies.
- Right-click each
Copy the unblocked policy files to:
C:\Program Files\FSLogix\Apps\RulesUpdate your pool of virtual machines
Log into a virtual machine to validate the rules are working
⚠️ Important Considerations:
- These policies will replace any existing FSLogix rules you may have configured for Desktop Connector
- The policies are designed to work "straight out of the box" with no additional configuration
- If you have custom FSLogix rules or use a different profile management solution, follow Option 2: Manual Configuration instead
Option 2: Manual configuration
Step 1: Redirect the SyncRootManager Registry Key (Required for Roaming Profiles)
Apply these changes to your gold image:
Install Desktop Connector (any supported version; 16.9.1.2222+ is required if the workspace location is changed).
Redirect the SyncRootManager registry key:
Use your vendor's method to redirect the following registry key from
HKLMtoHKCU.Change the registry path from:
HKEY_LOCAL_MACHINE\SOFTWARE\Microsoft\Windows\CurrentVersion\Explorer\SyncRootManagerto a location underHKEY_CURRENT_USERwith your redirection tool.For example, with FSLogix, use FSLogixAppsRuleEditorSetup.exe to redirect:
- Source:
HKEY_LOCAL_MACHINE\SOFTWARE\Microsoft\Windows\CurrentVersion\Explorer\SyncRootManager - Destination:
HKU\__USER_SID__\SOFTWARE\FSLogixRedirect\Microsoft\Windows\CurrentVersion\Explorer\SyncRootManager

- Source:
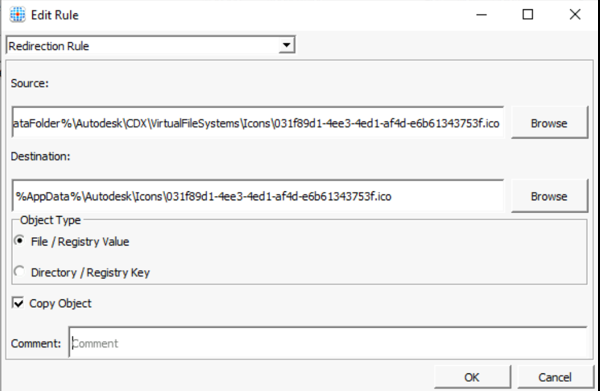
Step 2: Move the Forma Connector Icon File (Optional)
If the Forma Connector icon does not appear in Windows File Explorer:
Move the icon file to the user profile:
Source:
C:\ProgramData\Autodesk\CDX\VirtualFileSystems\Icons\031f89d1-4ee3-4ed1-af4d-e6b61343753f.icoTarget: A location under the user profile folder, preferably
%appdata%\Autodesk\CDXFor example, with FSLogix, use FSLogixAppsRuleEditorSetup.exe to create the following file redirection rule:
- Source:
C:\ProgramData\Autodesk\CDX\VirtualFileSystems\Icons\031f89d1-4ee3-4ed1-af4d-e6b61343753f.ico - Destination:
%AppData%\Autodesk\Icons\031f89d1-4ee3-4ed1-af4d-e6b61343753f.ico
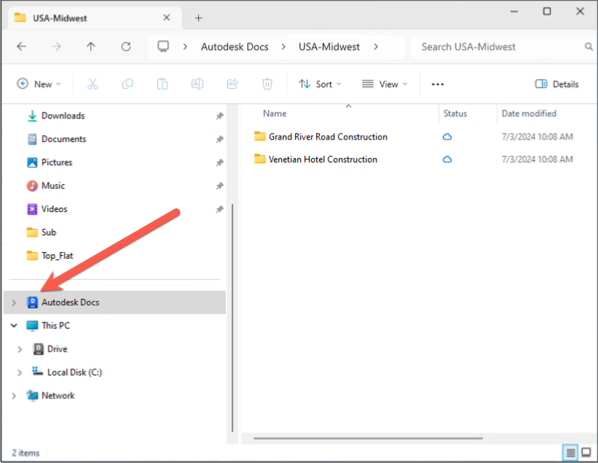
When configured correctly, the icon appears as shown in File Explorer:
- Source:
What if I skip these steps?
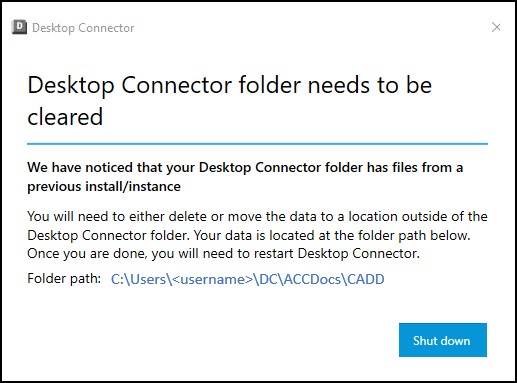
If you do not complete the required configuration, you may experience the following issues:
Changes made on your local device will not be recognized by Desktop Connector and will not sync to Forma.
Each time the virtual machine is started, Desktop Connector will show the "Desktop Connector Folder Needs to be Cleared" dialog. Users must clear the local workspace and restart Desktop Connector.
Related Content: