Issues in Model Coordination
Issues are used by teams to identify and communicate about areas of concern or required improvements in project files and models. Issues can be created and viewed in several ways in Model Coordination, for example using the Issues tool, when viewing models or views, or when reviewing clashes.
Project administrators control permissions and settings for issues in Model Coordination. These are controlled in Docs, and inherited by Model Coordination:
- Issues settings: These include categories and types, custom fields, root causes, templates, and statuses.
- Issues permissions
Issues tool
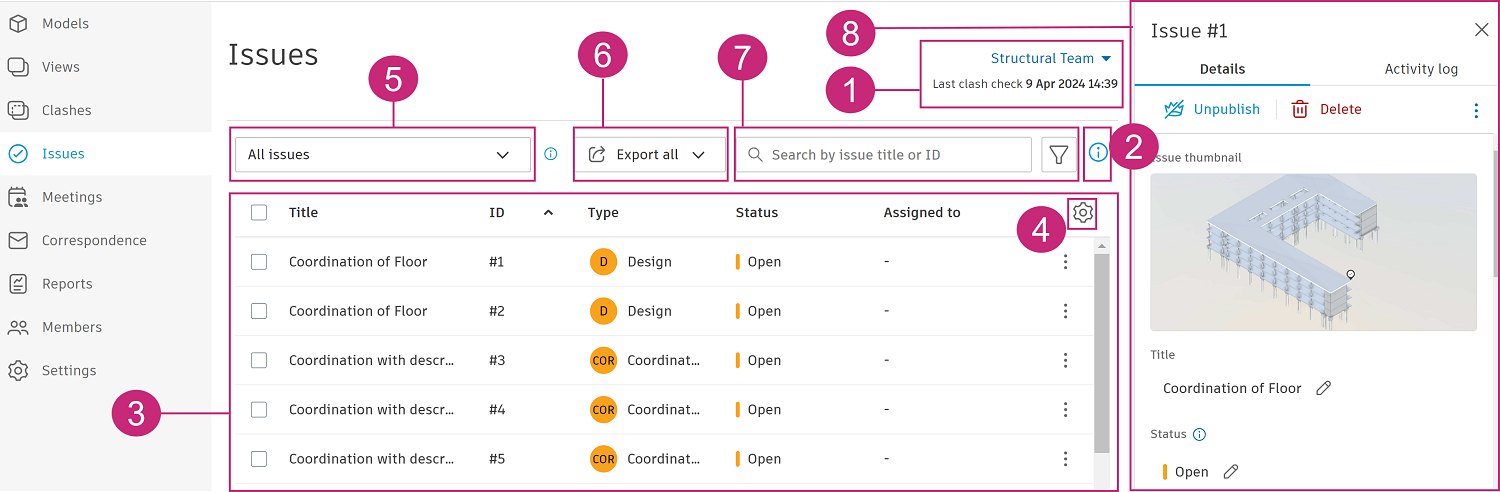
1. Coordination space
Click the coordination space drop-down to select the desired coordination space. The issues log will change to display the issues from the selected coordination space.
Last clash check...: This shows the date and time of the clash check that determines the issues which are displayed. Issues display from the last successful clash check. If there has never been a successful clash check, all models will display from the last unsuccessful clash check.
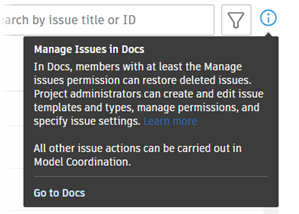
2. Manage issues in Docs
Hover the information icon to learn about the actions that can or need to be completed in Docs to affect issues in Model Coordination. Click Go to Docs to go to the Issues tool in Docs.
3. Issues log
The issues log in Model Coordination lists issues under various attributes (column headings) corresponding to entries in the details panel (see 8. Issue details panel) and updates to the issue. You can update the attributes shown using attributes settings (see 4. Attributes settings).
The issues log includes:
All the issues created against models contained in the selected coordination space.
Issues created in other coordination spaces (where a model is contained in more than one coordination space).
Issues created in Docs or Build (on 3D models).
All issue types, not just coordination, and clash issues.
Note: Issues that were created on models in the coordination space, but that have since been deleted, are also displayed.
The issues log does not include:
- Issues created on 2D files in Docs or Build.
- Issues created on project model or master model views in Design Collaboration.
Click an issue to open and review the details panel for that issue.
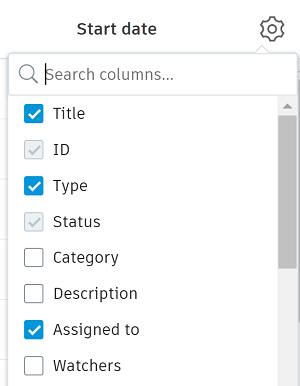
4. Attributes settings
![]() : Click the gear icon to search, sort, and update the attributes which display in the issues log.
: Click the gear icon to search, sort, and update the attributes which display in the issues log.
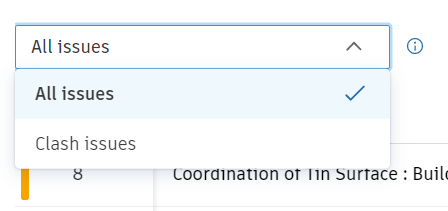
5. All issues or clash issues
Use the drop-down to filter the log of issues to show either:
All issues
Clash issues: Only shows issues created from clashes even if the issue was created with a different type.
6. Export
You can export a report for all, multiple, or individual issues.
- Export all issues: Click Export all.
- Export multiple issues: Select the issues that you require from the log. Click Export (x). For example, if you select five issues, the button will be Export (5).
For all and multiple issues, you can choose from the following options:
Export report: You can export an Issue detail or Issue summary XLSX or PDF file format.
Export as BCF: Export the selected issue or issues as a BCF file and share them with other BCF-supported apps.
Tip: Apply filters to the Issues log to find only the issues you want to export a report for. The resulting report will include details on which filters were applied at the time, as well as the name of the relevant coordination space.
To export an individual issue:
- Click the More menu
 of the relevant issue in the Issues log.
 - Click Export as PDF.
- Click Export in the dialog.
You will receive an email with a link to download the issue report.
For full details on exporting issues, see Export Issues and Issues Reports topic in the Docs help site.
7. Search and filter issues
- Search: Click the search box and enter terms to search by issue title or ID.
- Filter: Click the filter icon
 to open the filter panel. Configure the filter or filters that you want to use, and the issues log will update automatically. You can clear filters individually or clear all filters by clicking the X next to the filter icon.
8. Issue details panel
Click an issue in the issues log to open the issue details panel where you can review and edit the details for that issue. See Edit, Publish, and Delete Issues in Model Coordination for full details.
You can also view the details panel in the viewer if you need more model context. Click an issue in the issues log, scroll the details panel to the Placement section and click the file name. The details panel in the viewer also allows you to update your issue thumbnail and thumbnail markups if desired.