Edit Naming Standards
Project administrators can edit a naming standard once it's been created. They can edit the name, description, naming convention attributes, related attributes, reorder attributes, and change the delimiter.
Edit General Information

In the General Information section, project administrators can edit:
- Name: This is a required field and must be a unique naming standard name up to 255 characters.
- Description: This is an optional field.
Edit Naming Convention
In the Naming convention section, you can edit attributes, add or remove attributes, reorder attributes, and change the delimiter subject to the following restrictions:
| Action | Condition | Allowed? | Solution |
|---|---|---|---|
| Add, remove, or reorder attributes |
- Files exist in any applied folders. - Add more than 15 attributes. - Add system attributes. - Add the Classification attribute (can only be used for related attributes). |
No | - Remove files or unapply folders to make changes. - Only add up to 15 attributes -Don't add system attributes - Don't add Classification attributes |
| Edit attributes | Attributes are used by this or other naming standards applied to folders containing files. | No | Remove files or unapply folders from those naming standards to make changes. |
| Edit delimiter | Files exist in any applied folders. | No | Remove files or unapply folders to make changes. |
Edit Naming Convention Attributes
Click Edit next to the attribute details label.
 Note: If Edit is disabled and the naming standard applied folders don't contain files, this means that the attribute is part of other naming standards which are applied to folders which contain files.
Hover the info icon to see which naming standards also use the attribute:

You can edit the Name and Description of all attributes in the naming convention.
When no restrictions apply, you can also edit drop-down and text field attributes as follows:
Drop-down attributes: Add, edit, and reorder attribute values.
Text field attributes: Edit the following character settings:
Character length: Select from Any, Fixed, or Range.
- Any: Allows members to enter a maximum 255 characters as a value
- Fixed: Fix the value length to be an exact number between 1 to 50 characters
- Range: Select a value ranging from 1 to 50 characters
Character type: Select from Alphanumeric, Text, or Numeric
Important: If a naming convention attribute value contains the same character as the delimiter, the attribute won't display correctly in the validator
Add or Remove Naming Convention Attributes
You can remove, add, and reorder attributes in the naming convention subject to the restrictions.
Click Select attributes in the naming convention section.
Select the desired attributes and deselect any you no longer require.
Note: You can also hover over the tab name and click to remove the attribute.
If the attribute doesn't exist yet, click Create attribute. See Create Custom Attributes help section for full details about creating attributes.
Click
 to drag and reorder the attributes as required. This will determine the order of attributes to form the file name.
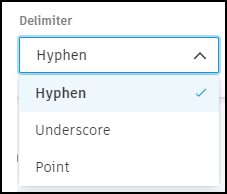
 Click the Delimiter menu to choose which character to use for the delimiter of the naming convention:
Hyphen
Underscore
Point
 Important: If a naming convention attribute value contains the same character as the delimiter, the attribute won't display correctly in the validator
After you've defined the naming convention and delimiter, click Save to save your changes or continue scrolling to edit the related attributes.
Related Attributes
Related attributes provide information about the file's presence in the system. Attributes include:
Edit Related Attributes
Related attributes can be edited as long as there aren't any files in folders applied with a naming standard which use those attributes. You can edit details like the name and description, and also details specific to the attributes such as the:
- Character type
- Required characters
- Codes
- Classification system: You can choose previous and newer releases of NBS Uniclass Classifications.
To change the attribute details, select the tab of the relevant attribute and click Edit next to the attribute details label.
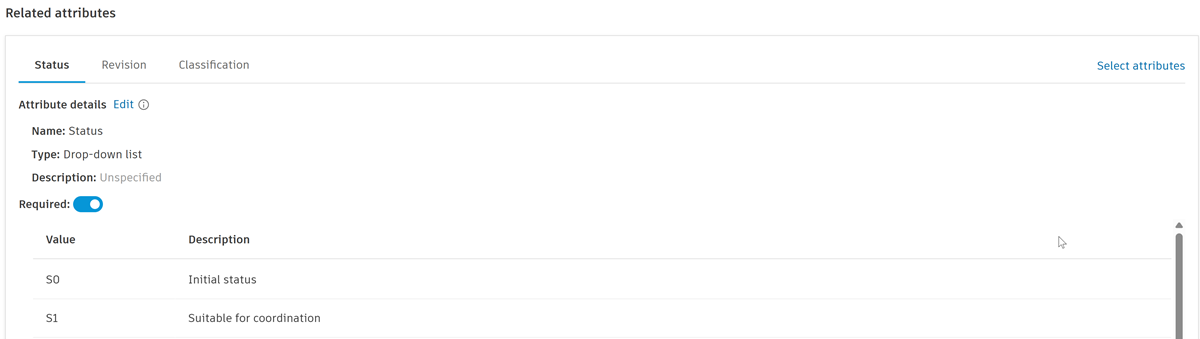
You can also set related attributes as Required if necessary. This means that when files are added to folders with a naming standard applied, they will need a compliant attribute values before the file will display in the folder.
Add or Remove Related Attributes
Related attributes can also be added, removed, or reordered in the naming standard. However, if related attributes are set as required , they can't be added or removed from a naming standard if it's applied to folders which contain files.
Click the relevant attribute tab.
Hover over the tab name and click
to remove the attribute.If necessary, click Select attributes in the related attributes section.
Select the desired attributes and deselect any you no longer require.
Note: You can't add system attributes.If the attribute doesn't exist yet, click Create attribute. See Create Custom Attributes help section for full details about creating attributes.
Hover over the tab and click
to drag and reorder the attributes.Click Save to save your changes.