Share Files and Folders with Another Project
You can share files and folders with another Autodesk Construction Cloud project to facilitate collaboration across different teams and projects.
Bridge is the enabling technology that lets you easily share project information with other Autodesk Construction Cloud projects and accounts. After you share files from the Files tool, you can track and manage what you share in the Bridge tool. Learn more about Bridge.
Markups aren't included when you share files with another project. Learn more about limitations when sharing files in Bridge for Build and Docs Limitations.
To share files and folders with another project:
In Files, select the files or folders you want to share.
For a single file or folder, select the checkbox next to the file or folder. Click the More menu
 next to the item and select Share.
For multiple files and folders, select the checkboxes next to the files or folders. Click
 in the header.Tip:
- When sharing only folders, you will be able to sync them to another project so that updates in the source folders are reflected in the receiving folders. If you want to create this type of automation, select folders and files separately.
- To share an earlier version of a file with another project, open the file you want to share instead. Select Share from the More menu in the viewer. Learn more about how to access this menu in Share, Download, Print, and Compare Files.
In the Share dialog, select Another project.
(Optional for folders only) If you want changes like updated or added files to automatically be reflected in the project you share with, select Automatically sync updates to target project.
Note:- The target project is the project that you choose to share with.
- A folder automation will be created for each folder and each subfolder. You can manage this automation like pausing or deleting the automatic sync in the Bridge tool. Learn more
- New subfolders created in the source folder after the initial share won't be automatically synced to the target project. If you want these folders to be shared, you will need to share those new subfolders separately.

(For folders only) By default, Include subfolders will be selected. All subfolders within the selected folders will be shared with the target project. If you don't want to include subfolders, deselect this option.
(Optional) Enter a title. A title will help you track what is shared in the Outgoing tab in the Bridge tool. Learn more in Manage Outgoing Bridged Content.
Select a target project to add files to from the My projects or Bridged projects tabs.
My projects: Projects where you are a project member with Edit permission or higher
Bridged projects: Projects that are bridged to your current project
Note: Selecting a bridged project will require a project administrator in the target project to accept the content you share. Learn more
If you select from My projects, select a target folder and click Select.
Note: You can't share with naming standard enforced target folders if the holding area isn't enabled in the target project. Learn more about naming standard enforced folders and the holding area.Check your selected items and resolve any errors. Click Add folders to add other folders or click
 to remove selected items.Note: There is always an Attributes section in the selected items. File attributes can be shared when sharing files with another project. Project administrators can add or remove which custom attributes can be shared by adjusting the Attributes Settings in the Bridge tool. Custom attributes will be shared if they are applicable and meet the required criteria. Learn more
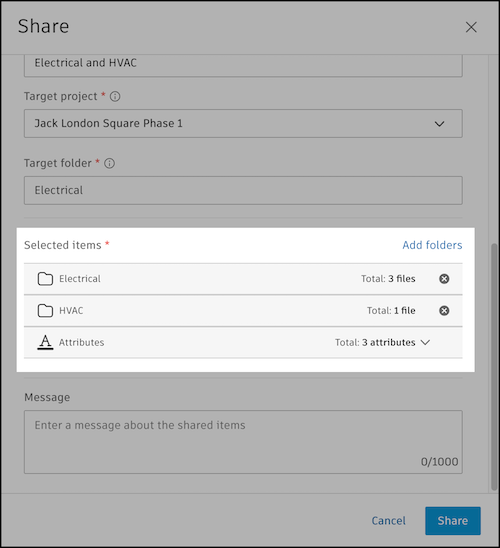
(Optional) Enter a message to provide context to the recipients. The message will appear in relevant emails and on the Detail page in Bridge.
Click Share. You will receive an email when all the items are added to the target project.
Next, in the Bridge tool, you can track the files and folders you share using the Outgoing tab. If you chose to create an automation, you can manage that automation, including pausing or deleting the sync. Learn more in Bridge Automations.
View Synced Folders and Files
You can see if a file or folder is synced to or from another project in the Files tool. The Indicators system attribute shows left or right arrow values to show the direction of the sync.
→: The right arrow shows that the file or folder is syncing to one or more named projects.
←: The left arrow shows that the file or folder is syncing from another project.
Hover the icon to see more information about the sync status and which project the file or folder is syncing to or from. Click See details to view more information in the Bridged projects tab of the Bridge tool. You can more easily manage automatic syncing to and from projects there.
