The Material Database is organized into 2 tabs: Main and Insulation. Both work the same way, but allow for the separation of Manufacturing materials and Insulation materials.
To create a new material:
- On the Database dialog, click Fittings
 Materials to display the Materials options.
- Click
 .
.

- At the prompt asking if this new material is to be based on the currently displayed material, click Yes to save typing in all of the thickness and sheet sizes, and copy the gauges and default sizes from the currently displayed material into the new material.
- On the Material Properties dialog, click in the Name field and change the name from Untitled to the new material name.
- Click
 to display the Material Properties dialog.

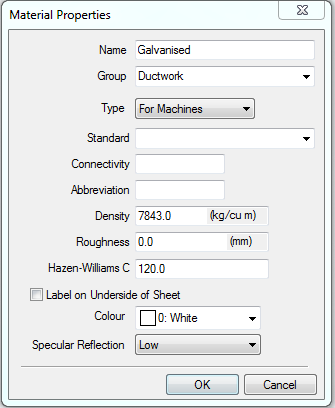
The Material Properties dialog lets you specify Groups, Standards, and other material information that will be used in reports. If you are using pressure in a Design Line, the Material Properties dialog also lets you specify airflow information. The following options are available on the Material Properties dialog.
-
Specify the following options on the Material Properties dialog:
- Group: Can be used to group materials together into groups, such as ferrous and non-ferrous. When data is entered, it is stored for future selection on other materials in the drop-down list.
-
Type: The Type property changes the behavior of the material gauge section on the content. For example, when the Type is set to Pipework, the Gauge drop-down selection list and content display the material specification. The Type property also acts as a filter when assigning the material to the items.
Note: To avoid unexpected results when upgrading, be sure to set the Material Type to something other than Undefined to assign a Material Specification prior to upgrading.For more information, see Material Type Property.
- For Machines: When selected, this material is displayed in the Installed Machines Tools dialog so that Lead Ins, Kerf Values, .etc can be applied to the material. When not selected, any items assigned to this material will not be nested.
- Standard: The Standard field allows extra information to be attached to the material which would show the material as being of a certain grade, such as a British Standard. When data is entered, it is stored for future selection on other materials in the drop-down list. This is also available as a print object.
- Connectivity: A material can be assigned a connectivity property. This is used in conjunction with the Coupling pattern in order to be able to attach different materials to one another. This is used within the connected drawing mode of quick takeoff, and in CADmep for controlling appropriate material connections.
- Abbreviation: An abbreviation for the material name can be entered here. These abbreviations are typically only 3 or 4 characters long. For example, an abbreviation such as STLS is generally used on reports, to minimize the amount of data on a report.
- Density: Density is used to calculate the weight of a part from its thickness and size. In metric units, the density is measured in kg/m3, whereas in imperial the units are lb/ft3.
- Roughness: Roughness is a value that is applied to a material so pressure drops can be accurately calculated on pipework. This is also available as a print object.
- Hazen-Williams C: Specifies the Hazen-Williams coefficient used in calculating friction loss in ducts and pipes.
- Label on Underside of Sheet: This property is used to force the flipping of the sheet, so the developments are turned over. Useful for materials or items which will end up on show.
- Color: A color can be applied to the material for use in Takeoff, Design Line, and CADmep drawings. If Use Material Color is used in Takeoff, the items made with this material will carry that color.
- Specular Reflection: Specular reflection is the mirror-like reflection of light (or of other kinds of wave) from a surface, in which light from a single incoming direction (a ray) is reflected into a single outgoing direction. This can be emulated using OpenGL and applied to the material.
- Click OK to return to the Database dialog.
- Click
 Filter Out Non-User Data to select the material data to be hidden from displayed properties in dialogs and in the model.
- Click
 to specify Owner Information. This information is used to assign materials to Product Listed and Content Driven Items.

Make sure the Main tab at the top of this dialog is selected.
The new material is now available for selection.