The Taper pattern has many available options to choose from and can be complex to input. The following information describes some of the options and features associated with the Taper pattern.
Offsets
The Taper Pattern can and often does have a double offset. It is important to understand how these offsets are represented visually on the Takeoff dialog. The four views below show the default layout of the taper in the Autodesk Fabrication software, as in a new installation.
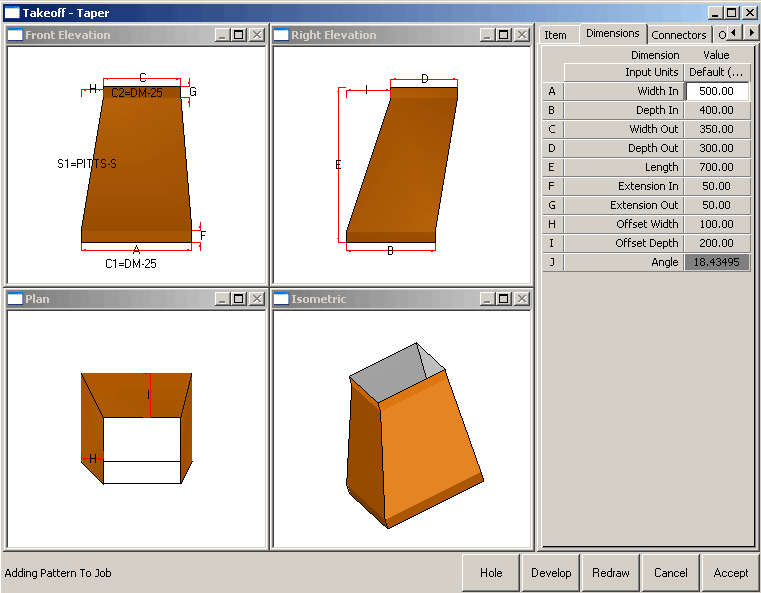
As with the other fittings, the size of the taper can be changed by modifying the dimensions. However, the taper can also set offsets in both the width and depth. This is controlled by the Offset Width and Offset Depth dimensions.
- The Offset Width (H) controls the 'left to right' offset across the width of the duct. The user can enter a value or choose between, Flat Left, Flat Right or Central . If a value of zero is entered, this would give the same result as selecting Flat Left. The image below is the top left view of the Pattern Takeoff dialog.

- The Offset Depth (I) controls the 'top to bottom' offset across the depth of the duct. The user can enter a value or choose between, Flat Bottom, Flat Top or Central. If a value of zero is entered, this would give the same result as selecting Flat Bottom. The image below is the top right view of the Pattern Takeoff dialog.
The effect of the values entered into the offsets are dependent on the settings specified for the Offset Width and Offset Depth parameters on the Takeoff dialog Options tab.

Offset Width
The different options that can be set here are Left In, Left Out, Right In and Right Out. They are described below.
- Left In is the default setting (and the one shown above). If a positive value is entered here it will offset the taper to the right, or inwards. A negative value will offset the taper to the left.
- The Left Out option works in the opposite way to Left In, in so much as a positive figure will offset the taper to the left, and a negative figure to the right.
- If the Right In option is selected, a positive figure will offset the right hand edge of the taper to the left. A negative figure will offset the right hand edge of the taper to the right.
- The
Right Out works in the opposite way to the Right In option. A positive figure will offset the right hand edge of the taper to the right. A negative figure will offset the right hand edge of the taper to the left.
Note: All of the options here are relevant to the top, left view of the pattern Takeoff dialog.
Offset Depth
This option is very similar to the Offset Width option described earlier. The different options available are Bottom Up, Bottom Down, Top Up and Top Down. They are described below.
- Bottom Up is the default setting (and the one shown above). If a positive value is entered here, it will offset the bottom of the taper upwards. A negative value will offset the taper downwards.
- The Bottom Down option works in the opposite way to Bottom Up, in so much as a positive figure will offset the bottom of the taper downwards, and a negative figure will offset the bottom of the taper downwards.
- If the Top Up option is selected, a positive figure will offset the top of the taper upwards. A negative figure will offset the top of the taper downwards.
- The Top Down works in the opposite way to the Top Up option. A positive figure will offset the top of the taper downwards. A negative figure will offset the top of the taper downwards.
Takeoff Dialog Options Tab
The Taper pattern has many other options. Described below are some of the less common options that appear in the Takeoff dialog Options tab.
2 Parts: If Yes is selected, the taper will be developed in 2 parts whenever possible. If No is selected, the taper will never be made in two pieces.
3 Parts: If Yes is selected, the taper will be developed in 3 parts whenever possible. If No is selected, the taper will never be made in three pieces.
Vee Depth Male: The user can enter a Value or select Auto. If Auto is selected the depth of the notch on the male seam will be determined by the seams own configuration. However, if a value is entered, that value will then be used as the Vee Notch Depth on the male seam.
Vee Depth Female: This works in the same way as the Vee Depth Male option above. Apart from the fact that it works on the female seam rather than the male.
Vee Notch Angle: Enter a value to determine the angle. A smaller angle gives a tighter Vee Notch.
Taper Notch If Straight Edge (Female): When a connector is applied to the taper fitting with a straight extension, the connector's Straight Notch will usually be used. This option can over-ride this and apply the Sloping notch. If this option is set, then edges with a Female seam allowance will use the Sloping Notch even when it is straight. The user can apply this to C1, C2, Both or None.
Taper Notch If Straight Edge (Male); This option works in the same way as the Taper Notch If Straight Edge (Female), apart from the fact that is applies to the male seam.
2-Sided Part Allowance: This offers the user 3 choices Male, Female and Auto and determines how the seam will be allocated when a taper is made in 2 parts.
- If Auto is selected, one edge has a male allowance, the other has a female allowance.
- The Male option puts a male allowance on both edges.
- If the Female option is selected, both edges will have female allowances.
Use Taper Notch For 2 Parts: This option only applies when the taper is developed in 2 parts and controls whether the Sloping Notch is used on the large (3-sided) part. Select Yes to enable this.
Input: This option allows the user to select whether the length of the taper will be entered. Select either Length or Angle. Both options appear in the dimensions tab, but only the one that is enabled will be useable. The other option is displayed 'greyed out' and can be used for reference only.
Splitters: It is also possible to place splitters within the taper. Many of the options within the options tab are relevant to the splitters. They are described below.
Maximum Angle: This option allows the user to determine the greatest side angle permitted before splitters are required. If set to 180, splitters will never be used. If this angle is exceeded, splitters will be added at the 1/4, 1/2 and 3/4 point from the side with the largest angle as necessary, until the angle of the splitter is less than the maximum angle.
Splitter Turnover: The amount entered here is the allowance added to the edge of the splitter plate for joining to the taper.
Splitter Extension: This option allows the user to add extra material to the length of the splitter. This is often used as to add a safe edge to the end of splitters.
Splitter Adjust: The width of the splitter can be adjusted here by entering an amount to reduce it by. Adjusting the width of the splitter plate allows easier fitting. Use a negative value to shrink the splitter plate.
Splitter Hole Diameter: If fixing holes are required for the splitter, enter the value here. Alternatively, leave the value at zero if fixing holes are not required.
Number Of Holes: This options allows the user to enter the amount of fixing holes.
Splitters: The splitters field allows the user to determine how many splitters will be generated, and how. This is used in conjunction with the Maximum Angle field. If this angle is exceeded, and the Splitters field is set to Half, splitters will be added at the 1/4, 1/2 and 3/4 point from the side with the largest angle as necessary, until the angle of the splitter is less than the maximum angle. If the Splitters field is set to Full, splitters will be added at the 1/4 and 3/4 point first from the side with the largest angle as necessary, until the angle of the splitter is less than the maximum angle.
Hole Inset: This option give the user the opportunity to inset the holes by the entered amount from the start of the splitter.