The Array command can be used to quickly reproduce features; for example, as a series of holes or access doors. Arrays can be either rectangular or polar.
Rectangular Arrays
A rectangular array consists of columns (running vertically) and rows (running horizontally). The example below has 3 rows and 4 columns of circular holes.

To create a rectangular array:
- Create one item of the array as a base for the rest of the elements, using any of the drawing tools available. If the example above is being re-created, draw the circle at the bottom left.
- From the menus, select Opus
 Array
Rectangular or click on the Array icon
Array
Rectangular or click on the Array icon
 or type ARRAY in the command window.

- You are then prompted to Select Elements. Left-click on the element(s) to be arrayed. Right-click to complete the selection.
- The following prompt displays, asking to select a Base Point. This will be the location that the array will be offset from.
- You are then prompted to define the offset and the number of rows and columns in the array. The offset will be relative to the Base Point previously set, and can be entered using X Y co-ordinates, or chosen by clicking on a point using the mouse.

- Once the offset point has been defined, you are then prompted to specify how many rows and columns are required.

- When entered, the array is drawn.
Polar Arrays
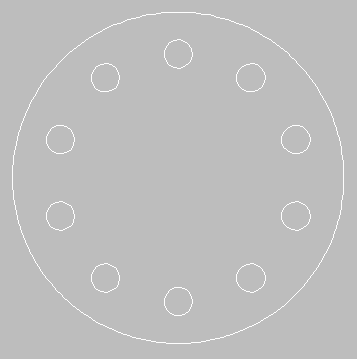
A polar array is constructed from a selected point with a fixing radius to determine placement, as in the following example:
To create a polar array:
- Create one item of the array as a base for the rest of the elements, using any of the drawing tools available. If the example above is being re-created, draw the circle at the top.
- From the menus, select Modify
Array
Polar, or click on the Polar Array icon
, or type ARRAYPOLAR at the command line.
- You are then prompted to Select Elements. Left-click on the element(s) to be arrayed. Right-click to complete the selection.

- You are then prompted to select a Base Point. This will be the location that the array will be offset from.
- The prompt changes to Center Point. This is the position that the array will rotate around. This can be entered using the mouse or X Y co-ordinates, relative to the previously created Base Point.
- Once the Center Point has been selected, the prompt changes to allow the user to enter the total number of items to be copied in the array, the angle to fill, and whether the copied item is to be rotated.
 .
.
- For the Total Number of Items prompt, enter the amount of items to be created in the array, including the one being used as the source for the array, in this case the small hole at the top.
- At the Angle to Fill prompt, enter an angle that the array will cover. By default this is 360 O. Lowering this angle results in the placement of the array members starting anticlockwise from the base member of the array. Enter an angle and press Enter.
- The Rotate copied items (Yes/No) prompt determines whether selected elements are rotated as they are created, so that the same part of each array member will make the same angle with the center. This is of no use for circles, but is used for other shapes, such as squares and rectangles. Type Y or N as needed.