Services Templates provide the main user interface for selecting products across Autodesk Fabrication applications. Services are linked to Service Templates and these individual templates can be used across several services.
Templates define the Products and Conditions associated with drawing a particular Service. A pre-requisite is that the required products are originally available from the Item Folders. The default installation includes default services for use which can be configured to your requirements.
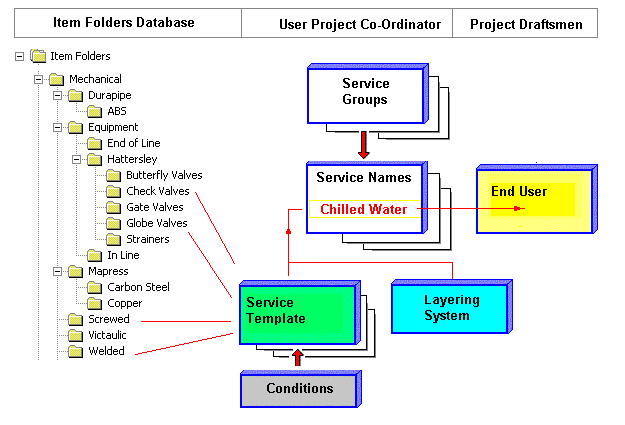
Creating or editing templates would normally be undertaken by the project co-ordinator / CAD manager with reference to the Project Specification Documents.
Definitions
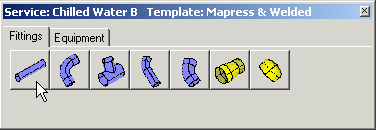
To the End user Service templates comprise of Item Buttons.
Creating a new service template
- Select the
 Edit Service Database button.
- Click the New Service Type icon.

-
The New Service dialog is displayed with the following message: - Create a Copy of Service Yes - No.
- Click No.
- The Edit Service Template dialog is displayed.
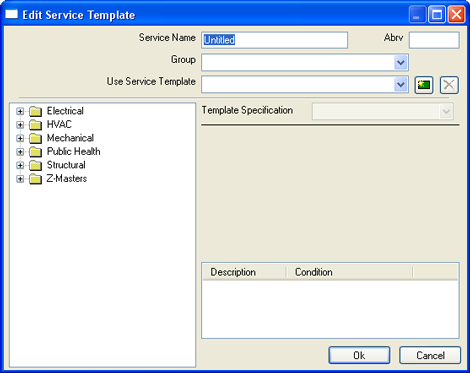
- Type in a new Service Name.
- Type an Abrv (Optional). The abbreviation can be used in conjunction with Sizes.
- Select a existing Group or type in a new group name.
- Select a pre-configured Service Template or Click the New Template icon.
A New Service Template dialog is displayed with the following message: - Copy Current Service Template "template name" Yes - No.
- Click No. A new template is created labelled "Untitled".
- Type the name of the Service Template - it is usually a good idea to keep the Template and Service names the same.
Creating Tabs
Prior to adding products to the template the user can group them by creating product group tabs within the template.
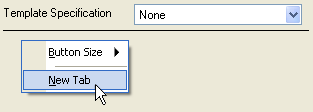
- Right Click in the blank grey area.
- Click New Tab.
- Type a description for the products to be added to the group. Click Ok.
- To rename a tab click the Rename Tab option. Type a new tab name. Click Ok.
- To delete a tab click the Delete Tab option. A dialog is displayed with the following message: - Delete the Group "tab name" and all it's buttons? Yes - No. This operation will remove all the buttons and the tab from current tab section of the template. Click Yes to delete the tab.
Changing the Button size
- Right Click on the grey tab area.
- Select the Button Size option.
- A fly-out appears with the following options: Small, Medium, Large or Auto-Size Buttons.
- Click the desired size or select Auto-size, Auto-size automatically changes the size of the buttons depending on the quantity of buttons on the template and the template size.
Creating Conditions
If the products are to have conditions assigned to them, these need to be set before adding products to the template. This will determine what size range is allowed with that specific product.
- Right Click in the bottom right hand window of the New Service Template dialog.
- Click New Condition.
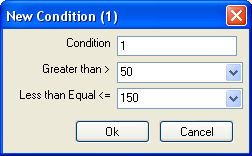
- Type a name for the new condition in the Condition window.
- Type a value or leave as Unrestricted in the Greater than > window.
- Type a value or leave as Unrestricted in the Less than Equal <= window.
- Click Ok.
- Repeat the above process to add more conditions.
Editing or Deleting Conditions
Once conditions have been created they can be edited or deleted.

Deleting
- Highlight the condition to be Edited or Deleted.
- Right Click in the condition window.
- Select Delete Condition (Condition Description - Range) and all dependant button entries? Select Yes or No.
Note: If Yes is selected both the condition and ALL dependant buttons will be deleted.
Editing
- Click the Edit Condition option.
- An Edit Condition dialog window is displayed as shown above. Make the required changes and click OK.
The new template can now be populated with products. These are located in the folder structure displayed in the left window.
Adding Products
- If the product is to be assigned a condition, prior to adding the product highlight the relevant pre-set condition .
- Browse to the required product by clicking the +, next to the relevant folder.
- Click the relevant group tab name to make it the current group.
- Click and drag the required product onto the grey area on the right.
- Release the mouse button to place the new product in the template. A button with an associated icon on it will be displayed in the grey area. This represents the product and the predetermined conditions, if any are set.
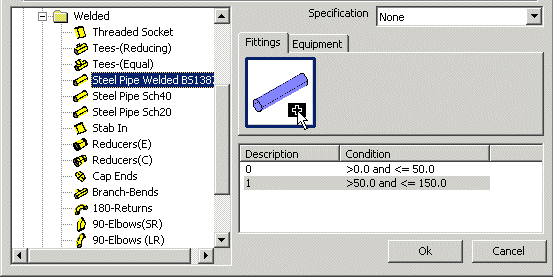
A single button can represent more than one product of a similar type. The products must have a different condition to each other. In the example shown above the initial product placed on the template is a Mapress - Carbon Steel pipe with a condition range set <=50.
To add another similar product to that button:
- Highlight the new condition to be assigned to the alternate product.
- Browse to the relevant folder for the new product.
- Click and drag the product from the folder over the top of the existing button, the A symbol is displayed.
- Release the mouse button.
In the example below the single button now represents Mapress - Carbon Steel pipe with a condition range set <=50 and Steel Pipe Welded BS1387 with a condition range >50 and <=150.
Button Option Properties and Settings
Buttons have options associated with them as displayed below. To display these options right click on a item button.
- Select Locate.
This displays the condition description, location of the product and the product name. The first part of the displayed line relates to the name of the condition associated with the product.

Changing the Caption
- Right Click on a item button.
- Select Set Caption 3.
- Type a new caption for the product if you wish to change the default caption. This will be displayed when the mouse is moved over the button.
Note: The AutoCAD AutoSnap tooltip must be selected in the Tools > Options > Drafting section for this to be displayed.
- Click Ok.
Changing the Icon
- Right Click on a button.
- Click Set Icon.
- Browse to the folder where the required bitmap is located.
- Select the bitmap to be displayed as the icon for the button.
- Click Open - The bitmap will be displayed as a new icon for the button.
Changing the Group
- Right click on a item button.
- Click Change Group 3.
- Type a new group name or select an existing group from the drop-down dialog window.
- Click OK. The button is moved to the new group retaining the product information and pre-determined conditions.
Deleting Conditions
This can only be done if a button has more than one condition / product associated with it.
- Click the condition to be deleted from the button in the bottom Set Condition window.
- Right click the button to have the condition removed.
- Select Delete Condition.
Deleting buttons
- Select the buttons required for deleting by either right clicking on a single button or using a selection crossing window around multiple buttons or holding the Ctrl Key and selecting multiple buttons.
- Right click on one of the selected buttons or selection of buttons.
- Select Delete Button. A dialog is displayed with the following message: Delete Button "Button Name"? Yes\No
- Click Yes to delete the buttons.
Displaying Button Properties
- Right click on a button.
- Click Button Properties to display the Button Properties dialog.
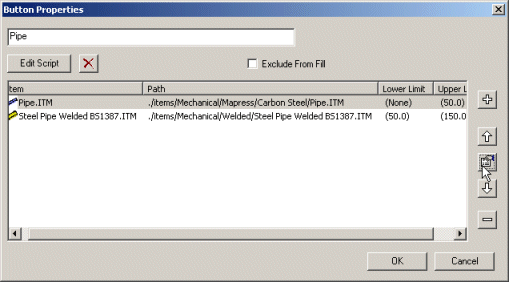
- The top window is the Button Caption window. Type a new name here to rename the tooltip caption.
- Select the Exclude from Fill option if the button products are not to be used in a fill routine.
- Use the
 and
and
 symbols to add or remove other products for the button.
- Use the
 and
and
 symbols to move the products in the list. This will determine which icon is used.
- The bottom window displays the item name, it's relative installation path and limits.
- Highlight an item and select the properties
 icon to display the Item Properties.
Applying Further Conditions
- Double click on the Item Name in the bottom section of the Button Properties window. This displays the Edit Item Condition dialog window.
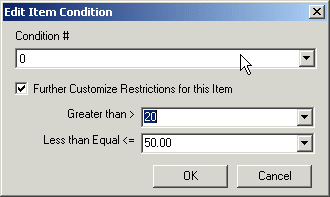
The top drop-down dialog displays the current product condition. The condition can be changed by clicking in the window and selecting an alternative one.
To add further restrictions to the product button.
- Click the Further Customize Restrictions for this Item box.
The option to add a restriction in the Greater than > window or the Less than Equal<= window is then enabled. The further restrictions must be within the limits of the current condition set for the product.
- Click OK.
Once the template has been populated with the required products Click the OK button.
Select the service from the Service drop-down dialog window, the new Service Template will be displayed with the new buttons and group tabs.