When creating fabrication content, after the basic item geometry is defined, and the specification, material, and gauge are specified, typically the next step is to configure the connectors. This is accomplished on the Other tab.
The steps below describe how to configure connectors that have already been created. If the connector you need does not exist in the content library, you may need to create that connector. See Creating Connectors.
To configure connectors on a new item:
- On the Takeoff dialog, click the Other tab.
The top portion of this tab lets you configure connectors. Optionally, the middle portion of this tab lets you configure seams (S1), and the bottom portion of this tab lets you configure dampers (D1), if needed.
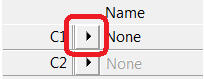
- Leave the C1 connector set as None.
- To configure the C2 connector, click the small arrow button
 next to the C2 connector to display the Connectors tab on the Database dialog.
- Expand the Generic Mechanical group, and select the GRC_M_FTP-150# connector.
- Do the same for the C3 connector.
- Click the Redraw button at the bottom of the Takeoff dialog to make the changes active. Notice that when you do this, the two connectors are added to the ends of the part. Verify that the two connectors are added correctly by visually inspecting them in the preview pane, using 3D viewing and other tools.
- Click OK to save and close the Takeoff dialog.
Now that the appropriate connector has been associated with the 90 degree pipework elbow item, this item is essentially functional, and can be used in the Autodesk Fabrication products. However, it is important to add a small, real-world (thumbnail) image to this item so that it can be easily identified in the Item Folders view, and in the Service pallet.
If there is no image associated with the item, the item displays as an X in the Item Folders view, and in the Service pallet. When an image is assigned, the image displays.
For information on how to add an image to the item, see Adding an Image to the Item.