This topic explains how Button Codes work with Design Lines, how to assign Button Codes, and the benefits of keeping Button Codes generic across multiple services.
Understanding Button Codes
A Design Line includes something called Node Keywords at each end of a segment. The Node Keywords define information such as item type and more. One of these Node Keywords is called a Button Code. A Design Line uses Button Codes to find and insert the correct fittings, such as valves and Tees, along a Design Line.
When the Fill in 3D command is selected, it starts at the source point of the Design Line and moves along the Design Line searching for Button Codes within each Node. Once it finds a Button Code on the Design Line, it then looks in the current Service palette for the first Button (part) that has a matching Button Code. If it finds a match, it will verify that the item associated with that button satisfies the design and geometry constraints.
If the button (part) does not meet the constraint requirements, the command continues searching for a matching Button Code.
If it does not find a matching Button Code or, if all matching Items fail to fit or meet the constraints, Fill in 3D will search the Button Mappings list in the Service database for Alternate Button Codes.
Alternate Button Codes point to another Button or use stacked (multiple) Button Codes to specify multiple items that will fit the situation. For example, an Alternate Button Code may define three or four typical fittings that, when combined, will create the desired complex fitting to solve a specific design requirement.
If the selected Button meets the constraints, Fill in 3D places that item or, in the case of stacked Alternative Button Codes, multiple items on the Design Line at the appropriate Node.
If the item or items cannot fit these constraints, Fill in 3D will skip to the next Node on the Design Line, leaving a gap in the line of 3D items. You will have to manually resolve these omissions, or edit the Button Mapping to make the fill work properly. In the Design Line interface, can use View
 Troubleshoot to help determine the cause of failed fill results.
Once all fittings are placed on the Design Line, Fill in 3D will place the pipes and ducts between these fittings.
Assigning Button Codes
Each button on the Service palette must have at least one Button Code assigned for it to be used in the Fill or Swap scenarios. To assign or access the Button Codes assigned to a button, right-click on the button in the Service palette, and click Button Properties. The Button Properties dialog displays.
On the Button Properties dialog, the Button Code drop-down menu offers presets for selection which are all common names used internally by the software. When a line is drawn, the Node Keyword will always be used and display one of these common codes in the line's annotation. For Fill or Swap, checks of the active service are performed for a code with the same name. If no buttons in the service are identified, Button Mappings are used to form combinations of buttons, for each of the Node Keywords.
Benefits of Generic Button Codes
The benefits of keeping Button Codes and Buttons Mapping the same, or rather, generic across multiple services where possible are as follows:
- Allows services to be swapped freely without any missing items.
- Allows the same scenarios to be performed for each Node Keyword.
- Swap out relies heavily on a like-for-like swap. Button Codes being generic allow for compatibility across multiple services.
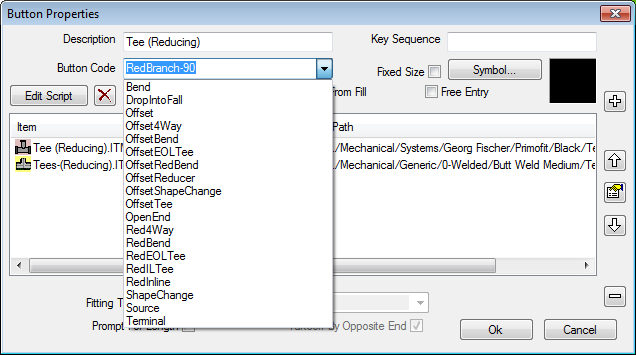
The example above shows a Reducing Tee using a unique Button Code RedBranch-90, as this is non standard, the Fill or Swap routine will not complete unless a Button Mapping is used for the Key node name.
The Reducing Tee is used in a run to reduce the run in size. (Seethe Design Line Button Mappings topic). The Key node used for this would be RedILTee. Unless a button is found in the active service that could accommodate the Reducing Tee scenario and is named RedILTee, the software moves to the next phase of checks within Button Mappings.
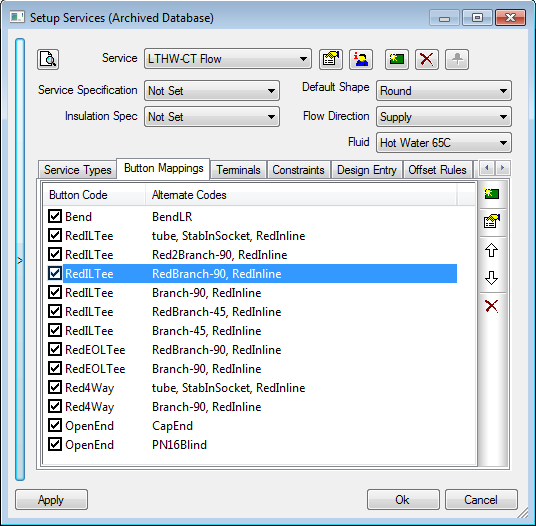
Within the active service, the Button Mappings tab is used to identify and capture the remaining scenarios if not already caught by the Service Buttons having Key node names.
Shown below, the RedILTee has been used multiple times to cover all instances of the configured service. The fill will flow from top to bottom when completing the checks in order to find the first possible solution. The RedBranch-90 solution is 3rd in the list, therefore the routine will go through the 1st and 2nd checks first before being able to fill with the RedBranch-90 button. In order for the RedBranch-90 to fill, the 1st and 2nd RedILTee would need to fail, perhaps due to no size in the product list on the buttons attached item.