The Oversize Check dialog lets you configure the Fabrication products to check parts in a job against default sheet sizes and sheets in stock and determine how the oversized part is fitted.
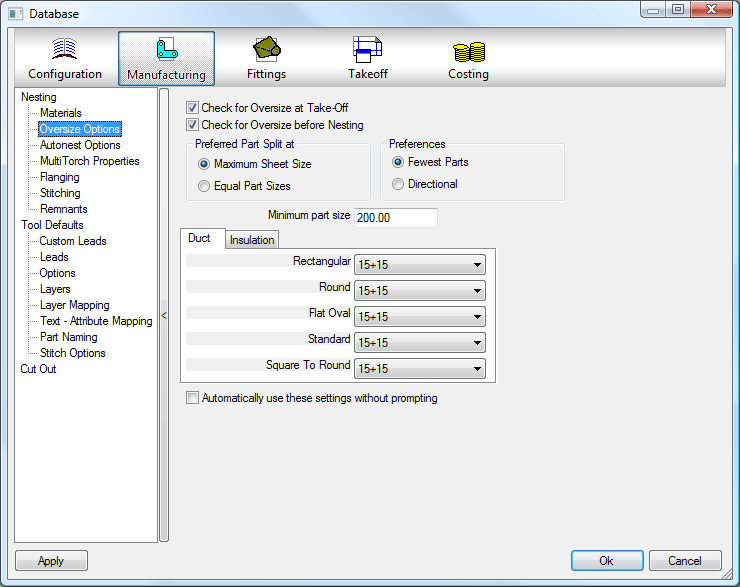
Check for Oversize at Take-Off / Check for Oversize before Nesting: With either of these options checked, the pattern at takeoff and / or prior to nesting is checked against the sheet sizes set up in Materials.
Preferred Part Split at: This option can be set to either Maximum Sheet Size or Equal Part Sizes.
Maximum Sheet Size: This option splits the pattern development so that the largest possible size can be placed onto the sheet.
Equal Part Sizes: This option splits the pattern development into two or more equally-sized developments.
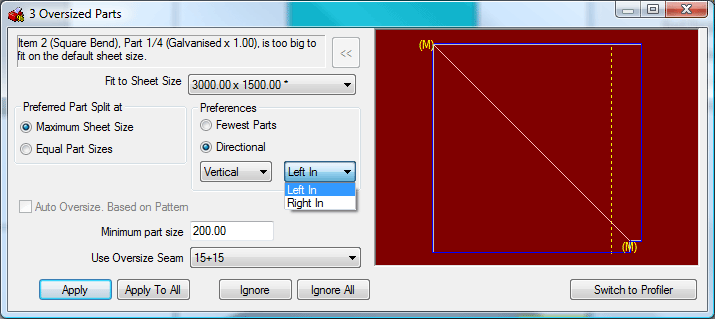
Directional: This option lets the user specify where the part will be split, whether its Vertical or Horizontal, Top, Bottom, Left, or Right.
Minimum Part Size: The value will set a minimum size for the development when the option Maximum Sheet Size is enabled. This value will then limit the size of the split that the program will create when automatically nesting.
Duct Tab
Rectangular: Clicking the down arrow at the end of the field will display all of the available seams from the Oversize Seams Database. Select a seam which will be used for all oversized rectangular patterns. When selecting a rectangular oversized pattern at takeoff the Oversized Item dialog is displayed, displaying the seam selected here as the default option for Use Oversize Seam.
Circular: Clicking the down arrow at the end of the field will display all of the available seams from the Oversize Seams Database. Select a seam which will be used for all oversized circular patterns. When selecting a circular oversized pattern at takeoff the Oversized Item dialog is displayed , displaying the seam selected here as the default option for Use Oversize Seam.
Flat Oval: Clicking the down arrow at the end of the field will display all of the available seams from the Oversize Seams Database. Select a seam which will be used for all oversized flat oval patterns. When selecting a flat oval oversized pattern at takeoff the Oversized Item dialog is displayed, displaying the seam selected here as the default option for Use Oversize Seam.
Standard: Clicking the down arrow at the end of the field will display all of the available seams from the Oversize Seams Database. Select a seam which will be used for all oversized standard parts. When selecting a standard oversized part at takeoff the Oversized Item dialog is displayed , displaying the seam selected here as the default option for Use Oversize Seam.
Square To Round: Clicking the down arrow at the end of the field will display all of the available seams from the Oversize Seams Database. Select a seam which will be used for all oversized square to round patterns. When selecting a square to round oversized pattern at takeoff the Oversized Item dialog is displayed , displaying the seam selected here as the default option for Use Oversize Seam.
Insulation Tab
Rectangular: Clicking the down arrow at the end of the field will display all of the available seams from the Oversize Seams Database. Select a seam which will be used for all oversized rectangular patterns. When selecting a rectangular oversized pattern at takeoff the Oversized Item dialog is displayed , displaying the seam selected here as the default option for Use Oversize Seam.
Circular: Clicking the down arrow at the end of the field will display all of the available seams from the Oversize Seams Database. Select a seam which will be used for all oversized circular patterns. When selecting a circular oversized pattern at takeoff the Oversized Item dialog is displayed , displaying the seam selected here as the default option for Use Oversize Seam.
Flat Oval: Clicking the down arrow at the end of the field will display all of the available seams from the Oversize Seams Database. Select a seam which will be used for all oversized flat oval patterns. When selecting a flat oval oversized pattern at takeoff the Oversized Item dialog is displayed, displaying the seam selected here as the default option for Use Oversize Seam.
Standard: Clicking the down arrow at the end of the field will display all of the available seams from the Oversize Seams Database. Select a seam which will be used for all oversized standard parts. When selecting a standard oversized part at takeoff the Oversized Item dialog is displayed, displaying the seam selected here as the default option for Use Oversize Seam.
Square To Round: Clicking the down arrow at the end of the field will display all of the available seams from the Oversize Seams Database. Select a seam which will be used for all oversized square to round patterns. When selecting a square to round oversized pattern at takeoff the Oversized Item dialog is displayed, displaying the seam selected here as the default option for Use Oversize Seam.
Automatically use these settings without prompting: This option allows the Oversized Item dialog to be bypassed and the part to be split to the default settings established here on every occasion. If the pattern's size is larger than the values set in the database and this option was not selected, then the following dialog is displayed at acceptance, warning that the pattern accepted is oversized.
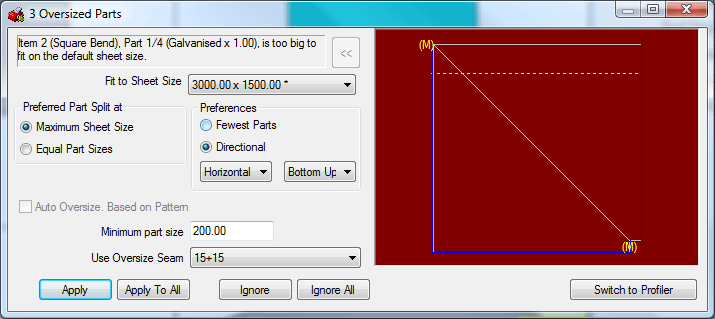
The options as defined earlier for Preferred Part Split and Minimum Part Size are displayed, but they can be altered for this particular part.
Use Oversize Seam: This will display the relevant seam as defined in the database editor, taking into account the library that the part is taken from.