Create a revision history table
Learn how to create a revision history table on a sheet in the Drawing workspace in Fusion.
Create a new revision history table
On the toolbar, select Tables > Revision History
 .
.The Table dialog displays.
In the Table dialog, make sure the Revision History is selected as the Type.
The empty revision history table displays at the cursor and it's size automatically matches the size of the title block.
Click to place the revision history table on the sheet.
The revision history table displays on the sheet. The revision attribute (also custom attribute called "REV") in the title block is now driven by the revision history table.
Double-click the blank description cell to add your description of the revision.
Edit a revision history table
Double-click the revision history table.
The Revision History dialog displays.
Adjust the Table Direction:
- Up: Places the header at the bottom and orders rows from bottom up.
- Down: Places the header at the top and orders rows from top down.
Adjust the display and order of columns in the revision history table:
- Check a column to include it.
- Uncheck a column to exclude it.
- Select a column, then click the Up arrow to move it up.
- Select a column, then click the Down arrow to move it down.
Add Generic Rows to gain more space for your description or other information you might need to add.
Adjust the display of rows in the revision history table:
- Select the Custom option to display/hide the desired rows:
- Check a row to include it.
- Uncheck a row to exclude it. The revision row is hidden from the revision table along with the revision marker.
- Delete selected revision row. The revision row is deleted from the revision table along with the revision marker.
- Select the Custom option to display/hide the desired rows:
Adjust the Text Settings:
- Font: Select a font from the drop-down list.
- Height: Specify the text height in the units of the current drawing.
- Typeface: Add bold, italic, or underline emphasis.
- Text Alignment: Select an alignment option to format text.
Add a revision row.
Click Close.
Change a revision scope
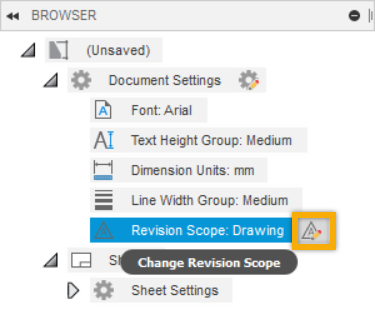
In the browser, expand the Document Settings node, if not already expanded.
Hover over the Revision Scope node, then click the icon Change Revision Scope next to it.
 .
.The Document Settings dialog displays and the Revision History section of the dialog is expanded.
Adjust the Revision Scope:
- Drawing (from sheet to drawing): All existing revision tables and revision markers are removed from all sheets. Add the same revision history table to each sheet of your drawing if needed.
- Sheet (from drawing to sheet): All existing revision markers and revision tables remain. Modify the revision history table on each sheet so that each sheet of your drawing has a different revision history table if needed.
Adjust Numbering:
- Custom
- A,B,C
- 1,2,3
Click OK.
Tips
- Define the revision history table in a drawing template. This will automatically populate revision tables in drawing sheets when you use templates for drawings creation.
- Place a table on the bottom half of the sheet to flip the column labels to the bottom of the table. The numbered rows are ordered from bottom to top.
- Press the
Shiftkey to lock or unlock the table flipping feature. - Click to select the table, then drag the grey round grips to resize rows and columns.
- Select the table, then click and drag the blue arrow grip to break the table into multiple table sections, or to consolidate multiple sections into a single table section.
- The text size in a revision history table matches the text height specified in Document Settings. When the text height is too large to fit in a revision history table on a sheet, the text height may scale to a smaller size.