Create and modify text (Drawing workspace)
Learn how to use the Text command in the Drawing workspace to create, edit, and format text on a sheet in a drawing in Fusion.
Create text
On the toolbar, select Text > Text
 .
.Click to place the opposite corners of the text box.
The text box displays on the sheet and the Text dialog displays.
In the Text dialog, adjust the text settings:
- Font: Select the font to apply to text.
- Height: Specify the text height.
- Bold: Add bold emphasis.
- Italic: Add italic emphasis.
- Underline: Add underline emphasis.
- Bulleted: Create a bulleted list.
- Numbered: Create a numbered list.
- Lettered: Create a lettered list.
- Justification: Select the paragraph justification to apply.
- Left
- Center
- Right
- Justify
- Distribute
- Symbols: Insert a symbol from the Symbols flyout.
Click inside the text box and type the text you want to display.
(Optional) Select a section of text after you enter it, then adjust the settings in the dialog to adjust the settings for only that text.
(Optional) Adjust the text box:
- Click and drag the horizontal, vertical, or corner grips to resize the text box.
- Click the ruler along the top of the text box to place indents.
Click outside the text box or click Close.
The formatted text displays on the current sheet.
Esc to cancel the Text command.Edit text
Double-click the text object.
The text box displays on the sheet and the Text dialog displays.
In the text box, edit the text:
- Click to position the cursor and start typing.
- Click and drag to highlight text, then adjust the settings in the dialog for the highlighted text.
- Click and drag the horizontal, vertical, or corner grips to resize the text box.
- Click the ruler along the top of the text box to place indents.
Click outside the text box or click Close.
The modified text displays on the current sheet.
Esc to cancel the Text command and discard your changes.Adjust indentation, tabs, and text box size
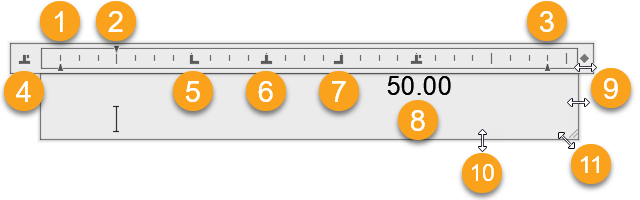
First Line Indent Marker: Drag to indent the first line of each paragraph from the left.
Hanging Indent Marker: Drag to indent all lines except the first line in each paragraph from the left.
Right Indent Marker: Drag to indent all lines from the right.
Tab Style Toggle: Click to cycle through the different tab styles.
Left Tab Stop: Click the ruler to place a tab stop that aligns text against the left edge of that position. Drag the tab stop along the ruler to adjust its position. Drag the tab stop off the ruler to remove it.
Center Tab Stop: Click the ruler to place a tab stop that centers text on that position.
Right Tab Stop: Click the ruler to place a tab stop that aligns text against the right edge of that position.
Decimal Tab Stop: Click the ruler to place a tab stop that aligns decimals in text with that position.
Horizontal Handles: Drag to resize the text box in the horizontal direction.
For multiple columns, drag the handle in the ruler over the last column to adjust spacing between columns.

Vertical Handle: Drag to resize the text box in the vertical direction.
Corner Handle: Drag to resize the text box in the horizontal and vertical direction.
Create bulleted, numbered, or lettered lists
You can create bulleted, lettered, or numbered lists in multiline text. When you add or delete an item, or move an item up or down a level, the order of the list automatically adjusts.
When you apply list formatting, you can specify bullets, numbers, or letters. Letters or numbers are followed by a period. Nested lists use a double bullet, letter, or number. Items are indented based on the tab stops on the ruler.
By default, list formatting is applied to all text that looks like a list. Text that meets the following criteria is considered a list:
- The line begins with one or more letters or numbers or a symbol.
- Letters or numbers are followed by punctuation.
- You press the
SpacebarorTabkey to add space after the punctuation. - You press
EnterorShift+Enterafter the space.
You can use the following characters as punctuation after the number or letter when you type a list, but you cannot use them as bullets:
| Character | Description |
|---|---|
. |
Period |
: |
Colon |
) |
Close parenthesis |
> |
Close angle bracket |
] |
Close square bracket |
} |
Close curly bracket |
Create Stacked Characters
Stacked text is the fraction and tolerance format applied to characters within multiline text objects and multileaders. You can format characters that represent fractions and tolerances so that they conform to several standards.
You use special characters to indicate how selected text should be stacked.
- Forward slash
/stacks text vertically, separated by a horizontal line. - Pound sign
#stacks text diagonally, separated by a diagonal line. - Caret
^creates a tolerance stack, which is stacked vertically and not separated by a line.
By default, when you enter numeric characters before and after a forward slash, pound sign, or caret, the numbers stack automatically. For tolerance stacking, the plus sign +, minus sign -, and decimal point . also stack automatically.