Annular ring (pad and via diameter)
Annular Ring settings determine the width of the ring around pads, vias, and micro vias. This ring is the copper left around a hole after drilling. You can set different widths for the inner and outer layers, and pads can differ between the Top and Bottom layers.
Usually, the value is a percentage of the hole diameter. You can also specify minimum and maximum values.
When you change a parameter and click Apply, you can immediately see the effects in the layout. To use different values or shapes for the upper and lower layers (see Shapes tab), set the colors for layers 17 (Pads) and 18 (Vias) to match the background color. This helps you see the true size and shape of the pad or via in its layer.
The Inspector, which has the same dialog as the context menu's Properties entry, informs you about the via diameter in outer and inner layers, and about the initial user-defined value. For example, in the following table:
| Predefined value (by CHANGE DIAMETER) | 0.7 |
| Actual calculated diameter in the outer layers | 0.9 |
| Actual calculated diameter in the inner layers | 0.8 |
Here the resulting via diameter is bigger than the predefined value, according to the given minimum value in the Design Rules Annular ring settings for vias.
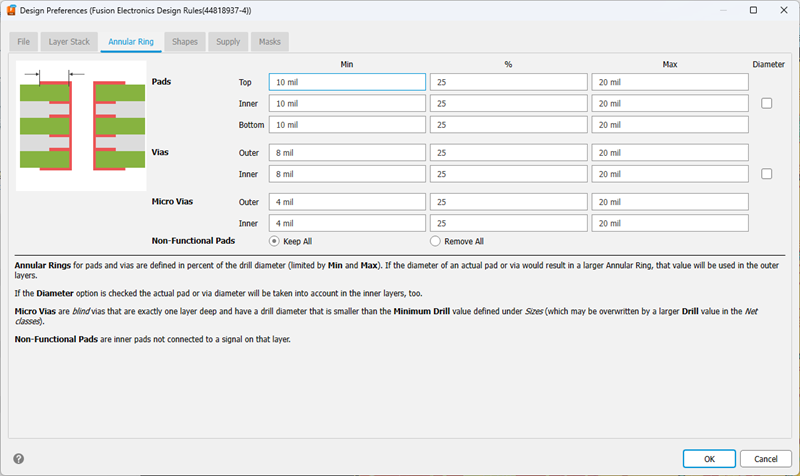
The following image shows the template for setting the width of the residual ring. The standard width for the ring around holes is 25% of the hole diameter. Since the width of the ring on small holes specified this way would soon fall below a technically feasible value, a minimum value (here: 10 mil for pads, 8 mil for vias, 4 mil for micro vias) is specified here. It is also possible to specify a maximum value.
Example:
The ring around a hole with 40-mil diameter is 10 mil (25%). It therefore lies in between the maximum and minimum values. If the hole is only 24 mil in diameter (for example, for a via), the calculation yields an annular ring value of only 6 mil. For a board made in standard technology this is fine, and cannot easily be made. It might well involve extra costs. In this case, a minimum value of 10 mil is given.
Annular ring settings are always active and can override library diameters if they are smaller than the calculated annular ring. To ensure your settings take effect, adjust them so the library-defined diameter is equal to or larger than the calculated value. For example, changing the minimum value from 10 to 5 may be sufficient. Your goal is to make sure the pad diameter in the library is equal to or larger than the calculated restring.

If you like to define an annular ring with a fixed width, use the same value for minimum and maximum. The value in percent has no effect in this case.
Diameter check box:
In case you defined a diameter for a pad in the library or for a via in the Layout Editor, and you want to have this given diameter considered for the inner layers, activate the Diameter option. This can be of interest if a predefined pad or via diameter exceeds the value calculated by the Design Rules. Otherwise the pad or via in the inner layers would be smaller than in the outer layers. If you want pads/vias to have the same diameter in all layers, set the option Diameter.
The option is set off, by default, for new created boards, but will be set on for boards that are updated from version 3.5 or prior because in these versions pads and vias had the same diameter in all layers. Thus the update process does not change the original layout.
All the values can also be given in Millimeters (for example 0.2 mm).
Nonfunctional pads are inner layer pads that do not connect to anything. In small, dense layouts, you can save routing space by removing them. By default, Fusion preserves all nonfunctional pads.