Activity: Add a library
In this activity, you are looking for OpAmp components:
- Search to find a component.
- Add a library that has the component, when component is not found.
- Select a component to view its details and attributes.
Steps
Open Schematic Design Workspace and create a project and schematic document.
- If necessary, click Show Data Panel
 .
. - Click New Project and enter the project Ecad Library Tutorial to create a project folder. If you do not want to create a project, create a folder for this tutorial.
- In Fusion, click File
 and select New Electronics Design, to open a blank electronics document.
 - Click Save
 and save the electronics design with the name Manage Libraries Electronics Design in the Ecad Library Tutorial project or folder you created.
 - Click Common > Create > New Schematic
 .
. - Click Save and save the schematic with the name Manage Libraries Schematic in the Ecad Library Tutorial project or folder you created.
- If necessary, click Show Data Panel
Check to see if a library containing OpAmp is available for use in the design.
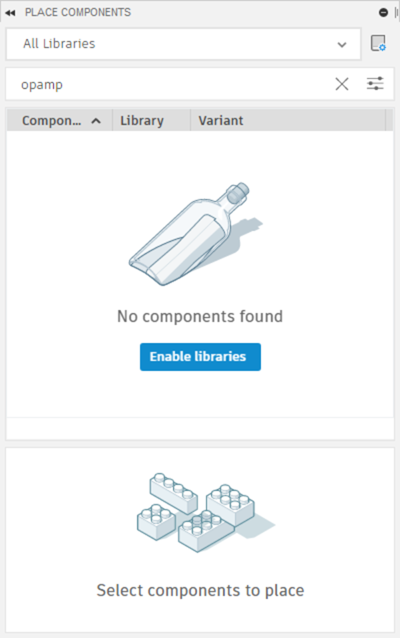
Click Design > Place > Place Component
 .
.In the Place Components panel cursor shows on Filter search box. Start entering opa and see that list updates as you enter the text.
If the library sought is not available, it does not show in the results.
To locate the library, open the Library Manager.
- In the Place Components panel, click Open Library Manager
 , or:
, or: - Click Library > Libraries > Open Library Manager .
- In the Place Components panel, click Open Library Manager
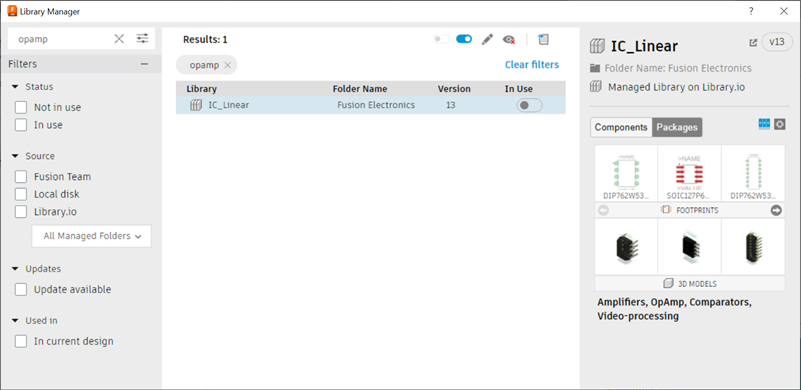
Search for a library that includes OpAmp components.
Enter opa in the Filter Results search box. As you enter text the search results update.
Verify the IC_Linear library containing OpAmp components is listed along with its details.
Import the library to use.
Right-click the IC_Linear Fusion Electronics library and click Edit New Linked Library.
In the Create Fusion library dialog, click Yes to access the library.
The library document opens. Click Save, then, enter IC_Linear_MYTEAM as the library name in the Save dialog and click Save. The new library is available in the Fusion web client.
Click the Manage Libraries Schematic document tab.
Click Open Library Manager and locate the IC_Linear_MYTEAM linked library in the Results list.
Click the toggle, at the right end of the library row, to enable it for use.
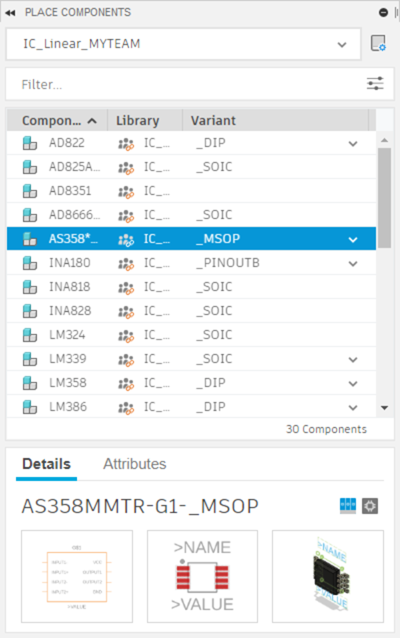
Close the Library Manager and in the Place Components panel library drop-down list, locate the IC_Linear_MYTEAM library.
Select a library component to display its Details and Attributes in the Place Components panel.
Each component can have a schematic representation, a footprint for the 2D PCB, and a 3D model for the 3D PCB.
Activity summary
In this activity, you:
- Searched for an OpAmp component and found it in the IC_Linear library.
- You added the library and enabled it for use in the design.
- You selected a component from the library to view its details and attributes.