Work with shared part number separation
If you're a hub admin, you can separate a shared part number group into individual models, each with its own unique part number.
Reasons to separate a shared part number group:
- Large groups may have been created accidentally during data transfer or hub migration.
- Someone mistakenly assigned the same part number to multiple unrelated models.
Once part number separation is started, it runs as a background process. A notification in the toolbar tracks progress and lets you know when it's finished. Secondary models in the group will each receive a unique part number. The primary model will keep the original part number. Part number separation can't be undone.
Access shared part number separation
- In the Fusion web client, click your profile in the upper right of the page.
- Click Admin.
- Click the Numbering tab.
- If necessary, scroll down to Shared Part Number Separation.
Separate a specific shared part number
Use the Search by number option under Shared Part Number Separation to find and separate one shared part number group.
In your hub, find and copy the shared part number you want to separate.
In the Fusion web client, under Admin > Numbering > Shared Part Number Separation, select Search by number.
In the search box, paste the shared part number you want to separate.
Search will only work for a complete part number. Partial numbers are not supported.
Click Search.
The results table shows the matching shared part number group, if it exists.
Optional: To see the member models in the group before you select it, click the expand arrow next to the part number.
Select the checkbox next to the part number group.
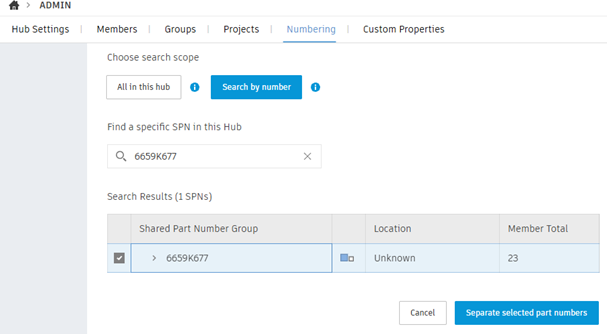
Click Separate selected part numbers.
In the Warning dialog, review the details and click OK.
Separate multiple shared part numbers
Use All in this hub to browse all shared part number groups so you can separate several at once.
In the Fusion web client, under Admin > Numbering > Shared Part Number Separation, make sure that All in this hub is selected (it is by default).
Click Search.
The results table lists all shared part number groups in the hub. If there are more than 50, only the first 50 will be listed. You can scroll down to add 50 more at a time.
In the results table, select the part number groups you want to separate.
Optional: To see the member models in a group before you select it, click the expand arrow next to the part number.
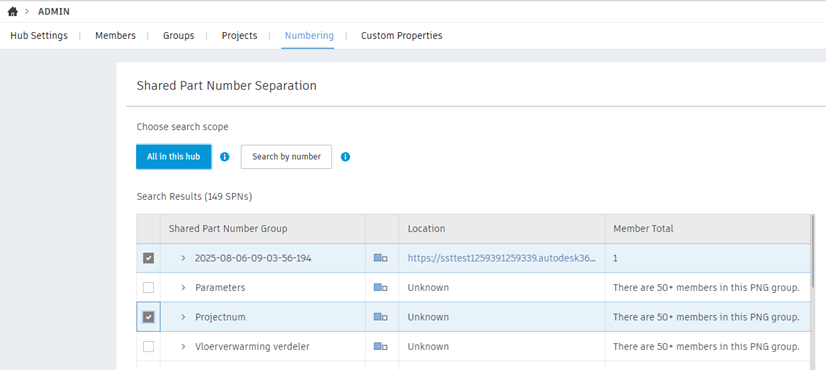
Click Separate selected part numbers.
In the Warning dialog, review the details and click OK.