Erase and fill regions on a mesh body
Use the Erase And Fill tool to fill holes and repair regions on a mesh body in Fusion.
Note: This tool is only available in Direct Edit in Parametric Modeling Mode or Direct Modeling Mode.
In the Design workspace, on the Mesh tab, select Modify > Direct Edit
 .
.In the canvas, select a mesh body.
In the dialog, click OK to enter the Direct Mesh Editing contextual environment.
On the Direct Mesh Editing tab, select Modify > Erase And Fill
 .
.The Erase And Fill dialog displays.
In the Mesh Selection Palette dialog, adjust the selection settings.
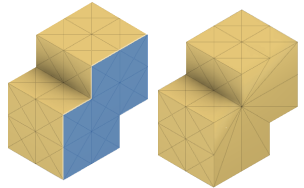
In the canvas, select the faces to erase and fill.
In the dialog, select a Type:
- Uniform: Fills the region with regular-shaped faces.
- Specify the Density to control the number of faces created.
- Minimal: Fills the region with the minimum number of faces, typically resulting in long, thin faces.
- Uniform: Fills the region with regular-shaped faces.
Click OK.
The modified mesh body displays in the canvas.
Tips
- Double-click any face along the boundary of a hole you want to fill, and all the faces along the boundary are automatically selected.
- Use the Uniform type to achieve the smoothest and most usable result.
- Use the Minimal type to reduce the number of faces on the mesh body, but note the long, thin triangular faces may be more difficult to work with downstream.