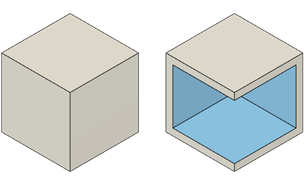
Shell a solid body
Learn how to use the Shell tool to create a thin-walled solid body by hollowing out its interior in Fusion.

Click Design > Solid > Modify > Shell
 .
.The Shell dialog displays.
Select a shell Type:
- Sharp Offset: Creates sharp offset corners.
- Rounded Offset: Creates rounded offset corners.
Select an object to shell:
- Faces: In the Canvas select faces to remove to create an opening and shell the body.
- Body: In the Browser, select a solid body to create a hollow body without removing faces.
In the dialog, select the Direction:
- Inside: Offsets the faces toward the inside of the solid.
- Outside: Offsets the faces toward the outside of the solid.
- Both: Offsets the faces toward the inside and the outside of the solid.
Use the manipulator handles in the canvas, or enter exact values to specify the wall thickness:
- Inside Thickness: Specifies the wall thickness inside the solid.
- Outside Thickness: Specifies the wall thickness outside the solid.
Click OK.
Tips
- Use Rounded Offset type to create a full or partial result that you can modify with surface tools.
- In the Extrude tool, you can use the Thin Extrude type to achieve a similar result.
- Hold
Ctrl(Windows) orCommand(MacOS) to modify the selection set once the chamfer tool preview displays on the body in the canvas. - Uncheck Tangent Chain to exclude tangentially connected edges when you select edges.